by Rain Chu 5 月 13, 2024 | AI , Chat , Linux , NodeJS , React , Ubuntu , ViteJS , 程式
AnythingLLM是一款全功能的應用程序,支持使用商業或開源的大語言模型(LLM)和向量數據庫建構私有ChatGPT。用戶可以在本地或遠端運行該系統,並利用已有文檔進行智能對話。此應用將文檔分類至稱為工作區的容器中,確保不同工作區間的資料隔離,保持清晰的上下文管理。
特點:多用戶支持、權限管理、內置智能代理(可執行網頁瀏覽、代碼運行等功能)、可嵌入到網站的聊天窗口、多種文檔格式支持、向量數據庫的簡易管理界面、聊天和查詢兩種對話模式、引用文檔內容的展示,以及完善的API支持客戶端定制整合。此外,該系統支持100%雲端部署,Docker部署,且在處理超大文檔時效率高,成本低。
VIDEO
注意,以下要用 linux 平台安裝,windows 用戶可以用 WSL,推薦用 Ubuntu OS
在自己的 home 目錄下,到 GitHub 中下載原始碼
git clone https://github.com/Mintplex-Labs/anything-llm.git 利用 yarn 作設定資源
cd anything-llm
yarn setup
把環境變數建立起來,後端主機是 NodeJS express
cp server/.env.example server/.env
nano server/.env
密文需要最少12位的字元,檔案的存放路徑也記得改成自己的
JWT_SECRET="my-random-string-for-seeding"
STORAGE_DIR="/your/absolute/path/to/server/storage"
前端的環境變數,先把/api打開即可
# VITE_API_BASE='http://localhost:3001/api' # Use this URL when developing locally
# VITE_API_BASE="https://$CODESPACE_NAME-3001.$GITHUB_CODESPACES_PORT_FORWARDING_DOMAIN/api" # for Github Codespaces
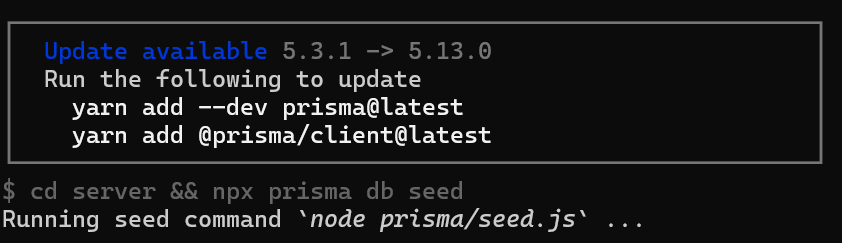
VITE_API_BASE='/api' # Use this URL deploying on non-localhost address OR in docker. 如果你在設定的時候,遇到更新請求,可以跟我著我下面的方法作
把 prisma 更新好
yarn add --dev prisma@latest
yarn add @prisma/client@latest
前端的程式碼
先編譯前端程式碼,前端是由 viteJS + React
cd frontend && yarn build 將編譯好的資料放到 server 的目錄下
cp -R frontend/dist/* server/public/ 選項,如果需要用到本地端的 LLM 模型,就把 llama-cpp 下載下來
cd server && npx --no node-llama-cpp download 把資料庫建立好
cd server && npx prisma generate --schema=./prisma/schema.prisma
cd server && npx prisma migrate deploy --schema=./prisma/schema.prisma
Server端是用來處理 api 以及進行向量資料庫的管理以及跟 LLM 交互
Collector 是一個 NodeJS express server,用來作UI處理和解析文檔
cd server && NODE_ENV=production node index.js &
cd collector && NODE_ENV=production node index.js &
更新的指令碼
現在 anything llm 更新速度超快,把這一段指令碼複製起來,方便未來作更新的動作
#!/bin/bash

cd $HOME/anything-llm &&\
git checkout . &&\
git pull origin master &&\
echo "HEAD pulled to commit $(git log -1 --pretty=format:"%h" | tail -n 1)"

echo "Freezing current ENVs"
curl -I "http://localhost:3001/api/env-dump" | head -n 1|cut -d$' ' -f2

echo "Rebuilding Frontend"
cd $HOME/anything-llm/frontend && yarn && yarn build && cd $HOME/anything-llm

echo "Copying to Sever Public"
rm -rf server/public
cp -r frontend/dist server/public

echo "Killing node processes"
pkill node

echo "Installing collector dependencies"
cd $HOME/anything-llm/collector && yarn

echo "Installing server dependencies & running migrations"
cd $HOME/anything-llm/server && yarn
cd $HOME/anything-llm/server && npx prisma migrate deploy --schema=./prisma/schema.prisma
cd $HOME/anything-llm/server && npx prisma generate

echo "Booting up services."
truncate -s 0 /logs/server.log # Or any other log file location.
truncate -s 0 /logs/collector.log

cd $HOME/anything-llm/server
(NODE_ENV=production node index.js) &> /logs/server.log &

cd $HOME/anything-llm/collector
(NODE_ENV=production node index.js) &> /logs/collector.log &
by Rain Chu 4 月 17, 2024 | Nginx , NodeJS , SERVER , 程式
如果你有用 Nginx 的快取服務,無論是 fastcgi or proxy cache,都會遇到很難有一套真正好用的清除工具,這邊示範一套自己開發的清除工具,也支援多伺服器使用
安裝必要的套件
你先需要有nodejs ,沒有的人先去官網安裝下,安裝完畢的人,先建立一個目錄,並且輸入以下指令,安裝必要的套件
npm init -y
npm install express
建立一個 Node.js App
可以命名為 app.js,內容如下,會建立一個小型的伺服器,用來處理 http 的請求,並且刪除指定的目錄
const express = require('express');
const { exec } = require('child_process');
const fs = require('fs');

const app = express();
const PORT = 3000;

const logFile = 'application.log';

function log(message) {
    const timestamp = new Date().toISOString();
    fs.appendFileSync(logFile, `${timestamp} - ${message}\n`);
}

app.get('/delete-dir', (req, res) => {
    let dir = req.query.dir;

    if (!dir || /[^a-zA-Z0-9_\-\/]/.test(dir)) {
        log('提供的路徑不合法!');
        return res.status(400).send('提供的路徑不合法!');
    }

    const command = `sudo find /run/proxy_cache/${dir} -mindepth 1 -type d -exec rm -rf {} +`;

    exec(command, (error, stdout, stderr) => {
        if (error) {
            log(`执行错误: ${error}`);
            return res.status(500).send('删除子目錄失敗!');
        }
        log('子目錄删除成功!');
        res.send('子目錄删除成功!');
    });
});

app.listen(PORT, () => {
    log(`服务器正在运行于 http://localhost:${PORT}`);
});
其中我把能刪除的資料定義在只有這個目錄下的才行 /run/proxy_cache/ ,避免權限過大問題
配置 sudo 權限
打開 sudoers 文件
加入指令,記得把 <username> 改成自己的名字,或是 www-data
<username> sudo find /run/proxy_cache/ -mindepth 1 -type d -exec rm -rf {} + 完成後的測試
可以利用 CURL 呼叫 API ,成功就會看到 “子目錄删除成功!” 的訊息
curl "http://localhost:3000/delete-dir?dir=cache_directory" 結論與注意事項
要記得別讓外部的人可以輕易地存取這項服務,防火牆要記得把port鎖好,執行權限要小心設定,這樣就可以搭配 Nginx Cache 使用,之後再來出對應的刪除功能。
開機時候自動執行
要讓 Node.js 應用在系統開機時由特定使用者(例如 www-data)啟動,需要配置一個 systemd 服務單元。在這個情況中,我們將創建一個服務單元文件來確保 Node.js 應用作為 www-data 使用者運行。
創建 systemd 服務文件
建立一個新的 systemd 服務文件。
sudo nano /etc/systemd/system/nodeapp.service 加入以下配置
[Unit]
Description=Node.js Web Application
After=network.target

[Service]
Type=simple
User=www-data
Group=www-data
WorkingDirectory=/path/to/your/app
ExecStart=/usr/bin/node /path/to/your/app/app.js
Restart=on-failure

[Install]
WantedBy=multi-user.target
參數意思如下
Description : 服務的描述。
After : 這個單元應該在網絡服務可用之後啟動。
User 和 Group : 指定運行此服務的使用者和組。
WorkingDirectory : 指定 Node.js 應用的工作目錄。
ExecStart : 指定啟動應用的命令。
Restart : 指定何時重新啟動服務,on-failure 表示只在程序異常退出時重啟。
啟用和啟動服務
重新加載 systemd 配置以讀取新的服務文件:
sudo systemctl daemon-reload 啟用剛創建的服務,使其在開機時自動啟動:
sudo systemctl enable nodeapp.service 啟動服務以檢查它是否運行正常:
sudo systemctl start nodeapp.service 檢查服務的狀態來確認一切正常:
sudo systemctl status nodeapp.service
by Rain Chu 3 月 6, 2024 | Javascript , NodeJS , web
Web Push 是一種標準的 Web 協議,允許網站向使用者發送推播通知。這項功能可用於各種目的,例如:
提醒使用者有新的內容或更新
提供即時通知,例如交易狀態或聊天訊息
提高使用者參與度
準備工作
前端訂閱推播服務的 js 檔案
前端訂閱推播服務的網頁,需要包含訂閱服務的 js
後端紀錄使用者訂閱資訊的服務
後端推播訊息的服務
後端註冊訊息伺服器的程式碼
建立前端網頁的訂閱表單
這個檔案將包含安裝、激活、攔截請求和推播事件的處理器。創建一個名為sw.js的檔案,並將其放在你網站的根目錄下
// 安裝Service Worker
self.addEventListener('install', function(event) {
    console.log('Service Worker 安裝成功');
});

// Service Worker 激活
self.addEventListener('activate', function(event) {
    console.log('Service Worker 激活成功');
});

// 監聽推播事件
self.addEventListener('push', function(event) {
    var title = '推播通知';
    var options = {
        body: '這是一條推播消息。',
        icon: 'icon.png',
        badge: 'badge.png'
    };

    event.waitUntil(self.registration.showNotification(title, options));
});
在你的網站上註冊一個Service Worker,這是實現Web推播的必要步驟。Service Worker將在背景執行,即使用戶沒有直接訪問你的網站也能接收通知。通常會把下面的 javascript 寫在首頁中,觸發訂閱的條件。
// 在主要的JavaScript檔案中
function urlBase64ToUint8Array(base64String) {
    const padding = '='.repeat((4 - base64String.length % 4) % 4);
    const base64 = (base64String + padding)
        .replace(/\-/g, '+')
        .replace(/_/g, '/');

    const rawData = window.atob(base64);
    const outputArray = new Uint8Array(rawData.length);

    for (let i = 0; i < rawData.length; ++i) {
        outputArray[i] = rawData.charCodeAt(i);
    }
    return outputArray;
}

if ('serviceWorker' in navigator) {
  navigator.serviceWorker.register('/sw.js').then(function(registration) {
    console.log('Service Worker 注册成功:', registration);
  }).catch(function(error) {
    console.log('Service Worker 注册失败:', error);
  });
}
navigator.serviceWorker.ready.then(function(registration) {
  if (!registration.pushManager) {
    alert('此瀏覽器不支持推播通知');
    return false;
  }
const applicationServerKey = 'your publice key';

// 訂閱推播
  registration.pushManager.subscribe({
    userVisibleOnly: true,
    applicationServerKey: urlBase64ToUint8Array(applicationServerKey)
  }).then(function(subscription) {
    console.log('推播訂閱成功:', subscription);

    // 發送訂閱資訊到後端
    fetch('https://your_webpush_server/subscribe', {
      method: 'post',
      headers: {
        'Content-type': 'application/json'
      },
      body: JSON.stringify({
        subscription: subscription
      }),
    });
  }).catch(function(error) {
    console.log('推播訂閱失败:', error);
  });
提供紀錄訂閱訊息的服務
這一段的作法很多,通常用你原本伺服器中的解決方案,例如 php,asp.net,nodejs,python,GO等,我這邊為了方便,用nodejs示範下
const express = require('express');
const cors = require('cors');
const bodyParser = require('body-parser');
const app = express();
app.use(cors());
app.use(bodyParser.json());
const subscriptions = {}; // 在實際應用中,應使用資料庫儲存訂閱資訊
const webPush = require('web-push');
// 設置你的VAPID鑰匙
webPush.setVapidDetails(
'mailto:[email protected] ',
'your publiec key',
'your private key'
};
app.post('/subscribe', (req, res) => {
const subscription = req.body;
const key = subscription.endpoint; // 使用endpoint作為唯一鑰匙
subscriptions[key] = subscription;
console.log('subscripted');
console.log(subscription);
// subscription是從前端發送到後端的訂閱對象
webPush.sendNotification(subscription.subscription, '消息內容')
.then(result => console.log('推播成功'))
.catch(err => console.log('推播失敗', err));
res.status(200).json({message: '訂閱成功'});
});
app.listen(8060, () => console.log('伺服器運行在8060端口')); 其中 sendNotification 平常應該是要放在 webpush service中的,這邊加入是用來測試使用
生成VAPID鑰匙 (自願應用伺服器身份驗證)
大部分現代瀏覽器(如Chrome、Firefox、Edge)都支持Web推播API,但是如果你不用市面上的解決方案如 OneSignal 而是要直接與這些瀏覽器的推播服務交互的話,需要使用VAPID(自願應用伺服器身份驗證)鑰匙進行身份驗證。
生成 VAPID Key 的方法如下
npx web-push generate-vapid-keys 記住保存生成的鑰匙。公鑰將在前端用於訂閱推播,私鑰將在後端用於發送推播。
npx(它通常隨npm自動安裝,作為npm 5.2.0及更高版本的一部分),那麼你可以通過下載最新版本的 nodejs
https://nodejs.org/
或是升級Node.js,或使用版本管理器如nvm(Node Version Manager)來管理不同版本的Node.js。
參考資料
https://developer.mozilla.org/en-US/docs/Web/API/Push_API


近期留言