Deprecated: explode(): Passing null to parameter #2 ($string) of type string is deprecated in C:\inetpub\raintips\wp-content\themes\Divi\core\functions.php on line 1613
Deprecated: explode(): Passing null to parameter #2 ($string) of type string is deprecated in C:\inetpub\raintips\wp-content\themes\Divi\core\functions.php on line 1613
Deprecated: explode(): Passing null to parameter #2 ($string) of type string is deprecated in C:\inetpub\raintips\wp-content\themes\Divi\core\functions.php on line 1613
Deprecated: explode(): Passing null to parameter #2 ($string) of type string is deprecated in C:\inetpub\raintips\wp-content\themes\Divi\core\functions.php on line 1613
Deprecated: explode(): Passing null to parameter #2 ($string) of type string is deprecated in C:\inetpub\raintips\wp-content\themes\Divi\core\functions.php on line 1613
Deprecated: explode(): Passing null to parameter #2 ($string) of type string is deprecated in C:\inetpub\raintips\wp-content\themes\Divi\core\functions.php on line 1613
Deprecated: explode(): Passing null to parameter #2 ($string) of type string is deprecated in C:\inetpub\raintips\wp-content\themes\Divi\core\functions.php on line 1613
Deprecated: explode(): Passing null to parameter #2 ($string) of type string is deprecated in C:\inetpub\raintips\wp-content\themes\Divi\core\functions.php on line 1613
Deprecated: explode(): Passing null to parameter #2 ($string) of type string is deprecated in C:\inetpub\raintips\wp-content\themes\Divi\core\functions.php on line 1613
Deprecated: explode(): Passing null to parameter #2 ($string) of type string is deprecated in C:\inetpub\raintips\wp-content\themes\Divi\core\functions.php on line 1613
Deprecated: explode(): Passing null to parameter #2 ($string) of type string is deprecated in C:\inetpub\raintips\wp-content\themes\Divi\core\functions.php on line 1613
Deprecated: explode(): Passing null to parameter #2 ($string) of type string is deprecated in C:\inetpub\raintips\wp-content\themes\Divi\core\functions.php on line 1613
Deprecated: explode(): Passing null to parameter #2 ($string) of type string is deprecated in C:\inetpub\raintips\wp-content\themes\Divi\core\functions.php on line 1613
Deprecated: explode(): Passing null to parameter #2 ($string) of type string is deprecated in C:\inetpub\raintips\wp-content\themes\Divi\core\functions.php on line 1613
Deprecated: explode(): Passing null to parameter #2 ($string) of type string is deprecated in C:\inetpub\raintips\wp-content\themes\Divi\core\functions.php on line 1613
Deprecated: explode(): Passing null to parameter #2 ($string) of type string is deprecated in C:\inetpub\raintips\wp-content\themes\Divi\core\functions.php on line 1613
Deprecated: explode(): Passing null to parameter #2 ($string) of type string is deprecated in C:\inetpub\raintips\wp-content\themes\Divi\core\functions.php on line 1613
Deprecated: explode(): Passing null to parameter #2 ($string) of type string is deprecated in C:\inetpub\raintips\wp-content\themes\Divi\core\functions.php on line 1613
Deprecated: explode(): Passing null to parameter #2 ($string) of type string is deprecated in C:\inetpub\raintips\wp-content\themes\Divi\core\functions.php on line 1613
Deprecated: explode(): Passing null to parameter #2 ($string) of type string is deprecated in C:\inetpub\raintips\wp-content\themes\Divi\core\functions.php on line 1613
Deprecated: explode(): Passing null to parameter #2 ($string) of type string is deprecated in C:\inetpub\raintips\wp-content\themes\Divi\core\functions.php on line 1613
Deprecated: explode(): Passing null to parameter #2 ($string) of type string is deprecated in C:\inetpub\raintips\wp-content\themes\Divi\core\functions.php on line 1613
Deprecated: explode(): Passing null to parameter #2 ($string) of type string is deprecated in C:\inetpub\raintips\wp-content\themes\Divi\core\functions.php on line 1613
Deprecated: explode(): Passing null to parameter #2 ($string) of type string is deprecated in C:\inetpub\raintips\wp-content\themes\Divi\core\functions.php on line 1613
Deprecated: explode(): Passing null to parameter #2 ($string) of type string is deprecated in C:\inetpub\raintips\wp-content\themes\Divi\core\functions.php on line 1613
Deprecated: explode(): Passing null to parameter #2 ($string) of type string is deprecated in C:\inetpub\raintips\wp-content\themes\Divi\core\functions.php on line 1613
Deprecated: explode(): Passing null to parameter #2 ($string) of type string is deprecated in C:\inetpub\raintips\wp-content\themes\Divi\core\functions.php on line 1613
Deprecated: explode(): Passing null to parameter #2 ($string) of type string is deprecated in C:\inetpub\raintips\wp-content\themes\Divi\core\functions.php on line 1613
Deprecated: explode(): Passing null to parameter #2 ($string) of type string is deprecated in C:\inetpub\raintips\wp-content\themes\Divi\core\functions.php on line 1613
Deprecated: explode(): Passing null to parameter #2 ($string) of type string is deprecated in C:\inetpub\raintips\wp-content\themes\Divi\core\functions.php on line 1613
Deprecated: explode(): Passing null to parameter #2 ($string) of type string is deprecated in C:\inetpub\raintips\wp-content\themes\Divi\core\functions.php on line 1613
Deprecated: explode(): Passing null to parameter #2 ($string) of type string is deprecated in C:\inetpub\raintips\wp-content\themes\Divi\core\functions.php on line 1613
Deprecated: explode(): Passing null to parameter #2 ($string) of type string is deprecated in C:\inetpub\raintips\wp-content\themes\Divi\core\functions.php on line 1613
Deprecated: explode(): Passing null to parameter #2 ($string) of type string is deprecated in C:\inetpub\raintips\wp-content\themes\Divi\core\functions.php on line 1613
Deprecated: explode(): Passing null to parameter #2 ($string) of type string is deprecated in C:\inetpub\raintips\wp-content\themes\Divi\core\functions.php on line 1613
Deprecated: explode(): Passing null to parameter #2 ($string) of type string is deprecated in C:\inetpub\raintips\wp-content\themes\Divi\core\functions.php on line 1613
Deprecated: explode(): Passing null to parameter #2 ($string) of type string is deprecated in C:\inetpub\raintips\wp-content\themes\Divi\core\functions.php on line 1613
Deprecated: explode(): Passing null to parameter #2 ($string) of type string is deprecated in C:\inetpub\raintips\wp-content\themes\Divi\core\functions.php on line 1613
Deprecated: explode(): Passing null to parameter #2 ($string) of type string is deprecated in C:\inetpub\raintips\wp-content\themes\Divi\core\functions.php on line 1613
Deprecated: explode(): Passing null to parameter #2 ($string) of type string is deprecated in C:\inetpub\raintips\wp-content\themes\Divi\core\functions.php on line 1613
Deprecated: explode(): Passing null to parameter #2 ($string) of type string is deprecated in C:\inetpub\raintips\wp-content\themes\Divi\core\functions.php on line 1613
Deprecated: explode(): Passing null to parameter #2 ($string) of type string is deprecated in C:\inetpub\raintips\wp-content\themes\Divi\core\functions.php on line 1613
Deprecated: explode(): Passing null to parameter #2 ($string) of type string is deprecated in C:\inetpub\raintips\wp-content\themes\Divi\core\functions.php on line 1613
Deprecated: explode(): Passing null to parameter #2 ($string) of type string is deprecated in C:\inetpub\raintips\wp-content\themes\Divi\core\functions.php on line 1613
Deprecated: explode(): Passing null to parameter #2 ($string) of type string is deprecated in C:\inetpub\raintips\wp-content\themes\Divi\core\functions.php on line 1613
Deprecated: explode(): Passing null to parameter #2 ($string) of type string is deprecated in C:\inetpub\raintips\wp-content\themes\Divi\core\functions.php on line 1613
Deprecated: explode(): Passing null to parameter #2 ($string) of type string is deprecated in C:\inetpub\raintips\wp-content\themes\Divi\core\functions.php on line 1613
Deprecated: explode(): Passing null to parameter #2 ($string) of type string is deprecated in C:\inetpub\raintips\wp-content\themes\Divi\core\functions.php on line 1613
Deprecated: explode(): Passing null to parameter #2 ($string) of type string is deprecated in C:\inetpub\raintips\wp-content\themes\Divi\core\functions.php on line 1613
Deprecated: explode(): Passing null to parameter #2 ($string) of type string is deprecated in C:\inetpub\raintips\wp-content\themes\Divi\core\functions.php on line 1613
Deprecated: explode(): Passing null to parameter #2 ($string) of type string is deprecated in C:\inetpub\raintips\wp-content\themes\Divi\core\functions.php on line 1613
Deprecated: explode(): Passing null to parameter #2 ($string) of type string is deprecated in C:\inetpub\raintips\wp-content\themes\Divi\core\functions.php on line 1613
Deprecated: explode(): Passing null to parameter #2 ($string) of type string is deprecated in C:\inetpub\raintips\wp-content\themes\Divi\core\functions.php on line 1613
Deprecated: explode(): Passing null to parameter #2 ($string) of type string is deprecated in C:\inetpub\raintips\wp-content\themes\Divi\core\functions.php on line 1613
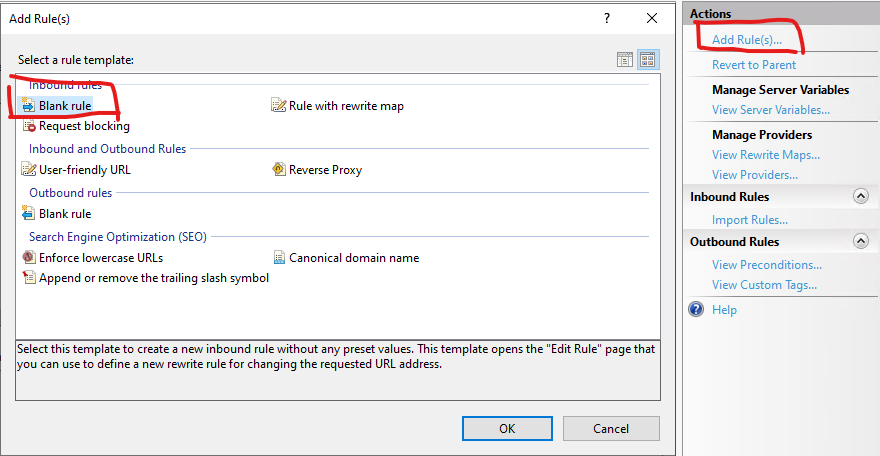
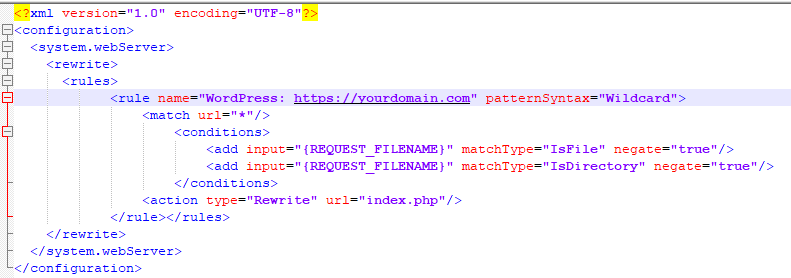
要用 ASP.NET MVC 開發 WEB API給大家使用,前端 javascript 工程師,總是會遇到錯誤訊息 Response to preflight request doesn’t pass access control check: It does not have HTTP ok status,這是一個超常見的 CORS (Cross-Origin Resource Sharing) – 跨來源資源共用錯誤訊息,網路上很多解法,但可以用的情境都不太一樣,我這邊提供一個我覺得最簡單請快速的方法給大家。
在 App_Start/WebApiConfig.cs 的 Register function 加入以下的程式碼
config.EnableCors();
會是長成以下的程式碼
        public static void Register(HttpConfiguration config)
        {
            // Web API 設定和服務
            config.EnableCors();

            // Web API 路由
            config.MapHttpAttributeRoutes();

            config.Routes.MapHttpRoute(
                name: "DefaultApi",
                routeTemplate: "{controller}/{id}",
                defaults: new { id = RouteParameter.Optional }
            );
        }
設定 WebAPI 的CORS 權限
我們可以在 WebApi 的 Class 上面設定,也可以在 Function 上做標記,但要注意的是不能有多個 CORS 繫結,如果你在 web.config 中設定,這邊就不能再做設定,如果你在 class 等級上設定了, function 等級就不能再設定,也是因為這個原因,所以我喜歡在 function 等級設定或是 class 等級上設定,web.config 比較少去做設定,雖然他有不用修改程式碼的好處。


近期留言