by rainchu 11 月 19, 2024 | 圖型處理 , 繪圖
img.ly 是一個專為設計、影像編輯和整合工具需求而打造的平台,有支援RD的各種SDK和API,能幫助用戶輕鬆創建高品質的影像內容,並支援各種應用場景的開發需求
什麼是 img.ly? img.ly 是一家專注於設計與影像編輯解決方案的科技公司,他們提供 API 和 SDK 服務,協助 RD 們將影像編輯功能直接整合到自己的應用程式或網站中。無論是建立圖片編輯器、社群媒體應用、行動遊戲,甚至是專業設計軟體。
其主要產品包括:
PhotoEditor SDK :功能強大的照片編輯工具,支援剪裁、濾鏡、文字覆蓋、筆刷、調整顏色等多種影像處理功能。VideoEditor SDK :讓開發者為用戶提供簡單易用的影片編輯功能,包括剪輯、特效、濾鏡、文字添加等。Design Editor :一個強大的設計平台,類似 Canva,幫助用戶快速製作出海報、名片、社群圖片等設計。
img.ly 的特色功能
高度可客製化
開發者可以根據需求調整編輯工具的外觀和功能,例如自訂顏色主題、添加專屬素材庫,甚至修改界面布局,讓用戶體驗更符合品牌形象。
跨平台支援
img.ly 的 SDK 支援多種開發環境,包括 Web、iOS 和 Android,並與主流框架如 React、Angular、Vue.js 相容,實現無縫整合。
AI 智能編輯
img.ly 結合了人工智慧技術,能夠自動識別影像內容並提供智能建議,例如背景移除、自動調整濾鏡效果等,節省用戶的操作時間。
專業級性能
SDK 以高效的設計為基礎,能快速處理大型影像文件且不損失品質,適合需要精細控制的專業級設計需求。
商業授權與支援
img.ly 提供靈活的商業授權模式,適合各種規模的企業。客戶還可獲得專業的技術支援,確保產品整合順利進行。
適用的應用場景 img.ly 的工具應用 於:
列印功能: 支援進階的列印功能選項,像我最近的專案就需要控制進階列印選項,像是控制列印邊界,調整大小等社交媒體平台 :用戶可以在應用內編輯照片和影片,創造吸引人的內容。電商平台 :提供商品圖片快速修飾或廣告素材製作工具。教育領域 :幫助學生進行多媒體創作,激發創造力。遊戲開發 :嵌入角色設計或遊戲場景編輯功能。
相關資訊
by rainchu 8 月 26, 2024 | AI , Chat
一個可以支援本地模型(ollama) ,支援使用者拖拉圖片到對話框、文生圖、STT、TTS、插件設計(Plugin)、自建GPTs、資料庫的強大的 Web Chat UI
支持各種方法安裝
https://lobehub.com/zh-TW/docs/self-hosting/start
本地開發
git clone https://github.com/lobehub/lobe-chat.git
cd lobe-chat
pnpm install
pnpm run dev
Docker 安裝
docker run -d -p 3210:3210 \
  -e OPENAI_API_KEY=sk-xxxx \
  -e ACCESS_CODE=lobe66 \
  --name lobe-chat \
  lobehub/lobe-chat
參考資料
GitHUB
by Rain Chu 2 月 22, 2024 | AI , 影片製作 , 音樂
Kaiber.ai 是一款專注於二次元動漫和卡通風格的 AI 驅動視頻創作工具,這個平台的主要特色在於它能夠讓用戶輕鬆地創造出充滿二次元風格的影片,透過先進的 AI 技術,Kaiber.ai 為動漫愛好者和創作者提供了一個簡單且直觀的方式來生成具有獨特視覺風格的視頻內容。這款工具特別適合那些對動漫和卡通有特殊情感的用戶,希望在他們的視頻製作中加入這種獨特風格。更多有關 Kaiber.ai 的詳細信息,可以訪問它的官方網站 了解。
主要功能
音樂創作 Audioreactivity
動畫製作 Animation
圖片畫風轉換 Transform
分鏡製作 Storyboard
支援平台
App Store、 Google Play、 WEB
延伸閱讀
by Rain Chu 12 月 7, 2023 | GCP , Linux , MIS , Ubuntu
建立一個會自動開機和關閉虛擬機器的排程
值得注意的事項:
主機時間都是 UTC 時間,設定的時候,要記得處理這邊,例如台灣時區是+8,所以設定時間的時候要-8
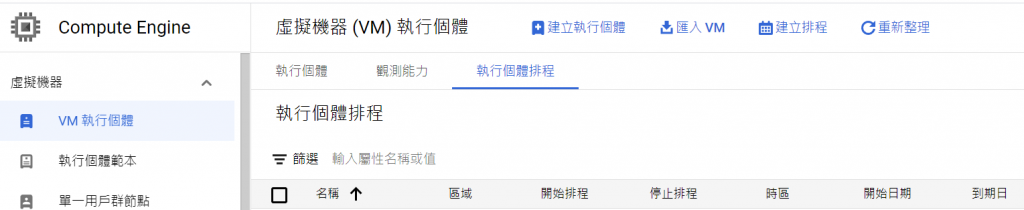
1.首先設定一個 Compute Engine 的 「執行個體排程」如圖所示
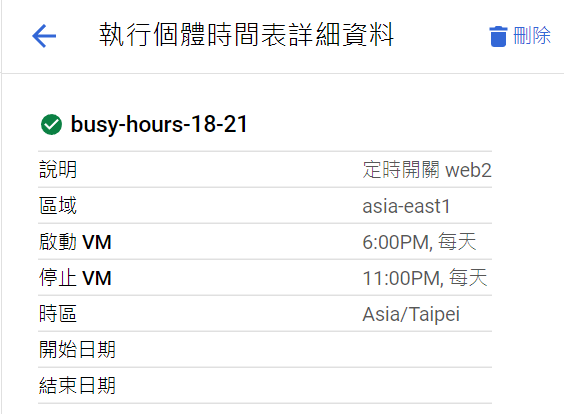
2.建立一個新的執行個體排程
設定在每天18:00到23:00最忙碌的時候多開一台主機
3.將要執行的 VM 個體加入到此排程中
記得建立好排程後,要把適用這個規則的 VM 個體都加入,GCP 的排程才會去處理 VM 的開關
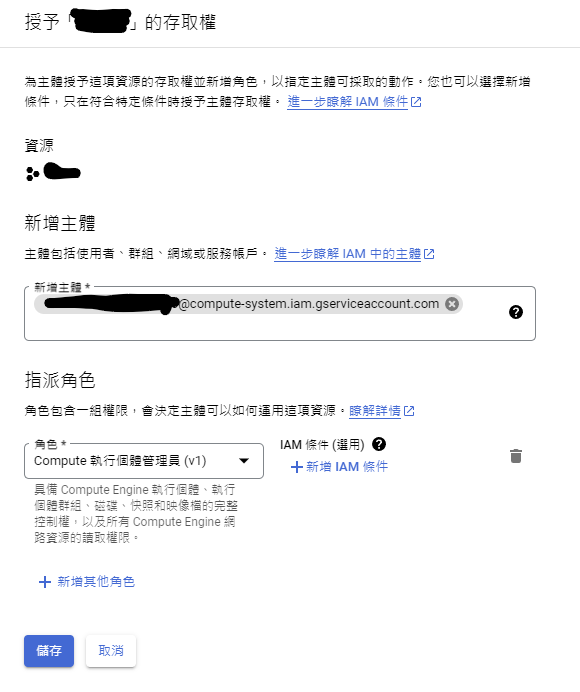
4.執行排程的權限設定
如果你之前沒做過權限設定,那肯定會遇到權限不足的錯誤訊息,這時候要來到 IAM 與管理 -> 身分與存取權管理,並且先勾選「包含 Google 提供的角色授權」,然後選擇「授予存取權」
然後主體要選擇你自己的 compute-system.iam 指派角色則是選擇 Compute 執行個體管理員(v1),如圖所示
建立 Ubuntu or Debian 的 Shell Script 定時執行開關機
1.建立自動開關設定的 Script
#!/bin/bash

SOURCE_CONF="/path/to/a.conf"
TARGET_CONF="/path/to/nginx/nginx.conf"

# 使用 sudo 執行需要 root 權限的命令
sudo cp "$SOURCE_CONF" "$TARGET_CONF"
sudo nginx -s reload
2.可以使用 crontab 命令來檢查和管理定時任務(cron jobs)
加入執行時間、程式碼等設定
# 分 鐘 小時 日期 月份 星期 命令
0 23 * * * /path/to/update_nginx_conf.sh
這樣就可以利用 root 權限運行 Script
其中:
分鐘 :分鐘(0-59)小時 :小時(0-23,採24小時制)日期 :一個月中的某天(1-31)月份 :月份(1-12)星期 :星期幾(0-7,其中0和7都代表星期日)命令 :要執行的命令或腳本的絕對路徑
例如,如果您希望每天凌晨 3 點執行一個名為 script.sh 的腳本,您應該這樣寫:
檢查
檢查 crontab 列表 :輸入 crontab -l 來確認您的任務已被添加到 crontab 列表中。
其他方法
at 指令
例如要讓指令碼在明天的 10:00執行,可以執行下面的指令
at 10:00 AM tomorrow /path/to/script.sh systemd (System and Service Manager)
創建一個 systemd 定時任務檔案。
在定時任務檔案中指定要執行的命令或腳本以及執行時間。
啟用定時任務。
例如:每一分鐘都要執行一次 script.sh
[Unit]
Description=My Script

[Timer]
OnCalendar=*-*-* *:* *

[Service]
ExecStart=/path/to/script.sh
錯誤處理
如果有遇到無法執行權限的話,可以參考下面的文章解決權限問題
結語
這樣設定完成後,GCP自己就會在晚上11點關機、晚上6點開機,而我的腳本則是在晚上11:00 關閉 Nginx 的 upstream,在18:15開啟 upstream server
by Rain Chu 10 月 19, 2023 | Nginx , SERVER
Nginx 是一個高效能、高穩定性的 Web 伺服器。其中,Nginx 提供的 fastcgi_cache 可以有效地快取後端伺服器(如 PHP-FPM)的回應,以提高網站的回應速度。但在預設情況下,我們需要手動清理這些快取。此時,我們可以使用 NGINX Helper 插件來協助進行快取的清除。
前期準備
要有編譯器
NGINX Helper
1. 安裝 NGINX Helper
首先,你需要在你的網站上安裝 NGINX Helper。如果你使用的是 WordPress,可以直接從插件庫中安裝。
2. 設定 NGINX 快取路徑
為了讓 NGINX Helper 知道你的 Nginx 快取路徑,你需要在 Nginx 的設定檔中,指定 fastcgi_cache_path。例如:
fastcgi_cache_path /var/run/nginx-cache levels=1:2 keys_zone=MYCACHE:100m inactive=60m; 此設定將會在 /var/run/nginx-cache 建立快取資料。
3. 配置 NGINX Helper
在 WordPress 的設定中,找到 NGINX Helper 的設定頁面,並啟用以下選項:
Enable Cache Purge
Purge Entire Cache when a post or page is published
並設定你的 Nginx 快取路徑(如 /var/run/nginx-cache)。
4. 手動清除快取
若需要手動清除快取,可以直接在 NGINX Helper 的設定頁面點選 “Purge Entire Cache” 按鈕。
5. Nginx 設定更新
確保你的 Nginx 設定檔有啟用快取清除功能:
location ~ /purge(/.*) { fastcgi_cache_purge MYCACHE "$scheme$request_method$host$1"; } 6.重新加載 Nginx 以使新設定生效。Copy code
sudo systemctl reload nginx
安裝 Nginx 新版包含有ngx_cache_purge
1.備份配置 :
在進行任何更改之前,確保備份你當前的 Nginx 配置,以防止任何數據丟失。
sudo cp -r /etc/nginx /etc/nginx-backup 停止和卸載現有的 Nginx :首先,停止 Nginx 服務:
sudo systemctl stop nginx 然後,卸載 Ubuntu 的 Nginx 版本:
sudo apt-get purge nginx nginx-common nginx-full 下載 OpenSSL
wget -c https://www.openssl.org/source/openssl-3.0.11.tar.gz ; tar zxf openssl-3.0.11.tar.gz ; rm openssl-3.0.11.tar.gz 下載第三方模組
安裝 ngx_cache_purge
下載最新版本 https://github.com/nginx-modules/ngx_cache_purge/releases
wget https://github.com/nginx-modules/ngx_cache_purge/archive/refs/tags/2.5.3.tar.gz
tar -xvzf 2.5.3.tar.gz
ngx_brotli
git clone https://github.com/google/ngx_brotli.git
pushd ngx_brotli
git submodule update --init
popd
編譯 ngx_brotli
cd ~/ngx_brotli/deps/brotli/c
mkdir -p out
cmake ..
make
編譯和安裝 Nginx 1.2 :如果你還沒有下載和編譯 Nginx 1.2,首先下載源代碼,然後編譯和安裝它:
sudo apt-get update
sudo apt-get install libpcre3 libpcre3-dev

wget https://nginx.org/download/nginx-1.24.0.tar.gz

tar -xvzf nginx-1.24.0.tar.gz

cd nginx-1.24.0/

./configure --with-pcre=../pcre-8.45 \
--http-log-path=/var/log/nginx/access.log \
--error-log-path=/var/log/nginx/error.log \
--with-http_ssl_module \
--with-http_gzip_static_module \
--with-openssl=../openssl-3.0.11 \
--add-module=../ngx_brotli \
--add-module=../ngx_cache_purge-2.5.3

make

sudo make install
預設情況下,自行編譯的 Nginx 會被安裝到 /usr/local/nginx。
如果出現下面的錯誤
./configure: error: the HTTP rewrite module requires the PCRE library.
You can either disable the module by using --without-http_rewrite_module
option, or install the PCRE library into the system, or build the PCRE library
statically from the source with nginx by using --with-pcre=<path> option.
代表你apt-get install libpcre3 libpcre3-dev這邊出現問題
可以自行安裝 PCRE
wget https://ftp.exim.org/pub/pcre/pcre-8.45.tar.gz
tar -xvzf pcre-8.45.tar.gz

./configure --with-pcre=../pcre-8.45 \
--http-log-path=/var/log/nginx/access.log \
--error-log-path=/var/log/nginx/error.log \
--with-http_ssl_module \
--with-http_gzip_static_module \
--with-openssl=../openssl-3.0.11 \
--add-module=../ngx_brotli \
--add-module=../ngx_cache_purge-2.5.3
如果出現gzip錯誤
./configure: error: the HTTP gzip module requires the zlib library.
You can either disable the module by using --without-http_gzip_module
option, or install the zlib library into the system, or build the zlib library
statically from the source with nginx by using --with-zlib=<path> option.
那可以自行安中 zlib
sudo apt-get update
sudo apt-get install zlib1g zlib1g-dev
如果出現 cannot find -lbrotlienc or cannot find -lbrotlicommon ,那需要安裝 Brotli
sudo apt update
sudo apt install libbrotli-dev
驗證 Brotli 是否安裝成功
ldconfig -p | grep brotli 檢查安裝是否成功
sudo /usr/local/nginx/sbin/nginx -V 配置系統啟動腳本 :如果你希望 Nginx 在系統啟動時自動運行,你需要設置一個 systemd 服務文件或 init 腳本。由於你從源代碼編譯 Nginx,它不會自帶 systemd 服務文件,所以你可能需要自行創建。
恢復配置 :從你之前備份的配置恢復設置:
sudo cp -r /etc/nginx-backup/* /usr/local/nginx/conf/ 請注意,由於 Nginx 版本之間可能存在差異,所以你可能需要調整配置以使其與 Nginx 1.2 版本兼容。
啟動新的 Nginx :sudo /usr/local/nginx/sbin/nginx
要使 /usr/local/nginx/sbin/nginx 可在任何地方都能執行
使用符號鏈接 :你可以在 /usr/bin 或 /usr/sbin 中創建一個指向 /usr/local/nginx/sbin/nginx 的符號鏈接。這樣,由於 /usr/bin 和 /usr/sbin 通常都在 $PATH 環境變量中,你就可以從任何地方執行 nginx 命令。
sudo ln -s /usr/local/nginx/sbin/nginx /usr/sbin/nginx 修改 $PATH 變量 :作為另一種方法,你可以將 /usr/local/nginx/sbin 目錄添加到 $PATH 環境變量中。這可以在你的 shell 啟動腳本中完成,例如 ~/.bashrc 或 ~/.profile。打開 ~/.bashrc 文件:
在文件末尾添加以下行:
export PATH=$PATH:/usr/local/nginx/sbin 然後,重新加載 .bashrc 以應用更改:
管理 Nginx
你可以直接從GitHub下載nginx-startup-script-for-debian-ubuntu.sh 至你的『/etc/init.d』目錄,並將名稱更改為『nginx』。
sudo wget -O /etc/init.d/nginx https://raw.githubusercontent.com/KJieGitHub/Nginx/master/nginx-script/nginx-startup/nginx-startup-script-for-debian-ubuntu.sh
sudo chmod +x /etc/init.d/nginx
sudo systemctl daemon-reload
sudo systemctl start nginx
sudo update-rc.d -f nginx defaults
實用管理命令
sudo systemctl start nginx
sudo systemctl stop nginx
sudo systemctl restart nginx
sudo systemctl reload nginx
實用連結
Nginx 版本以及下載連結
https://nginx.org/en/download.html
Nginx 第三方模組
NGINX 3rd Party Modules
參考資料
https://www.kjnotes.com/devtools/83
https://github.com/FRiCKLE/ngx_cache_purge
完整版本的 Nginx Config
proxy_cache_path /var/run/proxy_cache/ levels=1:2 keys_zone=demo-proxy:10m max_size=1000m inactive=600m use_temp_path=off;
fastcgi_cache_use_stale error timeout invalid_header http_500;
fastcgi_ignore_headers Cache-Control Expires Set-Cookie;

server {
		listen 80;
        server_name yoursite;

        proxy_cache demo-proxy;
        proxy_cache_valid 200 1d;

        #設定上傳的檔案大小
        client_max_body_size 64M;

        set $skip_cache 0;
        add_header X-Cache $upstream_cache_status;

        if ($request_method = POST) {
            set $skip_cache 1;
        }

        if ($query_string != "") {
            set $skip_cache 1;
        }

        if ($request_uri ~* "/wp-admin/|/xmlrpc.php|wp-.*.php|^/feed/*|/tag/.*/feed/*|index.php|/.*sitemap.*\.(xml|xsl)") {
            set $skip_cache 1;
        }

        if ($http_cookie ~* "comment_author|wordpress_[a-f0-9]+wp-postpass|wordpress_no_cache|wordpress_logged_in") {
            set $skip_cache 1;
        }

        location / {
                proxy_cache_bypass $skip_cache;
                proxy_no_cache $skip_cache;

                proxy_hide_header X-Frame-Options;
                proxy_pass http://X.X.X.X:X;
                proxy_set_header Host $host;
                proxy_set_header X-Real-IP $remote_addr;
                proxy_set_header X-Forwarded-For $proxy_add_x_forwarded_for;
                proxy_set_header X-Forwarded-Proto $scheme;
                proxy_cache        demo-proxy;
                proxy_cache_key    $uri$is_args$args;

        }

    location ~ /purge(/.*) {
        allow 127.0.0.1;
        proxy_cache_purge  demo-proxy $1$is_args$args;
    }
}


近期留言