by Rain Chu | 2 月 11, 2026 | PHP, 程式
最近我的伺服器突然出現網站 502 錯誤,檢查後發現 php8.2-fpm 服務竟然被系統強制終止。透過一系列排查,最終確認是 Linux OOM Killer(Out Of Memory) 觸發導致。
這篇文章整理完整排查過程與解決方案,提供給遇到相同問題的人參考。
📌 問題現象
使用 systemctl status php8.2-fpm 發現:
Active: failed (Result: oom-kill)
進一步檢查 kernel log:
Out of memory: Killed process 7057 (php-fpm8.2)
anon-rss:283560kB
shmem-rss:119848kB
代表:
- 系統記憶體耗盡
- Linux 啟動 OOM Killer
- 強制殺掉 php-fpm worker
🔍 進一步分析
查看當時 PHP worker 記憶體使用情況:
ps -o pid,rss,etime,cmd -C php-fpm8.2 --sort=-rss | head -n 20
當時結果顯示:
RSS 約 250MB ~ 325MB/每個 worker
而之前狀態顯示:
Processes active: 80
idle: 0
🔥 問題核心
如果每個 worker 約 300MB:
但機器只有:
👉 記憶體一定會爆。
🧠 伺服器環境
這代表:
- 沒有 swap 作為緩衝
- 一旦瞬間記憶體尖峰,直接 OOM
🛠 解決方案
✅ 1️⃣ 建立 8GB Swap(防止再次 OOM)
sudo fallocate -l 8G /swapfile
sudo chmod 600 /swapfile
sudo mkswap /swapfile
sudo swapon /swapfile
echo '/swapfile none swap sw 0 0' | sudo tee -a /etc/fstab
確認:
結果:
建議調整 swappiness
echo 'vm.swappiness=10' | sudo tee /etc/sysctl.d/99-swappiness.conf
sudo sysctl -p /etc/sysctl.d/99-swappiness.conf
✅ 2️⃣ 調整 PHP-FPM 設定(關鍵)
編輯:
/etc/php/8.2/fpm/pool.d/www.conf
修改為:
pm = dynamic
pm.max_children = 25
pm.start_servers = 6
pm.min_spare_servers = 4
pm.max_spare_servers = 10
pm.max_requests = 500
為什麼設 25?
假設每個 worker 約 150MB:
在 15GB RAM 環境下非常安全。
✅ 3️⃣ 開啟 Slow Log(抓出慢請求)
在 www.conf 加入:
request_slowlog_timeout = 10s
slowlog = /var/log/php8.2-fpm/www-slow.log
request_terminate_timeout = 60s
建立目錄:
sudo mkdir -p /var/log/php8.2-fpm
sudo chown -R www-data:www-data /var/log/php8.2-fpm
sudo systemctl restart php8.2-fpm
查看慢請求:
sudo tail -f /var/log/php8.2-fpm/www-slow.log
📊 調整後效果
重啟後查看:
ps -o pid,rss,etime,cmd -C php-fpm8.2 --sort=-rss | head -n 20
結果:
RSS 約 100MB ~ 170MB
ELAPSED 僅 20 秒左右
✔ 不再出現 300MB 以上肥 worker
✔ 不再出現 active 80
✔ 系統穩定運作
🎯 問題總結
本次 OOM 原因:
pm.max_children 設定過高- 每個 worker 記憶體使用偏高
- 沒有 swap 緩衝
- 慢請求導致 worker 堆積
最終解法:
- 限制 max_children
- 建立 swap
- 開 slowlog 抓慢請求
- 設定 max_requests 避免 memory leak
🚀 建議最佳實務
| 設定 | 建議 |
|---|
| Swap | 一定要有(至少 4GB) |
| max_children | 用 RAM / worker RSS 計算 |
| max_requests | 300~1000 |
| slowlog | 必開 |
| request_terminate_timeout | 必設 |
📌 結論
OOM Killer 不是錯誤,它是保護機制。
真正的問題通常是:
- PHP-FPM 設定不合理
- 慢請求堆積
- 記憶體容量與負載不匹配
只要正確限制 worker 數量並建立 swap,伺服器穩定度會大幅提升。
如果你也遇到 php-fpm 被 OOM kill 的問題,希望這篇實戰紀錄能幫助你快速排查與解決。
相關資訊
by Rain Chu | 2 月 20, 2025 | PHP, 程式
什麼是 OpenTBS?
OpenTBS(Open Template-Based Substitution)是一個基於 PHP 的插件,允許開發者使用 OpenTBS 在 Office Open XML(如 .docx、.xlsx、.pptx)以及 OpenDocument 格式(如 .odt、.ods、.odp)的範本中動態插入數據。它基於 TBS(TinyButStrong)引擎,並提供了一種靈活且易於使用的方法來生成動態文件。
為何選擇 OpenTBS?
- 無需額外安裝 Office 軟體:OpenTBS 直接操作 Office 文件格式,無需安裝 Microsoft Office 或 LibreOffice。
- 輕量級:僅需一個 PHP 文件,即可輕鬆集成到現有項目。
- 模板驅動:允許使用標準的 Office 應用程式來設計範本,無需學習額外的標記語言。
- 支持多種格式:可處理
.docx、.xlsx、.pptx、.odt 等格式,適用於多種場景,如報表、合同、發票等。
安裝 OpenTBS
OpenTBS 是一個 PHP 插件,可通過下載或使用 Composer 來安裝。
下載 Zip 檔
- 前往 官方網站 下載
tbs_class.php 和 tbs_plugin_opentbs.php。
- 將這兩個文件放入你的 PHP 項目中。
GitHub
說明文件
DEMO 網站
基本使用方法
以下是使用 OpenTBS 生成 Word(.docx)文件的基本示例。
1. 建立 Word 範本
在 Word (.docx) 文件中,使用 [] 來標記動態數據,例如:
2. 編寫 PHP 代碼
require_once('tbs_class.php');
require_once('tbs_plugin_opentbs.php');

// 創建 TBS 實例
$TBS = new clsTinyButStrong;
$TBS->Plugin(TBS_INSTALL, OPENTBS_PLUGIN);

// 載入範本文件
template = 'template.docx';
$TBS->LoadTemplate($template, OPENTBS_ALREADY_UTF8);

// 設定變數
$data = array(
    'company_name' => 'ABC 公司',
    'date' => date('Y-m-d'),
    'client_name' => '王小明'
);
$TBS->MergeField('var', $data);

// 輸出生成的文件
$output_file = 'output.docx';
$TBS->Show(OPENTBS_DOWNLOAD, $output_file);
exit;
圖片的進階用法
在 Word 模板中設定圖片
打開 Word (.docx) ,選擇一張要被替換的圖片,
設定 TBS 標籤(放入圖片的「替代文字」區域):
選取圖片 → 右鍵 → 圖片格式在「替代文字」欄位輸入以下內容:
[img.user_logo;ope=changepic]
pic 是變數名稱,稍後在 PHP 代碼中會用到,這樣 OpenTBS 就知道這張圖片要被替換!
使用 OPENTBS_CHANGE_PICTURE 手動更換圖片
其他參數
要根據原始圖片的框架大小設計的話可以使用
其他 adjust 參數:
| 參數 | 說明 |
|---|
adjust=inside | 圖片自動調整以適應框架(推薦) |
adjust=samewidth | 圖片的寬度與模板圖片相同 |
adjust=sameheight | 圖片的高度與模板圖片相同 |
adjust=100% | 圖片維持原始大小 |
範例
[onshow.pic;ope=changepic;adjust=samewidth;default=current;tagpos=inside]
特殊關鍵字
onshow : 會直接使用php中的同名變數做替換
結論
OpenTBS 是一個強大且輕量的 PHP 插件,能夠讓開發者方便地生成 Word、Excel、PowerPoint 等格式的動態文件,特別適用於報表生成、合約填寫、數據輸出等應用場景,如果你的項目需要動態生成 Office 文檔,可以試試 OpenTBS,它將為你帶來極大的便利!
by Rain Chu | 3 月 20, 2024 | PHP
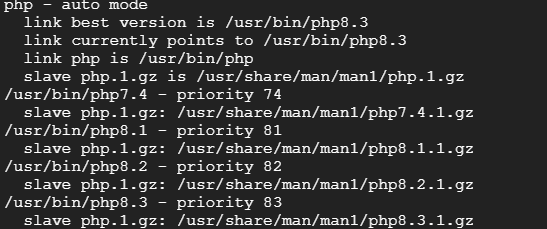
在 Linux 中更改命令行的預設 PHP 執行檔,通常涉及更新系統的 PATH 環境變數或使用 update-alternatives 工具(如果你的系統支援)。以下是幾種常見的方法來變更預設 PHP 執行檔:
方法 1:使用 update-alternatives(適用於 Debian、Ubuntu 及其衍生系統)
如果你的系統安裝了多個 PHP 版本,可以使用 update-alternatives 工具來設定預設的 PHP 版本。
列出所有可用的 PHP 替代版本:
sudo update-alternatives --display php
設定預設 PHP 版本:
使用下面的命令設定預設版本。將 phpX.Y 替換成你想設定為預設的 PHP 版本號,例如 php8.2。
sudo update-alternatives --set php /usr/bin/php8.2
如果你想要在可用選項之間手動選擇,可以使用:
sudo update-alternatives --config php
方法 2:直接修改 PATH 環境變數
你可以通過修改 PATH 環境變數來讓系統首先找到你想要的 PHP 版本。這可以通過在你的 ~/.bashrc、~/.zshrc 或其他適用的 shell 配置檔案中添加一行來實現。
假設你想使用的 PHP 版本位於 /usr/local/phpX.Y/bin(將 X.Y 替換成具體版本號),可以添加以下行:
export PATH=/usr/local/phpX.Y/bin:$PATH
然後,執行 source ~/.bashrc(或對應的配置檔案)來使變更生效。
方法 3:使用符號連結
另一個變更預設 PHP 執行檔的方法是建立一個指向你想要的 PHP 版本的符號連結(symlink)。這通常涉及到刪除或重命名舊的 PHP 符號連結,然後創建一個新的指向你選擇的版本。
刪除或重命名當前的符號連結:
sudo mv /usr/bin/php /usr/bin/php.old
建立新的符號連結:
將 /usr/bin/php 指向你想要的 PHP 版本。將 /path/to/your/php 替換成你想要設定為預設 PHP 執行檔的完整路徑。
sudo ln -s /path/to/your/php /usr/bin/php
在進行這些變更後,你可以通過執行 php -v 來驗證新的預設 PHP 版本是否已正確設定。
by Rain Chu | 2 月 21, 2024 | PHP, wordpress
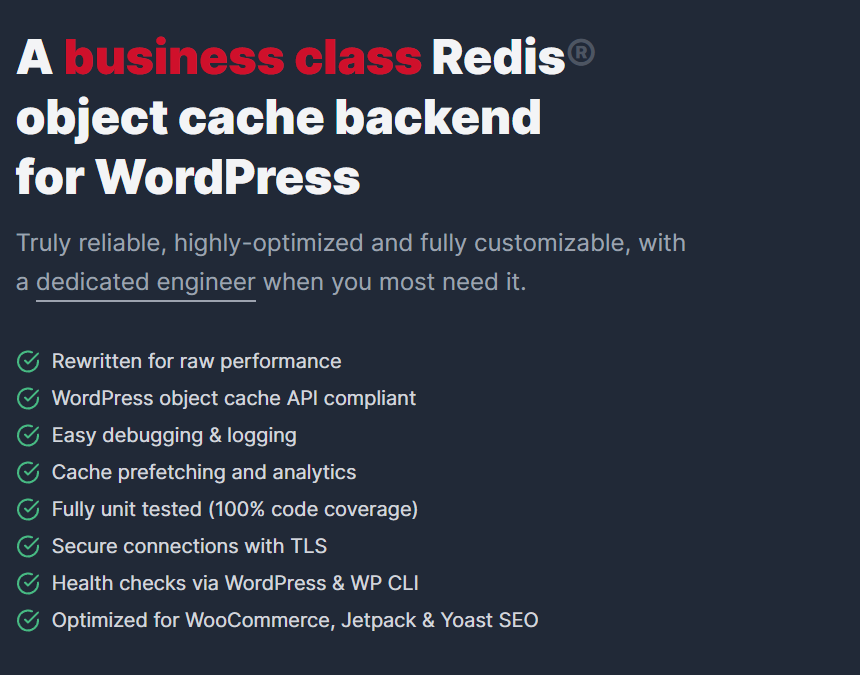
在處理大量數據和高流量的情況下,WordPress網站可能會面臨效能問題。這時,使用高效的緩存解決方案變得尤為重要。Object Cache Pro是一款專業級的物件緩存插件,它能夠顯著提升WordPress網站的性能和響應速度。本文將介紹如何在WordPress中安裝和配置Object Cache Pro。
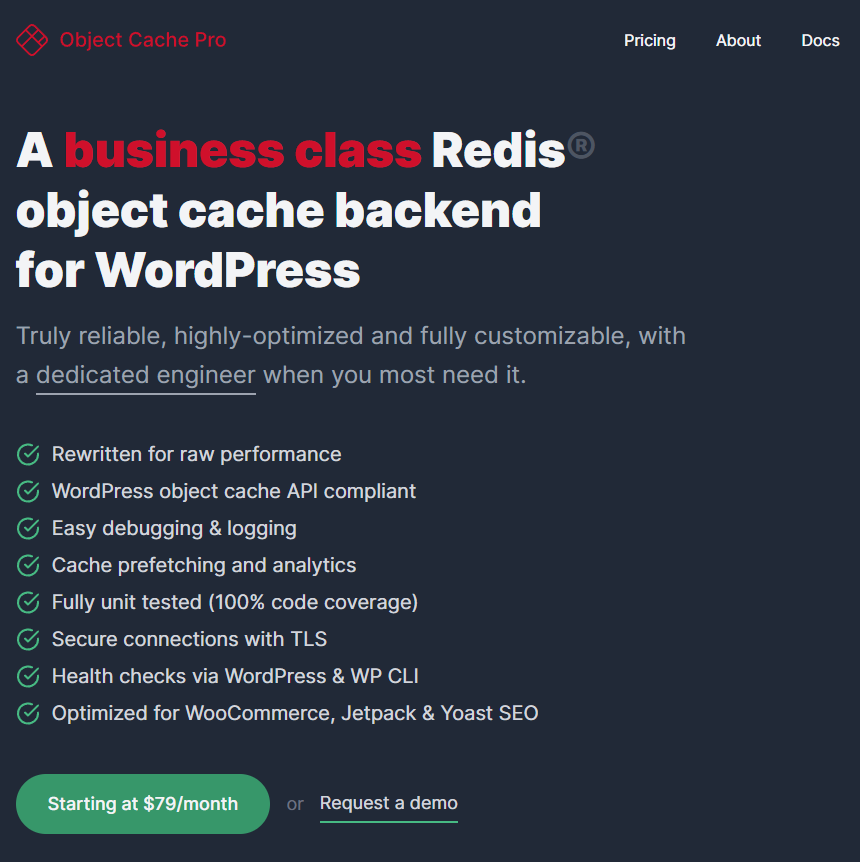
安裝Object Cache Pro
步驟1:獲取插件
先從Object Cache Pro官方網站購買插件。完成後會取得授權金鑰。
步驟2:上傳並安裝插件
- 登入您的WordPress後台。
- 點擊「插件」>「新增」。
- 選擇「上傳插件」,然後選擇您下載的Object Cache Pro插件文件。
- 上傳並安裝插件。
跟一般外掛不一樣的地方,這邊要自己手動在 /wp-content/wp-config.php 中,去配置參數,配置方法如下
define('WP_REDIS_CONFIG', [
    'token' => '<your-license-token>',
    'host' => '127.0.0.1',
    'port' => 6379,
    'database' => 0, // change for each site
    'maxttl' => 86400 * 7,
    'timeout' => 1.0,
    'read_timeout' => 1.0,
    'split_alloptions' => true,
    'debug' => false,
]);

define('WP_REDIS_DISABLED', false);
步驟4:清除舊資料
步驟4:啟用插件
安裝完成後,點擊「啟用插件」。
進階配置Object Cache Pro
超快速度的配置
Object Cache Pro 進階配置,將序列話變成二進制,並且啟用快速壓縮等功能,再加入多主機支援
define('WP_REDIS_CONFIG', [
    'token' => '...',
    'host' => '127.0.0.1',
    'port' => 6379,
    'database' => 0, // change for each site
    'timeout' => 0.5,
    'read_timeout' => 0.5,
    'retry_interval' => 10,
    'retries' => 3,
    'backoff' => 'smart',
    'compression' => 'zstd', // `zstd` compresses smaller, `lz4` compresses faster
    'serializer' => 'igbinary',
    'async_flush' => true,
    'split_alloptions' => true,
    'prefetch' => true,
    'strict' => true,
    'debug' => false,
    'save_commands' => false,
    'prefix' => 'mysitename',
]);

define('WP_REDIS_DISABLED', getenv('WP_REDIS_DISABLED') ?: false);
安裝 PHP 外掛支援超快速配置
想要享用超快速的 object cache pro 配置的話,有兩個前提要先做好
1.安裝igbinary serializer
簡易安裝
pecl install igbinary
pecl install --configureoptions='enable-redis-igbinary="yes"' redis
原始檔安裝
https://github.com/igbinary/igbinary#installing
2.安裝 lzf/lz4/zstd compression
簡易安裝
# Use prompts
pecl install redis

# Skip prompts
pecl install --configureoptions='enable-redis-lzf="yes" enable-redis-zstd="yes" enable-redis-lz4="yes"' redis
原始檔安裝
https://github.com/phpredis/phpredis/blob/develop/INSTALL.md
測試和優化
安裝並配置好Object Cache Pro後,您應該進行測試,以確保一切運作正常。您可以使用速度測試工具如GTmetrix來檢查網站效能的提升。
結論
使用Object Cache Pro可以顯著提升WordPress網站的效能。通過合理配置和優化,您可以為您的用戶提供更快、更流暢的瀏覽體驗。
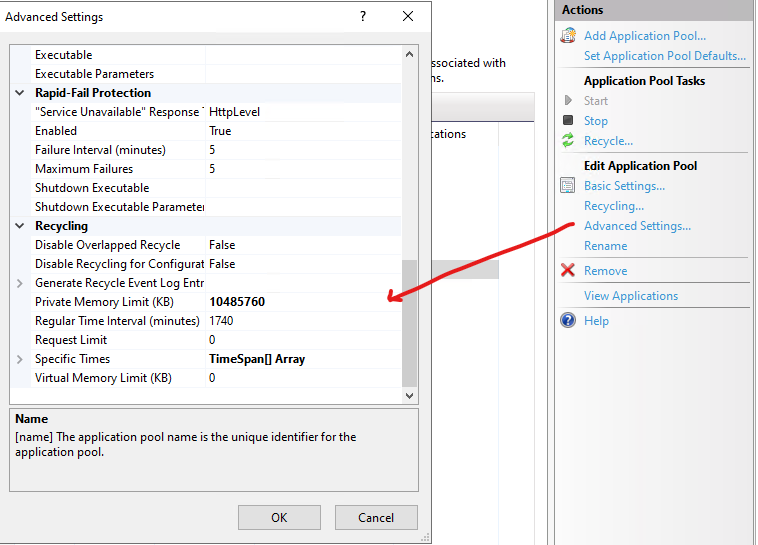
by Rain Chu | 9 月 6, 2023 | IIS, PHP
最近遇到 PHP 太吃記憶體的問題,我除了在php.ini 中設定 limit memory 以外,也打算在 IIS 中把總量的記憶體限制住,避免讓主機的記憶體爆滿,而當機,可以在記憶題超過限制後,把自己行程回收。
設定方法
在管理介面中,找到 「Advanced Settings」 ,進去後往下滑找到 「Private Memory Limit (KB)」 ,這邊這個數值是 KB 為主,如果希望將 Private Memory Limit (KB) 設定為 10GB,您需要將其設定為 10485760 KB 設定公式如下
10 GB = 10 * 1024 * 1024 KB = 10485760 KB
我設定的邏輯是觀察主機上所有的 Application Pool 會用到多少的記憶體,然後去分配她

by Rain Chu | 5 月 8, 2023 | PHP, 程式
WordPress 最好還是安裝在 Linux 下比較少問題,但非得要用到 Windows IIS 的時候,要注意現在 php 程式設計師很喜歡用 curl 在讀取資料,當你用 curl 讀取 SSL 加密(現在還有那個網站沒有)的時候,應該是會收到 PHP Curl SSL Certificate Problem: Unable to get local issuer certificate 錯誤訊息,解決方法如下
下載 pem 檔案
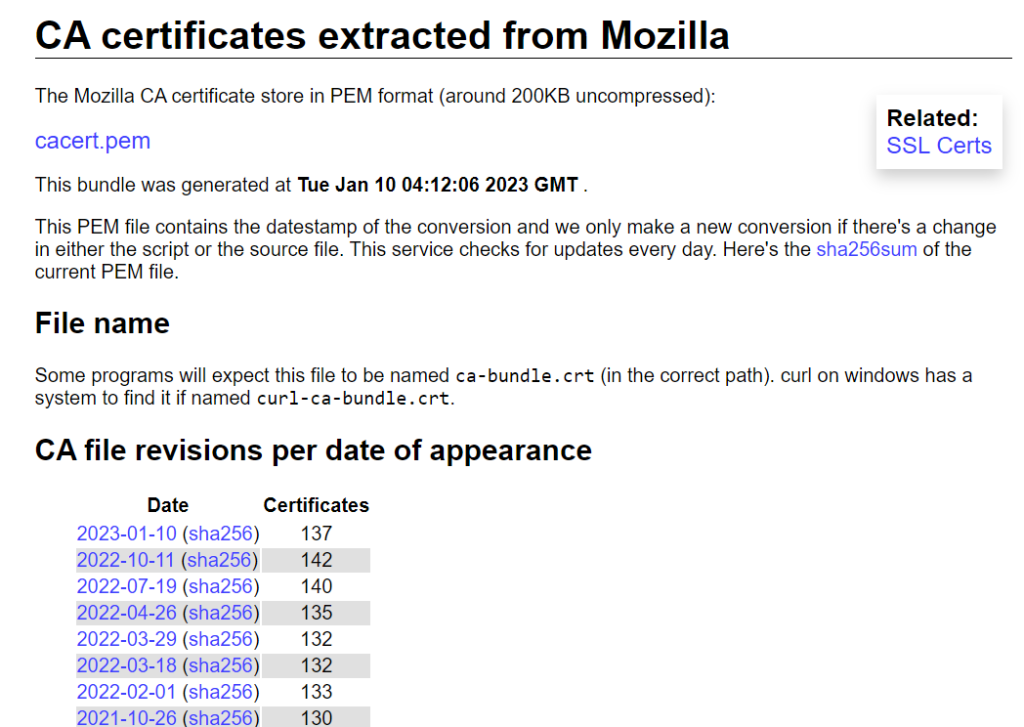
https://curl.se/docs/caextract.html
https://curl.se/ca/cacert.pem
將檔案放在 php 下的 SSL 目錄中
copy cacert.pem C:\php8\extras\ssl\

修改 php.ini
打開 php.ini 找到 curl.cainfo = ,加入你 cacert.pem 的路徑

重新啟動 IIS
1.回收 Application Pools
2.重啟網站
之後就可以使用了
近期留言