Select Page

WordPress 性能優化:使用 NGINX FastCGI Cache 提高頁面加載速度

在許多 WordPress 網站運營者的心中,提升網站載入速度始終是一項持續的任務。快速的載入速度不僅能改善用戶體驗,降低跳出率,還能在搜索引擎優化(SEO)上取得更好的成績。本文將引導您如何通過配置 NGINX 的 FastCGI Cache 來提升您的 WordPress 網站載入速度。

為什麼選擇 NGINX 的 FastCGI Cache?

NGINX 作為一款高效能的 Web 伺服器,其 FastCGI Cache 功能可以對動態內容(如 WordPress 生成的頁面)進行快取,從而減少對後端伺服器的請求,提高頁面載入速度。與其他快取方法相比,FastCGI Cache 直接在 Web 伺服器層面進行操作,能更精確地控制快取內容及其有效期。

步驟一:設定快取儲存路徑

建立快取存放的路徑,注意目錄擁有者是 www-data

sudo mkdir -p /etc/nginx/cache
sudo chown -R www-data:www-data /etc/nginx/cache

下面的設定是放在記憶體中的設定,如果你想要把快取放在記憶體內,要用下面這一個

sudo mkdir -p /var/run/cache/nginx
sudo chown -R www-data:www-data /var/run/cache/nginx

首先,您需要在 NGINX 配置文件中指定快取的儲存路徑及其他相關參數。打開您的 NGINX 配置文件(通常位於 /etc/nginx/nginx.conf),並添加以下配置:

http {
    ...
    fastcgi_cache_path /etc/nginx/cache levels=1:2 keys_zone=WORDPRESS_CACHE:100m inactive=60m max_size=256m;
    fastcgi_cache_key "$scheme$request_method$host$request_uri";
    fastcgi_cache_use_stale error timeout invalid_header http_500;
    fastcgi_ignore_headers Cache-Control Expires Set-Cookie;
    ...
}

這段配置創建了一個名為 WORDPRESS_CACHE 的快取區域,並將其儲存路徑設定為 /etc/nginx/cachelevels=1:2 定義了目錄結構,keys_zone 指定了快取鍵的儲存空間大小,1 MB 的記憶體大約可以存放八千個左右的鍵值,也就是說若設定為 16 MB 的話(16m),大約可以快取 128,000 個左右的網址,max_size 是設定快取檔案的總容量上限(也就是放在 /etc/nginx/cache 中的檔案大小上限),inactive=60m 表示如果快取內容在60分鐘內未被訪問,則會被自動清除。

步驟二:啟用 FastCGI Cache

接下來,在處理 PHP 請求的 location 塊中啟用 FastCGI Cache。這通常在您站點的伺服器配置中(例如 /etc/nginx/sites-available/yourdomain.com):

server {
    ...
    set $skip_cache 0;

	# POST 請求不用快取
	if ($request_method = POST) {
    	set $skip_cache 1;
  	}

  	# 若有 query 參數的網址不用快取
  	if ($query_string != "") {
      	set $skip_cache 1;
  	}

  	# 特殊的網址不用快取
  	if ($request_uri ~* "(/wp-admin/|/xmlrpc.php|/wp-(app|cron|login|register|mail).php|wp-.*.php|/feed/|index.php|wp-comments-popup.php|wp-links-opml.php|wp-locations.php|sitemap(_index)?.xml|[a-z0-9_-]+-sitemap([0-9]+)?.xml)") {
      	set $skip_cache 1;
  	}

  	# 已登入使用者、留言者不用快取
  	if ($http_cookie ~* "comment_author|wordpress_[a-f0-9]+|wp-postpass|wordpress_no_cache|wordpress_logged_in") {
      	set $skip_cache 1;
  	}
    
    #正在維護模式中也略過
	if (-f "$document_root/.maintenance") {
    	set $skip_cache 1;
	}

  	# 加入快取資訊表頭(除錯用)
  	add_header X-Cache $upstream_cache_status;

    location ~ \.php$ {
        include fastcgi_params;
        fastcgi_pass unix:/var/run/php/php8.2-fpm.sock;
        fastcgi_index index.php;
    	include fastcgi.conf;
        
        # FastCGI 快取設定
        fastcgi_cache WORDPRESS_CACHE;
        fastcgi_cache_valid 200 301 302 1d;
        fastcgi_cache_bypass $skip_cache;
    	fastcgi_no_cache $skip_cache;
        
        # 可以加入除錯用的標頭
        add_header X-Cache "$upstream_cache_status From $host";
    	add_header Cache-Control  max-age=0;
    	add_header Nginx-Cache "$upstream_cache_status";
    	add_header Last-Modified $date_gmt;
    }
    ...
}

這裡,fastcgi_cache 指令啟用了快取,並指定使用前面創建的快取區域。fastcgi_cache_valid 200 60m 表示成功的響應(HTTP 200 狀態碼)將被快取60分鐘。

步驟三:細化快取規則

為了避免快取敏感內容或確保特定條件下的頁面不被快取,您可以進一步細化快取規則。例如,避免快取已登入用戶的內容:

fastcgi_cache_bypass $cookie_user_logged_in;
fastcgi_no_cache $cookie_user_logged_in;

這些指令確保當 user_logged_in cookie 存在時,快取將被繞過。

清除快取

利用指令清除所有的快取

rm -rf /path/to/your/nginx/cache/*

利用 API 清除快取

首先去取 nginx 的 config 檔案中加入以下設定

location /purge_cache/ {
    allow 127.0.0.1; # 允許本地
    allow '多個主機ip';
    deny all; # 拒绝其他所有请求
    fastcgi_cache_purge WORDPRESS_CACHE $scheme$request_method$host$request_uri;
}

接下來就可以安裝 Nginx Helper 或是透過呼叫API網址清除快取

curl -X GET http://your-domain.com/purge_cache/the_uri_to_purge

區分手機版本和電腦版本

map $http_user_agent $is_desktop {
    default 0;
    ~*linux.*android|windows\s+(?:ce|phone) 0; # exceptions to the rule
    ~*spider|crawl|slurp|bot 1; # bots
    ~*windows|linux|os\s+x\s*[\d\._]+|solaris|bsd 1; # OSes
}

## Revert the logic.
map $is_desktop $is_mobile {
    1 0;
    0 1;
}
add_header x-ua-device $is_mobile;

# cache key 要加入 is_moubile
fastcgi_cache_key "$scheme$request_method$host$request_uri$is_mobile";

將快取放在記憶體,開機要自動執行

若是你把快取得存放路徑設定在記憶體中 /var/run ,那要記得設定重開機自動要建立該目錄,並且讓nginx重生效才行

先建立一個執行檔,執行重開機的設定

nano start-fastcgi.sh
chmod +x start-fastcgi.sh

start-fastcgi.sh的內容如下

mkdir -p /var/run/cache/nginx
chown -R www-data:www-data /var/run/cache/nginx
systemctl restart nginx

建立開機自動執行檔

sudo nano /etc/rc.local

rc.local 內容如下

#!/bin/bash
bash /home/yourname/start-fastcgi.sh

exit 0

設定開機自動執行

如果之前完全沒有設定過開機自動執行,那你會需要先設定開機自動執行的環境

rc-local 創建一個 Systemd 單元文件

sudo nano /etc/systemd/system/rc-local.service

將以下內容添加到文件中:

[Unit]
Description=/etc/rc.local Compatibility
ConditionPathExists=/etc/rc.local

[Service]
Type=forking
ExecStart=/etc/rc.local start
TimeoutSec=0
StandardOutput=tty
RemainAfterExit=yes
SysVStartPriority=99

[Install]
WantedBy=multi-user.target

啟用並啟動服務

現在您有了一個為 rc-local 正確配置的 systemd 服務文件,您可以啟用並啟動它:

sudo chmod +x /etc/rc.local
sudo systemctl enable rc-local.service
sudo systemctl start rc-local.service

常見問題

無法使用 purage_all 功能,可以重新編譯 Nginx ,加入參數 –add-module=/path/to/src/ngx_cache_purge-2.3.1

Nginx Helper 的替代 Nginx FastCGI Cache

Nginx Cache:fastcgi_cache purging (NGINX Helper)使用教學

Nginx 是一個高效能、高穩定性的 Web 伺服器。其中,Nginx 提供的 fastcgi_cache 可以有效地快取後端伺服器(如 PHP-FPM)的回應,以提高網站的回應速度。但在預設情況下,我們需要手動清理這些快取。此時,我們可以使用 NGINX Helper 插件來協助進行快取的清除。

前期準備

要有編譯器

sudo apt-get install g++

NGINX Helper

1. 安裝 NGINX Helper

首先,你需要在你的網站上安裝 NGINX Helper。如果你使用的是 WordPress,可以直接從插件庫中安裝。

2. 設定 NGINX 快取路徑

為了讓 NGINX Helper 知道你的 Nginx 快取路徑,你需要在 Nginx 的設定檔中,指定 fastcgi_cache_path。例如:

fastcgi_cache_path /var/run/nginx-cache levels=1:2 keys_zone=MYCACHE:100m inactive=60m;

此設定將會在 /var/run/nginx-cache 建立快取資料。

3. 配置 NGINX Helper

在 WordPress 的設定中,找到 NGINX Helper 的設定頁面,並啟用以下選項:

  • Enable Cache Purge
  • Purge Entire Cache when a post or page is published

並設定你的 Nginx 快取路徑(如 /var/run/nginx-cache)。

4. 手動清除快取

若需要手動清除快取,可以直接在 NGINX Helper 的設定頁面點選 “Purge Entire Cache” 按鈕。

5. Nginx 設定更新

確保你的 Nginx 設定檔有啟用快取清除功能:

location ~ /purge(/.*) { fastcgi_cache_purge MYCACHE "$scheme$request_method$host$1"; }

6.重新加載 Nginx 以使新設定生效。Copy code

sudo systemctl reload nginx

安裝 Nginx 新版包含有ngx_cache_purge

1.備份配置

在進行任何更改之前,確保備份你當前的 Nginx 配置,以防止任何數據丟失。

sudo cp -r /etc/nginx /etc/nginx-backup

停止和卸載現有的 Nginx

首先,停止 Nginx 服務:

sudo systemctl stop nginx

然後,卸載 Ubuntu 的 Nginx 版本:

sudo apt-get purge nginx nginx-common nginx-full

下載 OpenSSL

wget -c https://www.openssl.org/source/openssl-3.0.11.tar.gz ; tar zxf openssl-3.0.11.tar.gz ; rm openssl-3.0.11.tar.gz

下載第三方模組

安裝 ngx_cache_purge

下載最新版本 https://github.com/nginx-modules/ngx_cache_purge/releases

wget https://github.com/nginx-modules/ngx_cache_purge/archive/refs/tags/2.5.3.tar.gz
tar -xvzf 2.5.3.tar.gz

ngx_brotli

git clone https://github.com/google/ngx_brotli.git
pushd ngx_brotli
git submodule update --init
popd

編譯 ngx_brotli

cd ~/ngx_brotli/deps/brotli/c
mkdir -p out
cmake ..
make

編譯和安裝 Nginx 1.2

如果你還沒有下載和編譯 Nginx 1.2,首先下載源代碼,然後編譯和安裝它:

sudo apt-get update
sudo apt-get install libpcre3 libpcre3-dev

wget https://nginx.org/download/nginx-1.24.0.tar.gz 

tar -xvzf nginx-1.24.0.tar.gz

cd nginx-1.24.0/

./configure --with-pcre=../pcre-8.45 \
--http-log-path=/var/log/nginx/access.log \
--error-log-path=/var/log/nginx/error.log \
--with-http_ssl_module \
--with-http_gzip_static_module \
--with-openssl=../openssl-3.0.11 \
--add-module=../ngx_brotli \
--add-module=../ngx_cache_purge-2.5.3 

make

sudo make install

預設情況下,自行編譯的 Nginx 會被安裝到 /usr/local/nginx

如果出現下面的錯誤

./configure: error: the HTTP rewrite module requires the PCRE library.
You can either disable the module by using --without-http_rewrite_module
option, or install the PCRE library into the system, or build the PCRE library
statically from the source with nginx by using --with-pcre=<path> option.

代表你apt-get install libpcre3 libpcre3-dev這邊出現問題

可以自行安裝 PCRE

wget https://ftp.exim.org/pub/pcre/pcre-8.45.tar.gz
tar -xvzf pcre-8.45.tar.gz

./configure --with-pcre=../pcre-8.45 \
--http-log-path=/var/log/nginx/access.log \
--error-log-path=/var/log/nginx/error.log \
--with-http_ssl_module \
--with-http_gzip_static_module \
--with-openssl=../openssl-3.0.11 \
--add-module=../ngx_brotli \
--add-module=../ngx_cache_purge-2.5.3 

如果出現gzip錯誤

./configure: error: the HTTP gzip module requires the zlib library.
You can either disable the module by using --without-http_gzip_module
option, or install the zlib library into the system, or build the zlib library
statically from the source with nginx by using --with-zlib=<path> option.

那可以自行安中 zlib

sudo apt-get update
sudo apt-get install zlib1g zlib1g-dev

如果出現 cannot find -lbrotlienc or cannot find -lbrotlicommon ,那需要安裝 Brotli

sudo apt update
sudo apt install libbrotli-dev

驗證 Brotli 是否安裝成功

ldconfig -p | grep brotli

檢查安裝是否成功

sudo /usr/local/nginx/sbin/nginx -V

配置系統啟動腳本

如果你希望 Nginx 在系統啟動時自動運行,你需要設置一個 systemd 服務文件或 init 腳本。由於你從源代碼編譯 Nginx,它不會自帶 systemd 服務文件,所以你可能需要自行創建。

恢復配置

從你之前備份的配置恢復設置:

sudo cp -r /etc/nginx-backup/* /usr/local/nginx/conf/

請注意,由於 Nginx 版本之間可能存在差異,所以你可能需要調整配置以使其與 Nginx 1.2 版本兼容。

啟動新的 Nginx

sudo /usr/local/nginx/sbin/nginx

要使 /usr/local/nginx/sbin/nginx 可在任何地方都能執行

使用符號鏈接

你可以在 /usr/bin/usr/sbin 中創建一個指向 /usr/local/nginx/sbin/nginx 的符號鏈接。這樣,由於 /usr/bin/usr/sbin 通常都在 $PATH 環境變量中,你就可以從任何地方執行 nginx 命令。

sudo ln -s /usr/local/nginx/sbin/nginx /usr/sbin/nginx

修改 $PATH 變量

作為另一種方法,你可以將 /usr/local/nginx/sbin 目錄添加到 $PATH 環境變量中。這可以在你的 shell 啟動腳本中完成,例如 ~/.bashrc~/.profile。打開 ~/.bashrc 文件:

nano ~/.bashrc

在文件末尾添加以下行:

export PATH=$PATH:/usr/local/nginx/sbin

然後,重新加載 .bashrc 以應用更改:

source ~/.bashrc

管理 Nginx

你可以直接從GitHub下載nginx-startup-script-for-debian-ubuntu.sh至你的『/etc/init.d』目錄,並將名稱更改為『nginx』。

sudo wget -O /etc/init.d/nginx https://raw.githubusercontent.com/KJieGitHub/Nginx/master/nginx-script/nginx-startup/nginx-startup-script-for-debian-ubuntu.sh
sudo chmod +x /etc/init.d/nginx
sudo systemctl daemon-reload
sudo systemctl start nginx
sudo update-rc.d -f nginx defaults

實用管理命令

sudo systemctl start nginx
sudo systemctl stop nginx
sudo systemctl restart nginx
sudo systemctl reload nginx

實用連結

Nginx 版本以及下載連結

https://nginx.org/en/download.html

Nginx 第三方模組

NGINX 3rd Party Modules

參考資料

https://www.kjnotes.com/devtools/83

https://github.com/FRiCKLE/ngx_cache_purge

完整版本的 Nginx Config

proxy_cache_path /var/run/proxy_cache/ levels=1:2 keys_zone=demo-proxy:10m max_size=1000m inactive=600m use_temp_path=off;
fastcgi_cache_use_stale error timeout invalid_header http_500;
fastcgi_ignore_headers Cache-Control Expires Set-Cookie;

server {
		listen 80;
        server_name yoursite;

        proxy_cache demo-proxy;
        proxy_cache_valid 200 1d;
        
        #設定上傳的檔案大小
        client_max_body_size 64M;

        set $skip_cache 0;
        add_header X-Cache $upstream_cache_status;

        if ($request_method = POST) {
            set $skip_cache 1;
        }

        if ($query_string != "") {
            set $skip_cache 1;
        }

        if ($request_uri ~* "/wp-admin/|/xmlrpc.php|wp-.*.php|^/feed/*|/tag/.*/feed/*|index.php|/.*sitemap.*\.(xml|xsl)") {
            set $skip_cache 1;
        }

        if ($http_cookie ~* "comment_author|wordpress_[a-f0-9]+wp-postpass|wordpress_no_cache|wordpress_logged_in") {
            set $skip_cache 1;
        }

        location / {
                proxy_cache_bypass $skip_cache;
                proxy_no_cache $skip_cache;

                proxy_hide_header X-Frame-Options;
                proxy_pass http://X.X.X.X:X;
                proxy_set_header Host $host;
                proxy_set_header X-Real-IP $remote_addr;
                proxy_set_header X-Forwarded-For $proxy_add_x_forwarded_for;
                proxy_set_header X-Forwarded-Proto $scheme;
                proxy_cache        demo-proxy;
                proxy_cache_key    $uri$is_args$args;

        }

    location ~ /purge(/.*) {
        allow 127.0.0.1; 
        proxy_cache_purge  demo-proxy $1$is_args$args;
    }
}
Windows IIS Server (2022) 安裝 PHP 的方法以及設定

Windows IIS Server (2022) 安裝 PHP 的方法以及設定

我用 Windows Server 2022,已經沒法用Microsoft® Web Platform Installer (Web PI) 了,所以我就純手動安裝 PHP 8,這篇文章會假設你已經安裝好 IIS 了,並且提供下載PHP,安裝PHP,設定PHP,調教PHP,加速PHP等功能去說明

下載 Windows 版本的 PHP

https://www.php.net/downloads.php

在上面的畫面中選擇 Windows downloads,我們採用的是 IIS 所以在下面的畫面中選擇下載 Non Thread Safe 的 zip

下載完畢後,自行建立一個目錄把ZIP解壓縮後放在該目錄下,我是安裝了多個 PHP 版本,所以我建立了 PHP8 的目錄

C:\php8

Windows Server 主機啟用 FastCGI

[> 伺服器管理員]> [新增角色服務],在 [應用程式開發] 底下,選取 [CGI] 核取方塊

修改 PHP 組態的設定 (php.ini)

修改 C:\php8\php.ini ,將設定改成 Windows Server 適用的參數,官方建立設定如下

;IS 下的 FastCGI 支援模擬呼叫方用戶端之安全性權杖的能力。 這可讓 IIS 定義要求執行的安全性內容。
fastcgi.impersonate = 1

cgi.force_redirect = 0

;這可讓 PHP 遵循 CGI 規格存取實際路徑資訊。 IIS FastCGI 實作需要這個延伸模組設定。
cgi.fix_pathinfo = 1

;將 extension_dir 設定為指向 PHP 延伸模組所在的位置
extension_dir = "./ext"

我個人常用的設定如下

max_execution_time = 300

memory_limit = 256M

upload_max_filesize = 10M
post_max_size = 10M

log_errors = On
error_log = syslog

default_socket_timeout = 300

extension=curl
extension=fileinfo
extension=gd
extension=intl
extension=mbstring
extension=exif      ; Must be after mbstring as it depends on it
extension=mysqli
extension=openssl
extension=pdo_mysql
extension=php_imagick.dll

[opcache]
; Determines if Zend OPCache is enabled
opcache.enable=1

; Determines if Zend OPCache is enabled for the CLI version of PHP
opcache.enable_cli=1

; The OPcache shared memory storage size.
opcache.memory_consumption=256

; The amount of memory for interned strings in Mbytes.
opcache.interned_strings_buffer=8

; The maximum number of keys (scripts) in the OPcache hash table.
; Only numbers between 200 and 1000000 are allowed.
opcache.max_accelerated_files=4000

; The maximum percentage of "wasted" memory until a restart is scheduled.
;opcache.max_wasted_percentage=5

; When this directive is enabled, the OPcache appends the current working
; directory to the script key, thus eliminating possible collisions between
; files with the same name (basename). Disabling the directive improves
; performance, but may break existing applications.
;opcache.use_cwd=1

; When disabled, you must reset the OPcache manually or restart the
; webserver for changes to the filesystem to take effect.
opcache.validate_timestamps=1

; How often (in seconds) to check file timestamps for changes to the shared
; memory storage allocation. ("1" means validate once per second, but only
; once per request. "0" means always validate)
opcache.revalidate_freq=2

; Enables or disables file search in include_path optimization
;opcache.revalidate_path=0

; If disabled, all PHPDoc comments are dropped from the code to reduce the
; size of the optimized code.
;opcache.save_comments=1

; If enabled, compilation warnings (including notices and deprecations) will
; be recorded and replayed each time a file is included. Otherwise, compilation
; warnings will only be emitted when the file is first cached.
;opcache.record_warnings=0

; Allow file existence override (file_exists, etc.) performance feature.
;opcache.enable_file_override=0

; A bitmask, where each bit enables or disables the appropriate OPcache
; passes
;opcache.optimization_level=0x7FFFBFFF

;opcache.dups_fix=0

; The location of the OPcache blacklist file (wildcards allowed).
; Each OPcache blacklist file is a text file that holds the names of files
; that should not be accelerated. The file format is to add each filename
; to a new line. The filename may be a full path or just a file prefix
; (i.e., /var/www/x  blacklists all the files and directories in /var/www
; that start with 'x'). Line starting with a ; are ignored (comments).
;opcache.blacklist_filename=

; Allows exclusion of large files from being cached. By default all files
; are cached.
opcache.max_file_size=0

; Check the cache checksum each N requests.
; The default value of "0" means that the checks are disabled.
;opcache.consistency_checks=0

; How long to wait (in seconds) for a scheduled restart to begin if the cache
; is not being accessed.
;opcache.force_restart_timeout=180

; OPcache error_log file name. Empty string assumes "stderr".
;opcache.error_log=

; All OPcache errors go to the Web server log.
; By default, only fatal errors (level 0) or errors (level 1) are logged.
; You can also enable warnings (level 2), info messages (level 3) or
; debug messages (level 4).
;opcache.log_verbosity_level=1

; Preferred Shared Memory back-end. Leave empty and let the system decide.
;opcache.preferred_memory_model=

; Protect the shared memory from unexpected writing during script execution.
; Useful for internal debugging only.
;opcache.protect_memory=0

; Allows calling OPcache API functions only from PHP scripts which path is
; started from specified string. The default "" means no restriction
;opcache.restrict_api=

; Mapping base of shared memory segments (for Windows only). All the PHP
; processes have to map shared memory into the same address space. This
; directive allows to manually fix the "Unable to reattach to base address"
; errors.
;opcache.mmap_base=

; Facilitates multiple OPcache instances per user (for Windows only). All PHP
; processes with the same cache ID and user share an OPcache instance.
;opcache.cache_id=

; Enables and sets the second level cache directory.
; It should improve performance when SHM memory is full, at server restart or
; SHM reset. The default "" disables file based caching.
;opcache.file_cache=

; Enables or disables opcode caching in shared memory.
;opcache.file_cache_only=0

; Enables or disables checksum validation when script loaded from file cache.
;opcache.file_cache_consistency_checks=1

; Implies opcache.file_cache_only=1 for a certain process that failed to
; reattach to the shared memory (for Windows only). Explicitly enabled file
; cache is required.
;opcache.file_cache_fallback=1

; Enables or disables copying of PHP code (text segment) into HUGE PAGES.
; Under certain circumstances (if only a single global PHP process is
; started from which all others fork), this can increase performance
; by a tiny amount because TLB misses are reduced.  On the other hand, this
; delays PHP startup, increases memory usage and degrades performance
; under memory pressure - use with care.
; Requires appropriate OS configuration.
;opcache.huge_code_pages=0

; Validate cached file permissions.
;opcache.validate_permission=0

; Prevent name collisions in chroot'ed environment.
;opcache.validate_root=0

; If specified, it produces opcode dumps for debugging different stages of
; optimizations.
;opcache.opt_debug_level=0

; Specifies a PHP script that is going to be compiled and executed at server
; start-up.
; https://php.net/opcache.preload
;opcache.preload=

; Preloading code as root is not allowed for security reasons. This directive
; facilitates to let the preloading to be run as another user.
; https://php.net/opcache.preload_user
;opcache.preload_user=

; Prevents caching files that are less than this number of seconds old. It
; protects from caching of incompletely updated files. In case all file updates
; on your site are atomic, you may increase performance by setting it to "0".
;opcache.file_update_protection=2

; Absolute path used to store shared lockfiles (for *nix only).
;opcache.lockfile_path=/tmp

要注意的延伸模組

  • 資料庫延伸模組(php_mysql) — 大部分開放原始碼應用程式會針對資料庫引擎使用 MySQL,請使用 php_mysql 或 php_mysqli 延伸模組。 針對新的開發工作,這些延伸模組都能正常運作,或考慮使用 MySQL 驅動程式的 PDO 版本 (PDO 是 PHP 擴充功能,可提供資料存取抽象層,可與各種資料庫搭配使用) ;這個額外的抽象層提供一組更豐富的物件資料庫功能和控制項。 如果 Microsoft® SQL Server ® (或快速版本,例如 Microsoft SQL Server 2008 Express 或 Microsoft®® SQL Server ® ® 2005 Express Edition) 是資料庫引擎,請使用開放原始碼應用程式的php_mssql擴充功能。 針對新的開發工作,請使用 SQL 驅動程式的 PDO 版本。
  • 影像處理延伸模組(imagick) — 許多可讓映射使用 GD2 擴充功能的開放原始碼應用程式 – php_gd2,其具有許多良好的基本映射操作應用程式開發介面, (API) 。 某些應用程式會使用 ImageMagick 應用程式和程式庫。 另外還有一個 php_exif 程式庫,可用來處理新式數位相機儲存在影像中的擴充資訊。
  • 國際化和當地語系化延伸模組– i18n 和 l10n 最常使用的兩個延伸模組是php_mbstring (多位元組字元串) 和php_gettext (原生語言支援) 。 許多開放原始碼應用程式都使用其中一個或兩者。
  • Web 服務延伸模組 – 根據所需的服務選擇 Web 服務延伸模組。 以 PHP 來說,會廣泛使用 SOAP 延伸模組。 XML-RPC 擴充功能通常與 SOAP 和其他服務搭配使用。

將 PHP 目錄加入環境變數中

IIS管理員中的設定

在管理員中找到「處理常式對應」

新增PHP對應

FastCGI PHP 對應參數

  • 要求路徑: *.php
  • 模組 :FastCGImodule
  • 可執行檔: C:\php8\php-cgi.exe
  • 名稱: FastCGI

參考資料

https://learn.microsoft.com/zh-tw/iis/application-frameworks/install-and-configure-php-on-iis/enable-fastcgi-support-in-iis-7-on-windows-server-2008-windows-server-2008-r2-windows-vista-or-windows-7?source=recommendations

https://learn.microsoft.com/zh-tw/iis/application-frameworks/install-and-configure-php-on-iis/install-and-configure-php?source=recommendations

http://www.imagemagick.org/script/index.php

如何在 Ubuntu 20.04 上安裝 PHP 8.0、Nginx、MariaDB、WordPress CMS

如何在 Ubuntu 20.04 上安裝 PHP 8.0、Nginx、MariaDB、WordPress CMS

sudo apt update -y
sudo apt upgrade -y

安裝 Nginx

sudo apt install nginx -y

想要支援 fastcgi_cache purge module 的話,請改用下面的方法安裝 nginx

sudo add-apt-repository ppa:rtcamp/nginx
sudo apt-get update
sudo apt-get remove nginx*
sudo apt-get install nginx-full

可以用下面的指令,確認是否有安裝 fastcgi cache purge module

nginx -V 2>&1 | grep nginx-cache-purge -o

安裝完畢後可以啟用 nginx

sudo systemctl start nginx
sudo systemctl enable nginx

如果有啟用防火牆,記得要開啟相對應的PORT

sudo ufw allow 80/tcp
sudo ufw allow 443/tcp
sudo ufw reload

驗證以及測試一下是否正常


安裝以及設定 MariaDB

接下來可以安裝資料庫MariaDB

sudo apt install mariadb-server
sudo systemctl status mariadb

保護好你的資料庫,修改 root 密碼,以及移除用不到的帳戶以及資料表,和防止 root 遠端登入

sudo mysql_secure_installation

啟動 MariaDB Service

sudo systemctl start mariadb
sudo systemctl enable mariadb

為資料庫建立一個專用使用者,用來操作 wordpress db

sudo mysql -u root -p
MariaDB [(none)]> CREATE USER 'wordpressdbuser'@'localhost' IDENTIFIED BY 'password';

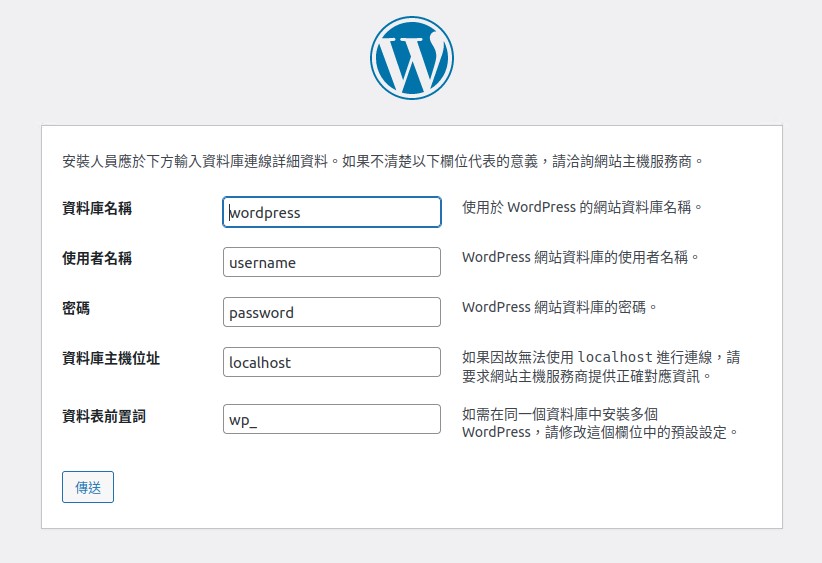
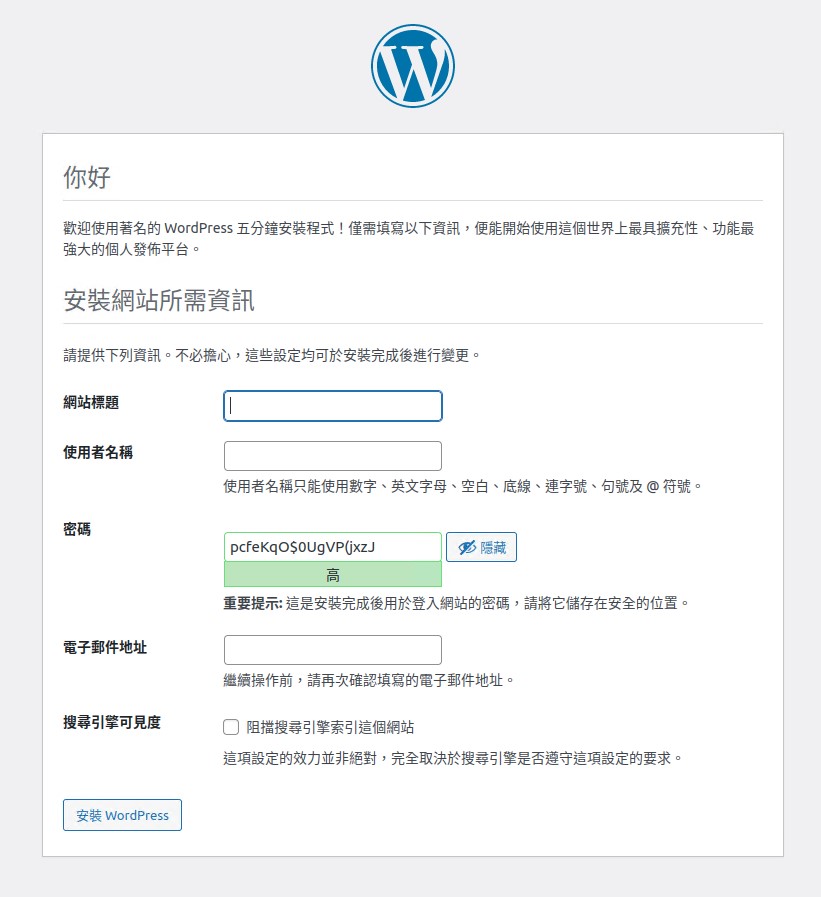
建立一個資料庫,以及一個資料庫的使用者(USER),要給 wordpress 系統使用的

sudo mysql -u root -p
MariaDB [(none)]> CREATE DATABASE wordpress DEFAULT CHARACTER SET utf8 COLLATE utf8_unicode_ci;
MariaDB [(none)]> GRANT ALL ON wordpress.* TO 'wordpressdbuser'@'localhost' IDENTIFIED BY 'password';
MariaDB [(none)]> FLUSH PRIVILEGES;

設定完畢後退出 MariaDB 的介面


安裝 PHP 8.0

因為 php 8 較新,還沒包含在標準套件中,所以我們要新增 PHP 8 的軟體包

sudo apt install software-properties-common
sudo add-apt-repository ppa:ondrej/php
sudo apt update
sudo apt upgrade

新增了PPA後,我們可以直接下指令安裝 PHP 8.0

sudo apt install php8.0

驗證是否安裝正確

php -v

預設 php8.0 安裝完畢後會是支援 apache ,我們需要在安裝 PHP 8 FPM 讓他可以支援 Nginx

sudo apt install php8.0-fpm

安裝常用的 PHP 8.0 擴充套件,可以依照情況刪減

sudo apt install php8.0-common php8.0-mysql php8.0-xml php8.0-curl php8.0-gd php8.0-imagick php8.0-cli php8.0-dev php8.0-imap php8.0-mbstring php8.0-opcache php8.0-soap php8.0-zip -y

為 Nginx 設定 PHP 8

sudo nano /etc/php/8.0/fpm/php.ini

可以修改下列的預設數值,讓 PHP 可以運行得更好

upload_max_filesize = 32M 
post_max_size = 48M 
memory_limit = 256M 
max_execution_time = 600 
max_input_vars = 3000 
max_input_time = 1000

修改完畢後存檔,並且重啟 PHP 8

sudo php-fpm8.0 -t 
sudo service php8.0-fpm restart

2023-11 更新,官方推薦也可以安裝 8.2 版本

#安裝php8.2-fpm
sudo apt-get install php8.2-fpm -y
#安裝php8.2套件
sudo apt install php8.2-common php8.2-mysql php8.2-xml php8.2-curl php8.2-gd php8.2-imagick php8.2-cli php8.2-dev php8.2-imap php8.2-mbstring php8.2-opcache php8.2-soap php8.2-zip -y
#檢查PHP版本
php -v

安裝 wordpress

先下載wordpress,我安裝的版本是中文正體 wordpress 5.8.1,下載完畢後,解壓縮,並且放到你想要放的目錄下,本例是 /var/www/mysite

wget -c https://tw.wordpress.org/latest-zh_TW.zip
unzip latest-zh_TW.zip
sudo cp -R ./wordpress/* /var/www/mysite/

剛複製過去的權限會是 root 的權限,接下來用指令設置權限為 www-data

sudo chown -R www-data:www-data /var/www/mysite
sudo chmod -R 775 /var/www/mysite

在 Nginx 中建立 WordPress 的虛擬伺服器 (VirtualHost)

先刪除 Nginx 中的預設檔,然後建立一個自己的設定檔(.conf)

sudo rm /etc/nginx/sites-enabled/default
sudo rm /etc/nginx/sites-available/default
sudo nano /etc/nginx/conf.d/mysite.conf

mysite.conf 內容如下,mysite 的資訊要換成你自己的伺服器資訊

server {
        listen 80;
        listen [::]:80;
        root /var/www/mysite.com;
        index  index.php index.html index.htm;
        server_name mysite.com www.mysite.com;

        error_log /var/log/nginx/mysite.com_error.log;
        access_log /var/log/nginx/mysite.com_access.log;
        
        client_max_body_size 100M;
        location / {
                try_files $uri $uri/ /index.php?$args;
        }
        location ~ \.php$ {
                include snippets/fastcgi-php.conf;
                fastcgi_pass unix:/run/php/php8.0-fpm.sock;
                fastcgi_param   SCRIPT_FILENAME $document_root$fastcgi_script_name;
        }
}

如果你是把 config 檔按放在 /etc/nginx/sites-available/ 下的話,要記得 ln (軟連結) config

sudo ln -sf /etc/nginx/sites-available/mysite.conf /etc/nginx/sites-enabled/mysite.conf

測試 Nginx ,成功的話就重啟伺服器

sudo nginx -t
sudo service nginx restart

透過瀏覽器安裝 WordPress

開啟瀏覽器,並且輸入 https://localhost/ 可以在本地端安裝 WordPress 系統

開始安裝WordPress
設定 WordPress 的資料庫資訊
設定要登入 WordPress 的帳號密碼
之後就大功告成了

多網站連結

可以使用另外建立一個 a config檔案,並且利用ln指令做連結

cd /etc/nginx/sites-enable/
sudo ln -s /etc/nginx/sites-available/a

參考資料:

https://tw511.com/a/01/23398.html

https://cn.linux-console.net/?p=1601