by Rain Chu 1 月 23, 2025 | web , 行銷
Portaly 一款由台灣團隊「真實引擎」開發的社群微型網站工具,可以協助創作者在數分鐘內建立專屬的 Link-in-Bio 頁面,整合 Facebook、Instagram、YouTube 與 Podcast 等多個平台的連結
主要功能特色:
高度客製化的頁面設計:Portaly 提供多種佈景主題、配色和版面配置,使用者可以輕鬆打造符合個人品牌風格的頁面。
多樣化的經營工具:除了基本的連結整合,Portaly 還提供作品展示、商品導購、收集名單等功能,滿足創作者多元的需求。
銷售變現功能:創作者可以透過 Portaly 銷售數位商品,如線上課程、電子書、模板檔案等,並支援金流串接,協助創作者實現流量變現。
數據分析與追蹤:平台提供流量數據監控,讓使用者了解頁面訪問情況,進而優化行銷策略。
支援多語言介面:Portaly 支援繁體中文和英文介面,對中文市場的創作者特別友善。
方案選擇: Portaly 提供免費的基本方案,讓使用者可以建立功能完善的頁面。若需要更多進階功能,如無限區塊與分頁、自訂主題與配色、自訂網域、E-mail 名單收集等,則可選擇付費的頂級方案。
by Rain Chu 1 月 1, 2025 | GitHub , Windows
PowerToys 是一套由在 Windows 95 就開始用到現在的 Microsoft 開發實用工具集合,專為提高 Windows 使用者生產力和使用體驗而設計,PowerToys 提供了許多高效能的工具,幫助使用者完成日常任務,近年來,Microsoft 將其重新打造為開源專案,並為 Windows 10 和 Windows 11 提供支持。
PowerToys 在 Windows 10, 11 新增功能介紹
進階貼上(Advanced Paste)
此工具允許使用者將剪貼簿中的文字以所需格式貼上,並提供 AI 支援的選項來強化貼上功能。
Always On Top
使用此功能,您可以透過快捷鍵 Win + Ctrl + T 將視窗固定在其他視窗之上,確保重要視窗不被遮蓋。
PowerToys Awake
此工具可讓電腦保持清醒狀態,無需調整電源和睡眠設定,適合執行長時間任務時使用。
File Locksmith
此功能可檢查哪些檔案正在使用中,以及由哪些程序使用,方便管理檔案鎖定狀態。
主控件檔案編輯器(Hosts File Editor)
提供方便的方式來編輯包含網域名稱和相符 IP 位址的「Hosts」檔案,便於網路管理。
無框線的滑鼠(Mouse Without Borders)
允許使用相同的鍵盤和滑鼠與多部電腦互動,順暢地在電腦之間共用剪貼簿內容和檔案。
New+
此功能可讓您從檔案總管中的一組個人化範本建立檔案和資料夾,提升工作效率。
預覽(Peek)
允許您預覽檔案內容,而不需要開啟多個應用程式或中斷工作流程,選取檔案並使用快捷方式 Ctrl + 空格鍵 即可。
螢幕尺規(Screen Ruler)
螢幕尺規是一個實用工具,允許使用者快速測量螢幕上的像素,對於設計師和開發者來說特別有用。 只需按下快捷鍵 Win + Shift + M,即可啟動螢幕尺規,選擇測量方式,量度的像素將顯示在螢幕上。
PowerToys 的主要功能介紹:
1. FancyZones FancyZones 是一個窗口管理工具,讓使用者可以輕鬆定義自訂的視窗佈局。這對於需要多任務處理的人來說非常實用,例如在多螢幕或高解析度顯示器上,同時排列多個應用程式視窗。
功能亮點 :
設定自訂區域佈局
快速分配應用程式到區域
支持鍵盤快速操作
2. PowerToys Run 這是一個快速啟動器,類似於 macOS 的 Spotlight,可以幫助使用者快速找到應用程式、檔案,甚至執行系統命令。
功能亮點 :
即時搜尋結果
支持插件擴展
可啟動 URL、執行腳本
3. Keyboard Manager Keyboard Manager 是一個鍵盤重映射工具,讓使用者根據自己的需求修改鍵盤快捷鍵或重新定義按鍵。
功能亮點 :
支持單鍵和組合鍵重映射
適合想提升工作流程的使用者
4. Color Picker Color Picker 是一個顏色選取工具,特別適合設計師和開發者。使用者可以快速提取螢幕上任意位置的顏色,並獲得 HEX、RGB 等格式。
功能亮點 :
5. File Explorer Add-ons 這個工具提供了多種檔案預覽功能,讓使用者可以直接在檔案總管中檢視支援格式的內容,例如 SVG、Markdown 和 PDF 等。
功能亮點 :
6. Text Extractor Text Extractor 是一個 OCR 工具,允許使用者從圖片中提取文字。這在需要快速複製文件或截圖中的內容時特別有用。
功能亮點 :
7. Mouse Utilities 這是一組滑鼠輔助工具,幫助使用者更輕鬆地找到滑鼠指標或執行高精度點擊。
功能亮點 :
8. Image Resizer Image Resizer 是一個影像大小調整工具,可以直接在檔案總管中調整圖片大小,適合需要快速批次處理影像的使用者。
功能亮點 :
為什麼選擇 PowerToys?
免費且開源 :PowerToys 是一個完全免費的工具,並且基於開源社群開發,功能持續更新。高度客製化 :所有工具都可以根據使用者需求進行自訂設置。整合 Windows 生態系統 :與 Windows 的原生功能深度整合,使用者不需要額外安裝繁瑣的軟體。
結論
可以透過 GitHub PowerToys 頁面 下載並探索更多功能。
by rainchu 11 月 22, 2024 | AI , 程式 , 程式開發
LLMs Server 還是需要放在 Linux 環境中比較好,但開發階段常常用 Windows 在開發,多數人使用的 Shell export 就沒法使用
export OPENAI_API_KEY="sk-...". Windows中設置LLM環境變數的幾種方法解決方法
使用命令列 CMD
set OPENAI_API_KEY=sk-... 使用 PowerShell
[Environment]::SetEnvironmentVariable("OPENAI_API_KEY", "sk-...", "User") 放在 Python 程式中
import os

# 設置環境變數
os.environ['OPENAI_API_KEY'] = 'sk-你的API密鑰'

# 之後就可以使用這個環境變數了
# 例如,當使用OpenAI的API時,就可以從環境變數中獲取API密鑰
api_key = os.environ['OPENAI_API_KEY']
print("API Key:", api_key)
檢查是否有正確設置
相關資料
by Rain Chu 11 月 6, 2024 | Python , 程式
可以在 windows, mac, Linux 上使用,自動地透過滑鼠鍵盤來控制你的電腦畫面,還支援螢幕截圖
簡易使用方法
安裝 pyautogui
使用 pyautogui
螢幕截圖
pyautogui.screenshot('screenshot.png') 滑鼠控制
pyautogui.moveTo(100, 100, duration = 1.5) #用1.5秒移動到x=100,y=100的位置
pyautogui.dragTo(100, 100, duration=2, button='right') #用2秒按住滑鼠右鍵到x=100,y=100的位置
pyautogui.click(clicks=2, interval=0.5, button='right') #雙擊左鍵並且中途間隔0.5秒
鍵盤控制
pyautogui.keyDown('ctrl')
pyautogui.press('a')
pyautogui.keyUp('ctrl') #全選的功能鍵效果
pyautogui.hotkey('ctrl', 'shift', 'esc') #開啟工作管理員的快捷鍵
資源
PyAutoGUI 說明文件
PyAutoGUI 原始碼
中文說明檔
相關資源
by rainchu 10 月 2, 2024 | Python , 程式
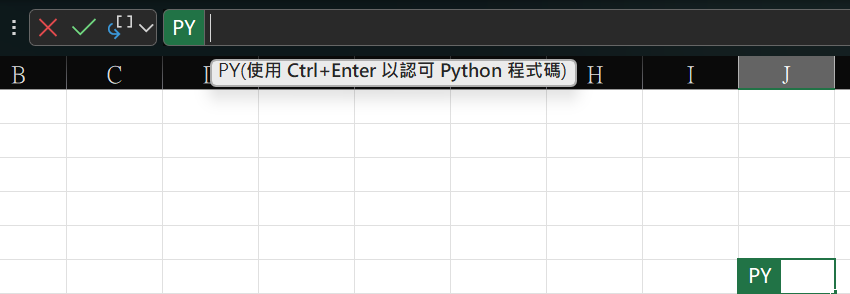
啟用 Excel 中的 Python
在輸入框中,輸入 =py 然後按下 TAB ,就會進入下圖,儲存格前面變成有綠色框的PY,這時就可以輸入 Python 程式碼了
繪製企鵝圖的公式
# 台積電股價的小提琴圖
stock2303 = xl("A1:G218", headers=True)
sns.set_theme (font='SimHei', font_scale=0.8)
plt.figure(dpi=300)
plt.ylabel('量', rotation = 0, labelpad=15)
sns.violinplot(x="成交價", y="分量(張)", data = stock2303)
參考資料
資料探索與視覺化的優秀入門數據集,https://github.com/allisonhorst/palmerpenguins
各種 python 圖表的程式碼範例,https://seaborn.pydata.org/examples/index.html
by rainchu 8 月 7, 2024 | Python
現在AI的時代,實在是離不開python,有時候想要快速的驗證程式設計,並且對外服務,給外部的人測試,這時候可以考慮把在 CLI 執行的 python code ,改成 web api,讓外部的人測試看看,改法如下
步驟 1: 安裝 Flask
步驟 2 : 建立一個 Web APP
可以建立一個名為 webapi.py 的檔案,並且輸入以下程式碼,這樣就可以簡單地把 GraphRAG 的服務對外
from flask import Flask, request, jsonify
import subprocess
import shlex

app = Flask(__name__)

@app.route('/query', methods=['POST'])
def query():
    # 获取请求中的问题
    data = request.json
    question = data.get('question')

    if not question:
        return jsonify({'error': 'No question provided'}), 400

    # 构建 CLI 命令
    command = f"python -m graphrag.query --root ./ragtest --method local \"{question}\""
    # 安全地处理命令
    args = shlex.split(command)

    # 执行命令
    try:
        result = subprocess.run(args, check=True, stdout=subprocess.PIPE, stderr=subprocess.PIPE, text=True)
        response = result.stdout
        # 假设输出中包含 "SUCCESS:" 和我们需要的答案
        if "SUCCESS:" in response:
            answer = response.split("SUCCESS:")[1].strip()  # 取得成功后的文本作为答案
            return jsonify({'answer': answer})
        else:
            return jsonify({'error': 'Failed to get a valid response from the CLI tool'}), 500
    except subprocess.CalledProcessError as e:
        return jsonify({'error': str(e)}), 500

if __name__ == '__main__':
    app.run(debug=True, port=5000)
步驟 3 : 開啟服務
步驟 4 : 使用 API
curl -X POST http://localhost:5000/query -H "Content-Type: application/json" -d "{\"question\": \"新修正之勞工特別休假日數有多少?\"}" 延伸閱讀

近期留言