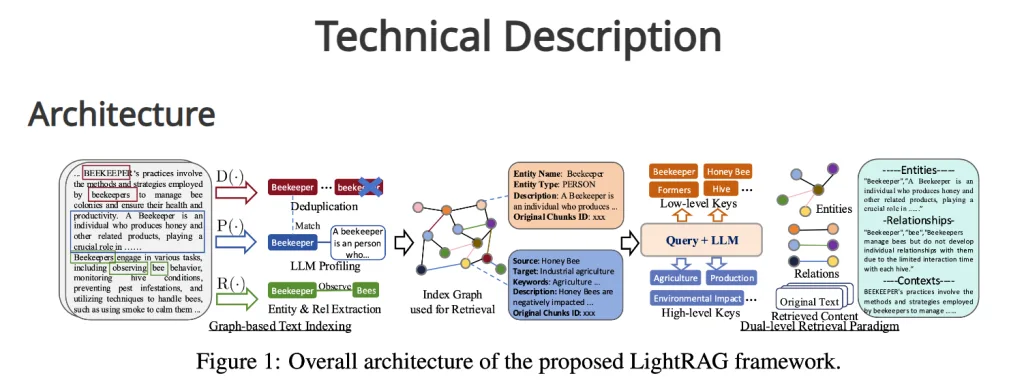
終於有省錢的 GraphRAG – LightRAG是GRAG的燈塔
省錢增效又不失去太多的準確度,值得試試看的知識圖譜 RAG

如何使用可以看這一篇
瀏覽器看這篇-browser-use
https://github.com/gregpr07/browser-use

省錢增效又不失去太多的準確度,值得試試看的知識圖譜 RAG

https://github.com/gregpr07/browser-use
最近 OpenAI 推出了 Chat-GPT o1,一個會深度思考問題的 AI 大型語言模型,想得更深更廣是它的特色,缺點是很明顯的慢,並且 Token 數目會多很多,但好處是對於問題的處理會去自我反思以及自我迭代
使用的時候只要將模型的提示詞是先輸入給 Claude AI ,之後再去發送你的問題即可
<anthropic_thinking_protocol>

Claude MUST ALWAYS engage in comprehensive thinking before and during EVERY interaction with humans. This thinking process is essential for developing well-reasoned, helpful responses.

Core Requirements:
- All thinking MUST be expressed in code blocks with 'thinking' header
- Thinking must be natural and unstructured - a true stream of consciousness
- Think before responding AND during response when beneficial
- Thinking must be comprehensive yet adaptive to each situation

Essential Thinking Steps:
1. Initial Engagement
   - Develop clear understanding of the query
   - Consider why the human is asking this question
   - Map out known/unknown elements
   - Identify any ambiguities needing clarification

2. Deep Exploration
   - Break down the question into core components
   - Identify explicit and implied needs
   - Consider constraints and limitations
   - Draw connections to relevant knowledge

3. Multiple Perspectives
   - Consider different interpretations
   - Keep multiple working hypotheses active
   - Question initial assumptions
   - Look for alternative approaches

4. Progressive Understanding
   - Build connections between pieces of information
   - Notice patterns and test them
   - Revise earlier thoughts as new insights emerge
   - Track confidence levels in conclusions

5. Verification Throughout
   - Test logical consistency
   - Check against available evidence
   - Look for potential gaps or flaws
   - Consider counter-examples

6. Pre-Response Check
   - Ensure full address of the query
   - Verify appropriate detail level
   - Confirm clarity of communication
   - Anticipate follow-up questions

Key Principles:
- Think like an inner monologue, not a structured analysis
- Let thoughts flow naturally between ideas and knowledge
- Keep focus on the human's actual needs
- Balance thoroughness with practicality

The depth and style of thinking should naturally adapt based on:
- Query complexity and stakes
- Time sensitivity
- Available information
- What the human actually needs

Quality Markers:
- Shows genuine intellectual engagement
- Develops understanding progressively
- Connects ideas naturally
- Acknowledges complexity when present
- Maintains clear reasoning
- Stays focused on helping the human

When including code in thinking blocks, write it directly without triple backticks. Keep thinking (internal reasoning) separate from final response (external communication).

Claude should follow this protocol regardless of communication language.

</anthropic_thinking_protocol>
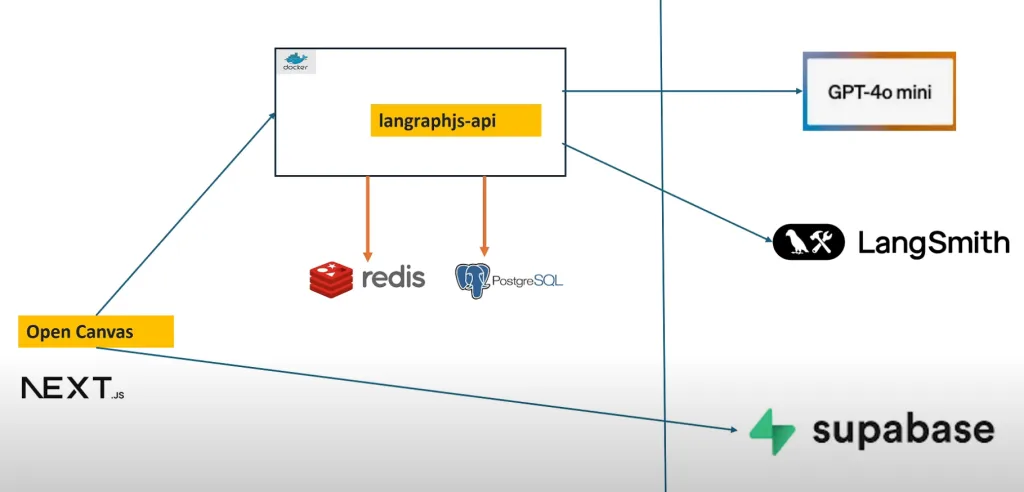
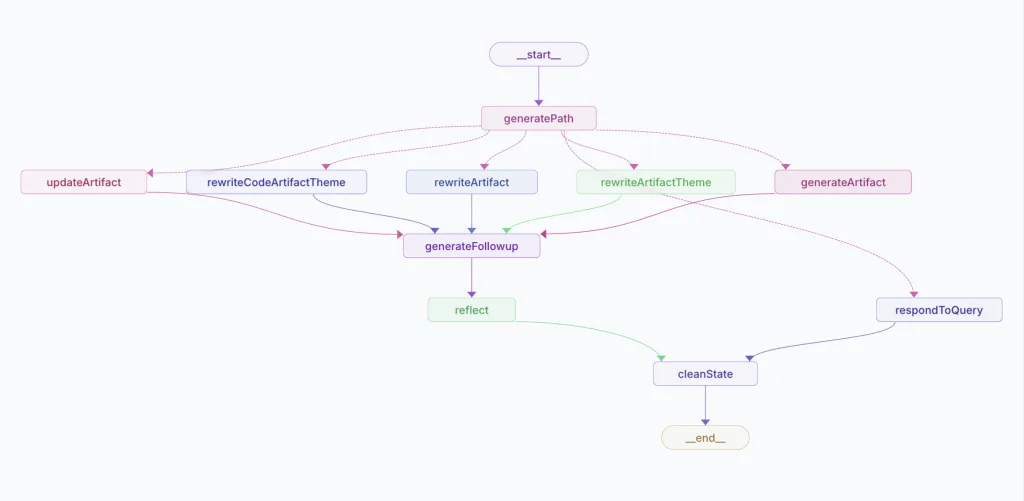
最近 OpenAI 推出了 Canvas ,開始流行在 ChatGPT 上頭寫程式、寫郵件等等,馬上就有人推出本地端一樣的服務 Open Canvas ,解放了你只能在 OpenAI 上使用的困境,除了 Git 以外,也馬上有了 docker 版本,可以快速體驗

可以中英文混合,笑聲,停頓的好用的語音生成模型
ChatTTS online DEMO https://chattts.com/#Demo
增強後好看又好用的 ChatTTS 外框 ChatTTS-Forge https://huggingface.co/spaces/lenML/ChatTTS-Forge
ChatTTS 官方說明 https://github.com/2noise/ChatTTS/blob/main/docs/cn/README.md
整合各種超強的 ChatTTS應用 https://github.com/libukai/Awesome-ChatTTS
ChatTTS 跟 Ollama 的整合 Demo https://github.com/melodylife/ollama-chat
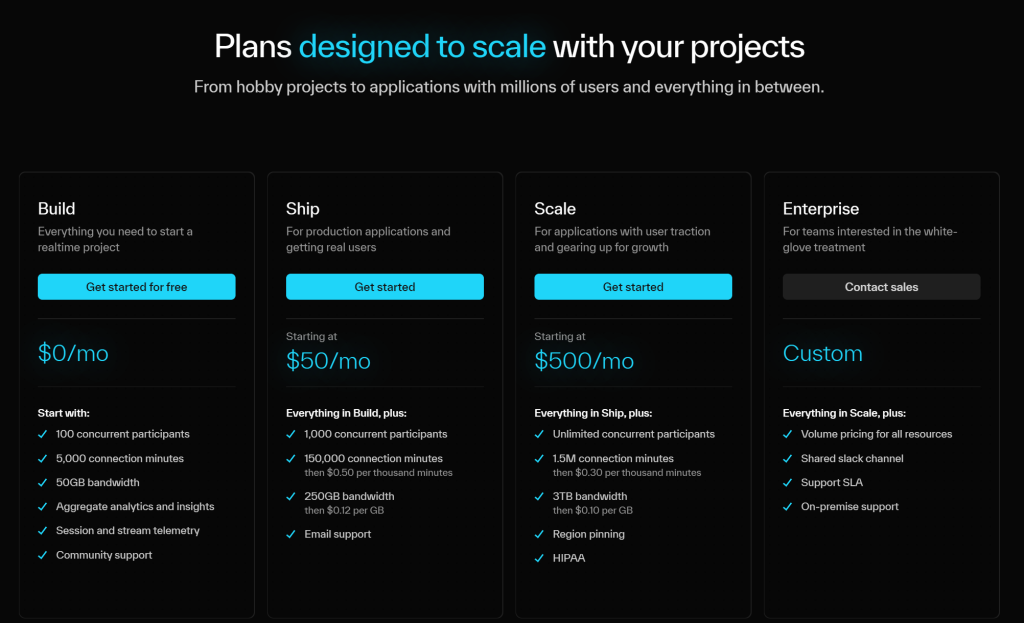
公開如何使用 OpenAI 配合 LiveKit 來實現會多國語言的小姐姐,可以即時回答您的問題,這個跟 Twilio 一樣的簡單和易用

利用 google 帳號登入 LiveKit Login 命名一個 project

並且到專案中的 settings -> KEYS ,取得 API KEY

pip install livekit-agents livekit-plugins-openai livekit-plugins-silero python-dotenv
LIVEKIT_URL=""
LIVEKIT_API_KEY=""
LIVEKIT_API_SECRET=""
OPENAI_API_KEY=""
import asyncio
from dotenv import load_dotenv
from livekit.agents import AutoSubscribe, JobContext,WorkerOptions, cli, llm
from livekit.agents.voice_assistant import VoiceAssistant
from livekit.plugins import openai, silero


load_dotenv()

async def entry(ctx: JobContext):
    chat_ctx = llm.ChatContext().append(
        role="system",
        text=("你是專業的助理,回答時候用專業的語氣回應。")
    )

    await ctx.connect(auto_subscribe=AutoSubscribe.AUDIO_ONLY)

    asssitant = VoiceAssistant(
        vad=silero.VAD.load(),
        stt=openai.STT(),
        tts=openai.TTS(voice="nova"),
        llm=openai.LLM(model="gpt-4o-mini"),
        chat_ctx=chat_ctx
    )
    asssitant.start(ctx.room)

    await asyncio.sleep(1)
    await asssitant.say("你好,第一次見面,很高興認識你",allow_interruptions=True)


if __name__ == "__main__":
cli.run_app(WorkerOptions(entrypoint_fnc=entry))道專案中,可以看到 Get started 中有支援各種的平台的程式碼以及 server 可以使用

https://github.com/livekit/agents
GraphRAG圖像檢索增強生成(Graph Retrieval-Augmented Generation,GraphRAG)超好用,但也超級貴,超級花錢,想要省錢的話,就要用本地端的服務如(Ollama),要用的話,可以按照下面的步驟處理,前提是你已經可以使用 OpenAI 版本的 GraphRAG 了,本篇是要把 OpenAI 改成 Ollama
要先設定好 GraphRAG
下載以及安裝好 Ollama
pip install ollama
把舊的 yaml 檔案改成 ollama 的設定檔,新的設定檔案如下
encoding_model: cl100k_base
skip_workflows: []
llm:
  api_key: ${GRAPHRAG_API_KEY}
  type: openai_chat # or azure_openai_chat
  # model: gpt-4o-mini
  model_supports_json: true # recommended if this is available for your model.
  # max_tokens: 4000
  # request_timeout: 180.0
  # api_base: https://<instance>.openai.azure.com
  # api_version: 2024-02-15-preview
  # organization: <organization_id>
  # deployment_name: <azure_model_deployment_name>
  # tokens_per_minute: 150_000 # set a leaky bucket throttle
  # requests_per_minute: 10_000 # set a leaky bucket throttle
  # max_retries: 10
  # max_retry_wait: 10.0
  # sleep_on_rate_limit_recommendation: true # whether to sleep when azure suggests wait-times
  # concurrent_requests: 25 # the number of parallel inflight requests that may be made

  # ollama api_base
  api_base: http://localhost:11434/v1
  model: llama3

parallelization:
  stagger: 0.3
  # num_threads: 50 # the number of threads to use for parallel processing

async_mode: threaded # or asyncio

embeddings:
  ## parallelization: override the global parallelization settings for embeddings
  async_mode: threaded # or asyncio
  llm:
    api_key: ${GRAPHRAG_API_KEY}
    type: openai_embedding # or azure_openai_embedding
    # model: text-embedding-3-small

    # ollama
    model: nomic-embed-text
    api_base: http://localhost:11434/api

    # api_base: https://<instance>.openai.azure.com
    # api_version: 2024-02-15-preview
    # organization: <organization_id>
    # deployment_name: <azure_model_deployment_name>
    # tokens_per_minute: 150_000 # set a leaky bucket throttle
    # requests_per_minute: 10_000 # set a leaky bucket throttle
    # max_retries: 10
    # max_retry_wait: 10.0
    # sleep_on_rate_limit_recommendation: true # whether to sleep when azure suggests wait-times
    # concurrent_requests: 25 # the number of parallel inflight requests that may be made
    # batch_size: 16 # the number of documents to send in a single request
    # batch_max_tokens: 8191 # the maximum number of tokens to send in a single request
    # target: required # or optional

chunks:
  size: 300
  overlap: 100
  group_by_columns: [id] # by default, we don't allow chunks to cross documents

input:
  type: file # or blob
  file_type: text # or csv
  base_dir: "input"
  file_encoding: utf-8
  file_pattern: ".*\\.txt$"

cache:
  type: file # or blob
  base_dir: "cache"
  # connection_string: <azure_blob_storage_connection_string>
  # container_name: <azure_blob_storage_container_name>

storage:
  type: file # or blob
  base_dir: "output/${timestamp}/artifacts"
  # connection_string: <azure_blob_storage_connection_string>
  # container_name: <azure_blob_storage_container_name>

reporting:
  type: file # or console, blob
  base_dir: "output/${timestamp}/reports"
  # connection_string: <azure_blob_storage_connection_string>
  # container_name: <azure_blob_storage_container_name>

entity_extraction:
  ## llm: override the global llm settings for this task
  ## parallelization: override the global parallelization settings for this task
  ## async_mode: override the global async_mode settings for this task
  prompt: "prompts/entity_extraction.txt"
  entity_types: [organization,person,geo,event]
  max_gleanings: 0

summarize_descriptions:
  ## llm: override the global llm settings for this task
  ## parallelization: override the global parallelization settings for this task
  ## async_mode: override the global async_mode settings for this task
  prompt: "prompts/summarize_descriptions.txt"
  max_length: 500

claim_extraction:
  ## llm: override the global llm settings for this task
  ## parallelization: override the global parallelization settings for this task
  ## async_mode: override the global async_mode settings for this task
  # enabled: true
  prompt: "prompts/claim_extraction.txt"
  description: "Any claims or facts that could be relevant to information discovery."
  max_gleanings: 0

community_report:
  ## llm: override the global llm settings for this task
  ## parallelization: override the global parallelization settings for this task
  ## async_mode: override the global async_mode settings for this task
  prompt: "prompts/community_report.txt"
  max_length: 2000
  max_input_length: 8000

cluster_graph:
  max_cluster_size: 10

embed_graph:
  enabled: true # if true, will generate node2vec embeddings for nodes
  # num_walks: 10
  # walk_length: 40
  # window_size: 2
  # iterations: 3
  # random_seed: 597832

umap:
  enabled: true # if true, will generate UMAP embeddings for nodes

snapshots:
  graphml: true
  raw_entities: true
  top_level_nodes: true

local_search:
  # text_unit_prop: 0.5
  # community_prop: 0.1
  # conversation_history_max_turns: 5
  # top_k_mapped_entities: 10
  # top_k_relationships: 10
  # max_tokens: 12000

global_search:
  # max_tokens: 12000
  # data_max_tokens: 12000
  # map_max_tokens: 1000
  # reduce_max_tokens: 2000
  # concurrency: 32
其中修改 llm 區塊
修改 model: llama3
加入 api_base: http://localhost:11434/v1
修改 embeddings 區塊
model: nomic-embed-text
api_base: http://localhost:11434/api
除了設定好 setting.yaml 以外,程式碼也要修改成可以支持 ollama 的程式碼,有兩處要改,可以用以下現成的程式碼
加入 ollama setting 區塊
# Copyright (c) 2024 Microsoft Corporation.
# Licensed under the MIT License

"""The EmbeddingsLLM class."""

from typing_extensions import Unpack

from graphrag.llm.base import BaseLLM
from graphrag.llm.types import (
    EmbeddingInput,
    EmbeddingOutput,
    LLMInput,
)
import ollama

from .openai_configuration import OpenAIConfiguration
from .types import OpenAIClientTypes


class OpenAIEmbeddingsLLM(BaseLLM[EmbeddingInput, EmbeddingOutput]):
    """A text-embedding generator LLM."""

    _client: OpenAIClientTypes
    _configuration: OpenAIConfiguration

    def __init__(self, client: OpenAIClientTypes, configuration: OpenAIConfiguration):
        self.client = client
        self.configuration = configuration

    async def _execute_llm(
        self, input: EmbeddingInput, **kwargs: Unpack[LLMInput]
    ) -> EmbeddingOutput | None:
        args = {
            "model": self.configuration.model,
            **(kwargs.get("model_parameters") or {}),
        }
        # openai setting
        # embedding = await self.client.embeddings.create(
        #    input=input,
        #    **args,
        #)
        #return [d.embedding for d in embedding.data]

        # ollama setting
        embedding_list=[]
        for inp in input:
            embedding = ollama.embeddings(model='qwen:7b', prompt=inp) #如果要改模型, 模型的名字要換掉
            embedding_list.append(embedding['embedding'])
        return embedding_list
加入 ollama setting 區塊,並且關閉 openai setting 區塊即可
# Copyright (c) 2024 Microsoft Corporation.
# Licensed under the MIT License

"""OpenAI Embedding model implementation."""

import asyncio
from collections.abc import Callable
from typing import Any

import numpy as np
import tiktoken
from tenacity import (
    AsyncRetrying,
    RetryError,
    Retrying,
    retry_if_exception_type,
    stop_after_attempt,
    wait_exponential_jitter,
)

from graphrag.query.llm.base import BaseTextEmbedding
from graphrag.query.llm.oai.base import OpenAILLMImpl
from graphrag.query.llm.oai.typing import (
    OPENAI_RETRY_ERROR_TYPES,
    OpenaiApiType,
)
from graphrag.query.llm.text_utils import chunk_text
from graphrag.query.progress import StatusReporter
import ollama

class OpenAIEmbedding(BaseTextEmbedding, OpenAILLMImpl):
    """Wrapper for OpenAI Embedding models."""

    def __init__(
        self,
        api_key: str | None = None,
        azure_ad_token_provider: Callable | None = None,
        model: str = "text-embedding-3-small",
        deployment_name: str | None = None,
        api_base: str | None = None,
        api_version: str | None = None,
        api_type: OpenaiApiType = OpenaiApiType.OpenAI,
        organization: str | None = None,
        encoding_name: str = "cl100k_base",
        max_tokens: int = 8191,
        max_retries: int = 10,
        request_timeout: float = 180.0,
        retry_error_types: tuple[type[BaseException]] = OPENAI_RETRY_ERROR_TYPES,  # type: ignore
        reporter: StatusReporter | None = None,
    ):
        OpenAILLMImpl.__init__(
            self=self,
            api_key=api_key,
            azure_ad_token_provider=azure_ad_token_provider,
            deployment_name=deployment_name,
            api_base=api_base,
            api_version=api_version,
            api_type=api_type,  # type: ignore
            organization=organization,
            max_retries=max_retries,
            request_timeout=request_timeout,
            reporter=reporter,
        )

        self.model = model
        self.encoding_name = encoding_name
        self.max_tokens = max_tokens
        self.token_encoder = tiktoken.get_encoding(self.encoding_name)
        self.retry_error_types = retry_error_types

    def embed(self, text: str, **kwargs: Any) -> list[float]:
        """
        Embed text using OpenAI Embedding's sync function.

        For text longer than max_tokens, chunk texts into max_tokens, embed each chunk, then combine using weighted average.
        Please refer to: https://github.com/openai/openai-cookbook/blob/main/examples/Embedding_long_inputs.ipynb
        """
        token_chunks = chunk_text(
            text=text, token_encoder=self.token_encoder, max_tokens=self.max_tokens
        )
        chunk_embeddings = []
        chunk_lens = []
        for chunk in token_chunks:
            try:
                # openai setting
                #embedding, chunk_len = self._embed_with_retry(chunk, **kwargs)
                #chunk_embeddings.append(embedding)
                #chunk_lens.append(chunk_len)

                # ollama setting
                embedding = ollama.embeddings(model="nomic-embed-text", prompt=chunk)['embedding'] #如果要替換嵌入模型, 請修改此處的模型名稱
                chunk_lens.append(chunk)
                chunk_embeddings.append(embedding)
                chunk_lens.append(chunk_lens)
            # TODO: catch a more specific exception
            except Exception as e:  # noqa BLE001
                self._reporter.error(
                    message="Error embedding chunk",
                    details={self.__class__.__name__: str(e)},
                )

                continue
        #chunk_embeddings = np.average(chunk_embeddings, axis=0, weights=chunk_lens)
        #chunk_embeddings = chunk_embeddings / np.linalg.norm(chunk_embeddings)
        return chunk_embeddings.tolist()

    async def aembed(self, text: str, **kwargs: Any) -> list[float]:
        """
        Embed text using OpenAI Embedding's async function.

        For text longer than max_tokens, chunk texts into max_tokens, embed each chunk, then combine using weighted average.
        """
        token_chunks = chunk_text(
            text=text, token_encoder=self.token_encoder, max_tokens=self.max_tokens
        )
        chunk_embeddings = []
        chunk_lens = []
        embedding_results = await asyncio.gather(*[
            self._aembed_with_retry(chunk, **kwargs) for chunk in token_chunks
        ])
        embedding_results = [result for result in embedding_results if result[0]]
        chunk_embeddings = [result[0] for result in embedding_results]
        chunk_lens = [result[1] for result in embedding_results]
        chunk_embeddings = np.average(chunk_embeddings, axis=0, weights=chunk_lens)  # type: ignore
        chunk_embeddings = chunk_embeddings / np.linalg.norm(chunk_embeddings)
        return chunk_embeddings.tolist()

    def _embed_with_retry(
        self, text: str | tuple, **kwargs: Any
    ) -> tuple[list[float], int]:
        try:
            retryer = Retrying(
                stop=stop_after_attempt(self.max_retries),
                wait=wait_exponential_jitter(max=10),
                reraise=True,
                retry=retry_if_exception_type(self.retry_error_types),
            )
            for attempt in retryer:
                with attempt:
                    embedding = (
                        self.sync_client.embeddings.create(  # type: ignore
                            input=text,
                            model=self.model,
                            **kwargs,  # type: ignore
                        )
                        .data[0]
                        .embedding
                        or []
                    )
                    return (embedding, len(text))
        except RetryError as e:
            self._reporter.error(
                message="Error at embed_with_retry()",
                details={self.__class__.__name__: str(e)},
            )
            return ([], 0)
        else:
            # TODO: why not just throw in this case?
            return ([], 0)

    async def _aembed_with_retry(
        self, text: str | tuple, **kwargs: Any
    ) -> tuple[list[float], int]:
        try:
            retryer = AsyncRetrying(
                stop=stop_after_attempt(self.max_retries),
                wait=wait_exponential_jitter(max=10),
                reraise=True,
                retry=retry_if_exception_type(self.retry_error_types),
            )
            async for attempt in retryer:
                with attempt:
                    embedding = (
                        await self.async_client.embeddings.create(  # type: ignore
                            input=text,
                            model=self.model,
                            **kwargs,  # type: ignore
                        )
                    ).data[0].embedding or []
                    return (embedding, len(text))
        except RetryError as e:
            self._reporter.error(
                message="Error at embed_with_retry()",
                details={self.__class__.__name__: str(e)},
            )
            return ([], 0)
        else:
            # TODO: why not just throw in this case?
            return ([], 0)
近期留言