by Rain Chu 7 月 9, 2022 | PHP , wordpress
在 WordPress 中,尤其是使用到 woocommerce 商店功能時候,最常需要客製化的通常是使用者的各式各樣資訊,例如有使用者的手機號碼、推薦人資訊等,通常這些資訊沒有良好的plugin可以支援,欄位高度客製化,這時可以寫點 php 程式,來支持讓自己的網站更美好,以下分CRUD新增、修改、刪除、讀取來做說明。
新增 user meta 的方法
add_user_meta(int $user_id, string $meta_key, mixed $meta_value, bool $unique = false); 刪除 user meta 的方法
delete_user_meta( $user_id, $meta_key, $meta_value ); 修改 user meta 的方法
update_user_meta ( $user_id, $meta_key, $meta_value, $prev_value ); 讀取 user meta 的方法
get_user_meta( $user_id, $meta_key, $single ); 參考資料
by Rain Chu 5 月 13, 2022 | Nginx , PHP , wordpress
我的系統是 Ubuntu 20 + Nginx + Php7.4-fpm ,遇到不能安裝程式,安裝到一半都會停掉,去檢查 /var/log/php7.4fpm.log ,發現出現 warning message
warning : [pool www] seems busy (you may need to increase pm.start_servers, or pm.min/max_spare_servers), spawning 32 children, there are 0 idle, and 15 total children
我的解決方法是去到 /etc/php/7.4/fpm/pool.d 下打開 www.conf
sudo nano /etc/php/7.4/fpm/pool.d/www.conf 然後改善 pm 的相關設定值,以我的機器為例,16GB RAM,CPU 4 顆,我的設定值參考公式為
pm.start_servers = min_spare_servers + (max_spare_servers - min_spare_servers) / 2 所以我修改的參數如下
pm = dynamic
pm.max_children = 30 # 10-30 間是常見的設定
pm.start_servers = 10
pm.min_spare_servers = 10
pm.max_spare_servers = 10
pm.max_requests = 5000
修改完畢之後,重啟就不會看到問題了
pm.max_children 的合理配置方法
要合理的評估一個數字,要先考量以下幾點
伺服器可用的記憶體 (RAM):確認伺服器總共有多少記憶體可供 PHP-FPM 使用。每個 PHP 進程的平均記憶體消耗量 :觀察或測試你的應用,以確定每個 PHP 進程大概需要多少記憶體。保留記憶體 :為作業系統和其他服務保留一部分記憶體,以確保系統穩定運行。
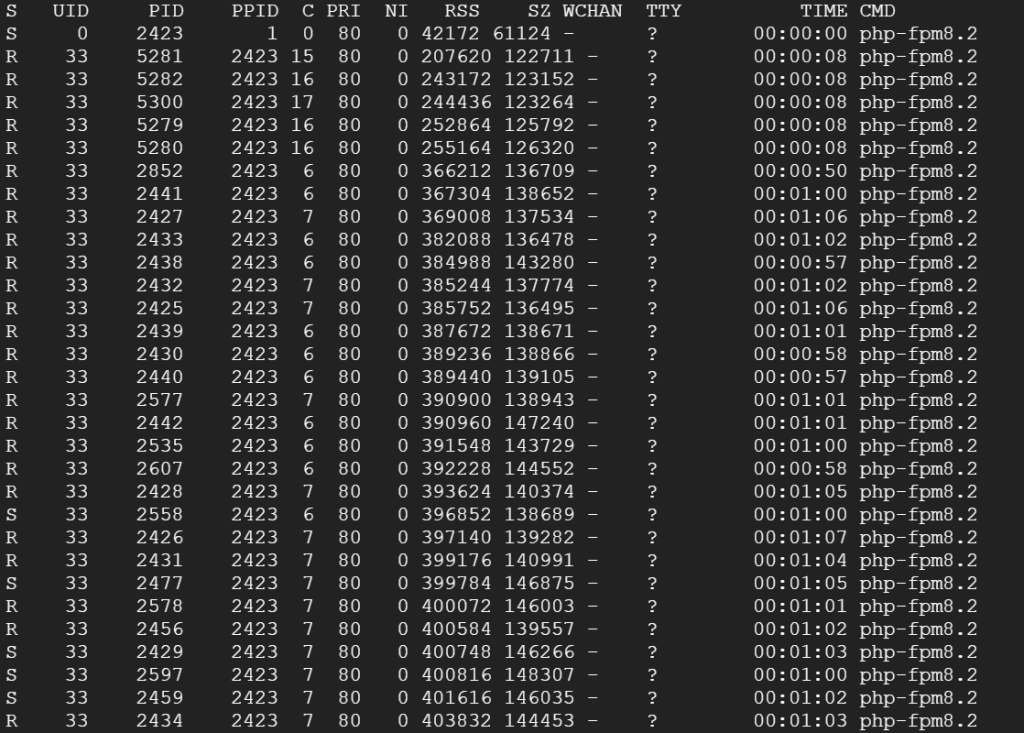
步驟 1:測量 PHP 進程的平均記憶體消耗
ps -ylC php-fpm8.2 --sort:rss 找到 RSS 列的值(常駐集大小),將它們加起來,然後除以 PHP-FPM 進程的數量,得到平均記憶體消耗量(單位是 KB)。
步驟 2:計算可用記憶體
確定伺服器上為 PHP-FPM 分配的記憶體總量。如果伺服器僅運行 PHP-FPM(例如,沒有資料庫等其他服務),則可以減去為作業系統和其他必要服務保留的記憶體量。一個常見的保留量是 512MB 到 1GB。
步驟 3:計算 pm.max_children
利用以下公式
pm.max_children = (伺服器可用記憶體 – 保留記憶體) / 平均每個 PHP 進程的記憶體消耗
假設:
伺服器有 6GB(6144MB)的 RAM。
作業系統和其他服務保留了 1GB(1024MB)。
通過測量,你發現每個 PHP 進程平均消耗 50MB 記憶體
pm.max_children = (6144MB – 1024MB) / 50MB = 102.4
在這個例子中,你可以將 pm.max_children 設置為大約 100。
注意 :始終留有足夠的餘地來處理意外的高峰,不要將所有資源都分配給 PHP-FPM,以避免伺服器過載。此外,實際部署後,應監控伺服器性能,並根據需要調整 pm.max_children 的值。
參考資料如下
https://www.gushiciku.cn/pl/p9Vf/zh-tw
by Rain Chu 3 月 22, 2022 | PHP , woocommerce , wordpress
點選商品圖片後的行為網址
客戶常常是想要快速結帳,所以通常希望在商品頁面中,點選圖片就可以直接進入結帳了,這時候在 wordpress woocommerce 中沒有特別好用的 Pugin 可以利用,我的解法是在佈景主題中的 functions.php ,加入下面的程式碼片段,其中add-to-cart=id , id 指的是商品 id , quantity=1,1 是數量。
點選圖片後,會直接到結帳頁面,/checkout/?add-to-cart=’.$product->get_id().’quantity=1 點選圖片後,會直接到購物車,/cart/?add-to-cart=’.$product->get_id().’&quantity=1 /?add-to-cart=’.$product->get_id() functions.php
// woocommerce
// 設定圖片上的商品連結
if ( ! function_exists( 'woocommerce_template_loop_product_link_open' ) ) {
	/**
	 * Insert the opening anchor tag for products in the loop.
	 */
	function woocommerce_template_loop_product_link_open() {
		global $product;

        //原先的設定
		//$link = apply_filters( 'woocommerce_loop_product_link', get_the_permalink(), $product );

      	// 1.改成直接到結帳頁面中
        $link = '/checkout/?add-to-cart='.$product->get_id().'&quantity=1';

      	// 2.點選圖片直接會到購物車中
      	$link = '/cart/?add-to-cart='.$product->get_id().'&quantity=1';

      	// 3.點選圖片後不跳轉,但會加入到購物車中
      	$link = '/?add-to-cart='.$product->get_id();

		echo '<a href="' . esc_url( $link ) . '" class="woocommerce-LoopProduct-link woocommerce-loop-product__link">';
	}
}
搜尋商品後,點選產品清單中的圖片直接進入購物車
/wp-content/themes/themename/template-tags.php
修改$permalink = !empty( $args[‘permalink’] ) ? $args[‘permalink’] : ‘/checkout/?add-to-cart=’.$post_id.’quantity=1′;
function et_extra_get_post_thumb( $args = array() ) {
	$default_args = array(
		'post_id'                    => 0,
		'size'                       => '',
		'height'                     => 50,
		'width'                      => 50,
		'title'                      => '',
		'link_wrapped'               => true,
		'permalink'                  => '',
		'a_class'                    => array(),
		'img_class'                  => array(),
		'img_style'                  => '',
		'img_after'                  => '', // Note: this value is not escaped/sanitized, and should be used for internal purposes only, not any user input
		'post_format_thumb_fallback' => false,
		'fallback'                   => '',
		'thumb_src'                  => '',
		'return'                     => 'img',
	);

	$args = wp_parse_args( $args, $default_args );

	$post_id = $args['post_id'] ? $args['post_id'] : get_the_ID();

	// add to cart link
	//$permalink = !empty( $args['permalink'] ) ? $args['permalink'] : get_the_permalink( $post_id );
	$permalink = !empty( $args['permalink'] ) ? $args['permalink'] : '/checkout/?add-to-cart='.$post_id.'quantity=1';

	$title = !empty( $args['title'] ) ? $args['title'] : get_the_title( $post_id );

	$width = (int) apply_filters( 'et_extra_post_thumbnail_width', $args['width'] );
	$height = (int) apply_filters( 'et_extra_post_thumbnail_height', $args['height'] );
	$size = !empty( $args['size'] ) ? $args['size'] : array( $width, $height );
	$thumb_src = $args['thumb_src'];
	$img_style = $args['img_style'];

	$thumbnail_id = get_post_thumbnail_id( $post_id );

	if ( !$thumbnail_id && !$args['thumb_src'] ) {
		if ( $args['post_format_thumb_fallback'] ) {
			$post_format = et_get_post_format();
			if ( in_array( $post_format, array( 'video', 'quote', 'link', 'audio', 'map', 'text' ) ) ) {
				$thumb_src = et_get_post_format_thumb( $post_format, 'thumb' );
			} else {
				$thumb_src = et_get_post_format_thumb( 'text', 'thumb' );
			}
		} else if ( !empty( $args['fallback'] ) ) {
			return $args['fallback'];
		} else {
			$thumb_src = et_get_post_format_thumb( 'text', 'icon' );
		}
	}

	if ( $thumbnail_id ) {
		list($thumb_src, $thumb_width, $thumb_height) = wp_get_attachment_image_src( $thumbnail_id, $size );
	}

	if ( 'thumb_src' === $args['return'] ) {
		return $thumb_src;
	}

	$image_output = sprintf(
		'<img src="%1$s" alt="%2$s"%3$s %4$s/>%5$s',
		esc_attr( $thumb_src ),
		esc_attr( $title ),
		( !empty( $args['img_class'] ) ? sprintf( ' class="%s"', esc_attr( implode( ' ', $args['img_class'] ) ) ) : '' ),
		( !empty( $img_style ) ? sprintf( ' style="%s"', esc_attr( $img_style ) ) : '' ),
		$args['img_after']
	);

	if ( $args['link_wrapped'] ) {
		$image_output = sprintf(
			'<a href="%1$s" title="%2$s"%3$s%5$s>
				%4$s
			</a>',
			esc_attr( $permalink ),
			esc_attr( $title ),
			( !empty( $args['a_class'] ) ? sprintf( ' class="%s"', esc_attr( implode( ' ', $args['a_class'] ) ) ) : '' ),
			$image_output,
			( !empty( $img_style ) ? sprintf( ' style="%s"', esc_attr( $img_style ) ) : '' )
		);
	}

	return $image_output;
}
by Rain Chu 3 月 7, 2022 | IIS , PHP , wordpress
很少人使用 IIS 架設 wordpress ,因為文件不好找,例外狀況又多,這次又發現 WordPress 的 Route 規則怪怪的,會在所有路徑中出現 index.php? ,這才意識到之前用 nginx 時候這些規則都早就解決,只要研究如何處理這樣的困境,研究之後得到有三個要點。
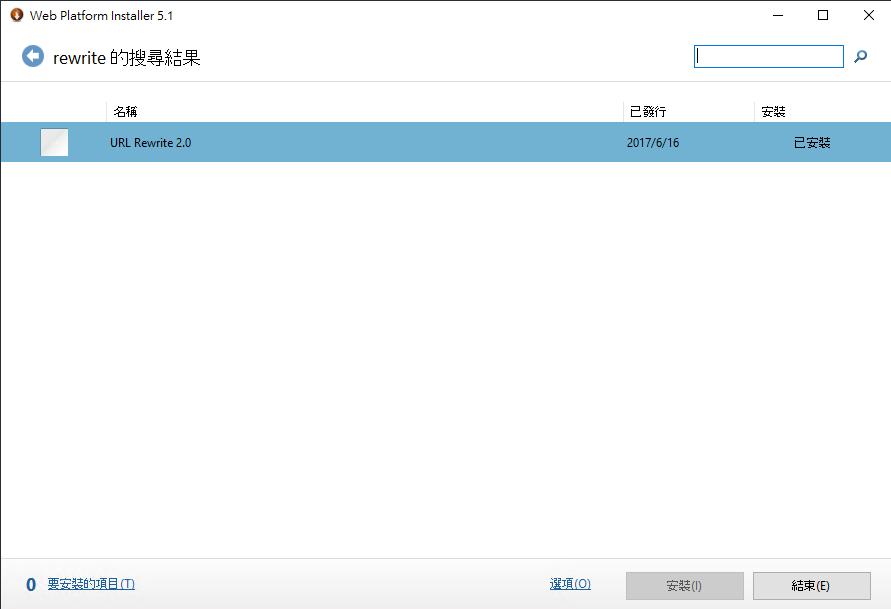
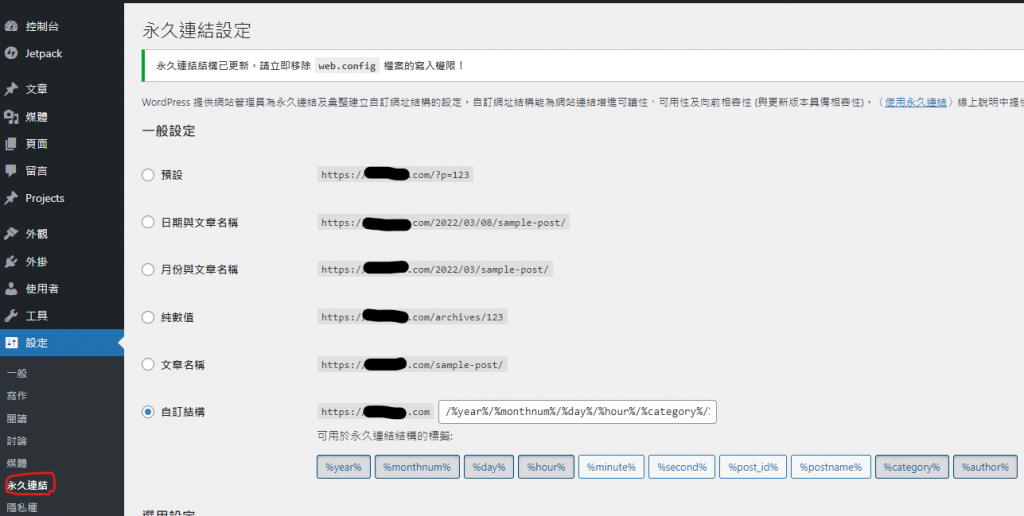
IIS 需要有 URL rewrite 擴充 WordPress 後台要去「設定->永久連結」設定自訂結構 WordPress 中的 web.config 需要加入 rewrite rule
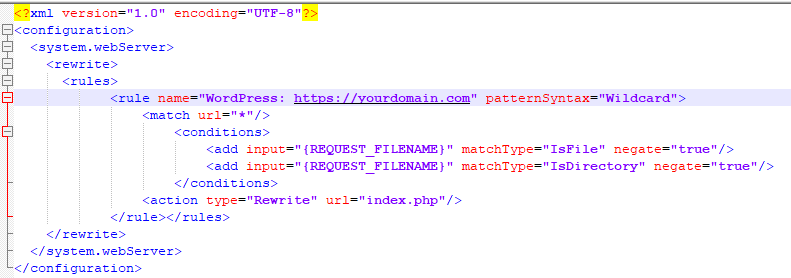
先安裝 IIS 的 URL Rewrite 回到 WordPress 的後台設定永久連結 更改 web.config 設定 rewrite rule <rewrite>
<rules>
<rule name="WordPress: https://yourdomain.com" patternSyntax="Wildcard">
<match url="*"/>
<conditions>
<add input="{REQUEST_FILENAME}" matchType="IsFile" negate="true"/>
<add input="{REQUEST_FILENAME}" matchType="IsDirectory" negate="true"/>
</conditions>
<action type="Rewrite" url="index.php"/>
</rule></rules>
</rewrite> Apache and Nginx 的設定作法
https://www.php.cn/cms/wordpress/459657.html
by Rain Chu 2 月 18, 2022 | IIS , PHP , Windows , wordpress
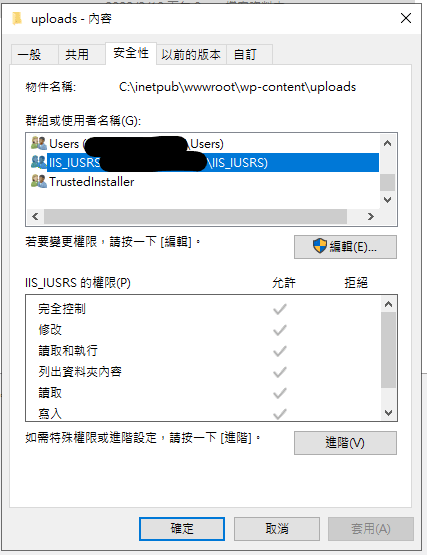
通常用 WordPress 的人,多數會選擇在 Linux + nginx or apache + php 的解決方案,在這個架構下,權限控管通常是 www-data 所去主管的,在 IIS 中的權限控管相對複雜許多,但直接對應 Linux 系統的是 IIS_IUSRS,這次新安裝在 IIS 的 WordPress ,發現了上傳圖片,明明有在目錄中出現,但卻無法在網站中顯示,網站直接存取圖片時候,會發生代碼 500 的錯誤,查證後,確定是圖片的權限無法讓 IIS_IUSRS 讀取,直接將目錄的權限開放後即可在網站上看到上傳的檔案。
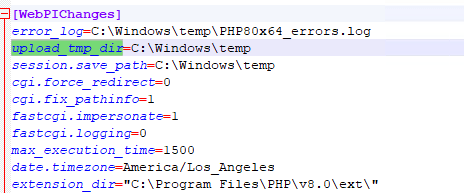
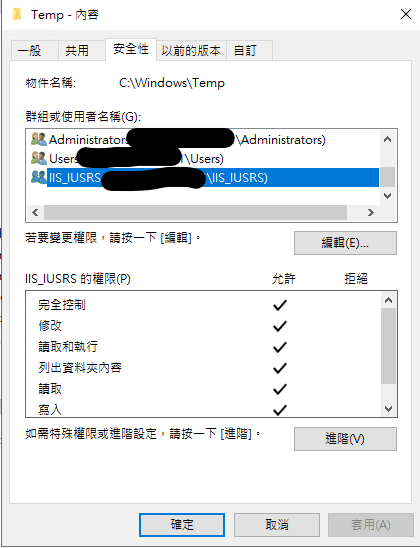
但詭異的是,再次作圖檔上傳測試的時候,發現相同可以上傳但無法顯示圖片的問題一直出現,但只要改了檔案權限後就可以讀取,最後往前去追溯 php 上傳並且產生圖檔的過程後,發現她會先將檔案上傳到 Windows\Temp 然後再複製到 inetpub\wwwroot\wp-content\uploads ,造成檔案的權限是繼承 Windows\Temp 的權限過來的
路徑在C:\Program Files\PHP\v8.0 問題的源頭要將 C:\Windows\temp 的目錄改成讓 IIS_IUSRS 可以修改即可
當你修改 Windows\temp 下的權限會有很多緊告出現,你還可以透過修改 php.ini ,將暫存目錄移動更好的位置中,設定良好的權限後,一直可以解決此一個問題
想知道我如何替PHP除錯?
by Rain Chu 2 月 8, 2022 | PHP , woocommerce , wordpress
WordPress Woocommerce 中,如果是 B2B 的網站或是會員限定的網站,通常會有一個需求,不能對來賓客戶顯示金額,登入後,也應該要對每一個不同的客戶顯示不同的金額,這邊文章先提供如何對沒有登入的客戶隱藏價格,之後再提供不同來賓顯示不同金額
作法很簡單,將以下的程式碼片段,貼到你的佈景主題的 functions.php 即可
// 對訪客隱藏價格
add_filter('woocommerce_get_price_html',function($price){
    if(!is_user_logged_in()){
        return '' ;
    }
    else {
        return $price; // 返回原價
    }});

add_filter('woocommerce_cart_item_price','__return_false');
add_filter('woocommerce_cart_item_subtotal','__return_false');
Woocommerce 如何對不同的使用者權限做價格控制
add_filter( 'woocommerce_get_price_html', function( $price ) {
if ( is_admin() ) return $price;
$user = wp_get_current_user();
$hide_for_roles = array( 'wholesale', 'wholesale-silver', 'wholesale-gold' );
// If one of the user roles is in the list of roles to hide for.
if ( array_intersect( $user->roles, $hide_for_roles ) ) {
return ''; // Return empty string to hide.
}
return $price; // Return original price
} );
add_filter( 'woocommerce_cart_item_price', '__return_false' );
add_filter( 'woocommerce_cart_item_subtotal', '__return_false' );
Woocommerce 如何對不同的類別中的商品做價格控制
add_filter( 'woocommerce_get_price_html', function( $price, $product ) {
if ( is_admin() ) return $price;
// Hide for these category slugs / IDs
$hide_for_categories = array( 'clothes', 'electronics' );
// Don't show price when its in one of the categories
if ( has_term( $hide_for_categories, 'product_cat', $product->get_id() ) ) {
return '';
}
return $price; // Return original price
}, 10, 2 );
add_filter( 'woocommerce_cart_item_price', '__return_false' );
add_filter( 'woocommerce_cart_item_subtotal', '__return_false' );
Woocommerce 如何對特別的商品做價格控制
add_filter( 'woocommerce_get_price_html', function( $price, $product ) {
$hide_for_products = array( 89, 125 );
if ( in_array( $product->get_id(), $hide_for_products ) ) {
return '';
}
return $price; // Return original price
}, 10, 2 );
add_filter( 'woocommerce_cart_item_price', '__return_false' );
add_filter( 'woocommerce_cart_item_subtotal', '__return_false' );
好用外掛推薦
![wordpress 優化 PHP : WARNING: [pool www] seems busy (you may need to increase pm.start_servers, or pm.min/max_spare_servers)](https://rain.tips/wp-content/uploads/2024/03/image-9-1024x733-152401_1024x675.png)
近期留言