by Rain Chu 10 月 31, 2023 | MariaDB , SQL , 資料庫
1. 瞭解 MariaDB Master to Master 備援的重要性
Master to Master (M2M) 備援在 MariaDB 中是非常重要的一種設定。它允許兩個 MariaDB 伺服器雙向地同步資料,確保其中一台伺服器發生問題時,另一台可以立即接手,確保資料的持續可用性。對於那些尋求高可用性和資料完整性的應用程式來說,這是一個非常有用的設定。
2. Windows 環境下的 MariaDB 安裝步驟
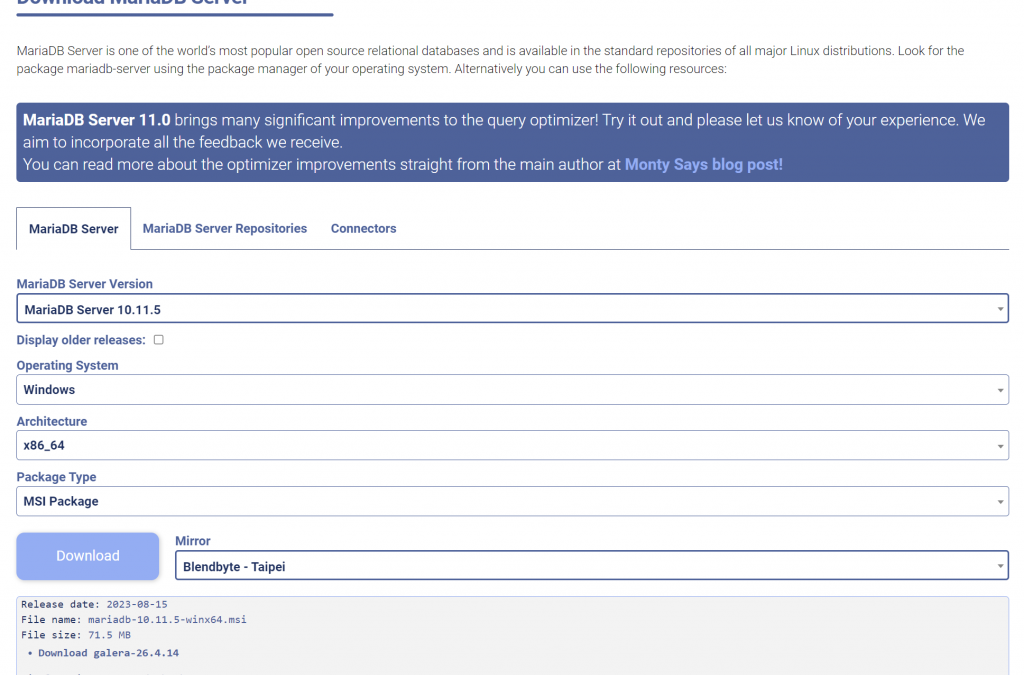
要在 Windows 上設定 M2M,首先需要正確地安裝 MariaDB。下載適用於 Windows 的 MariaDB 版本並執行安裝程式。選擇適當的安裝選項,例如伺服器位置、資料庫大小等。並且確保在安裝過程中設定一個強大的 root 密碼,以確保資料庫的安全。
目前MariaDB長期支援版本為 MariaDB 10.11 版本,11版本則是有最佳化過的,兩者都可以用,可以依照自己的需求做選擇
假設兩台主機如下
Hostname: Master01 ,IP:192.168.0.10
Hostname: Master02 ,IP:192.168.0.11
3. 配置 Master to Master 備援
設定 M2M 備援涉及許多步驟:
修改 my.ini(Windows) 或 my.cnf(Linux) 設定檔,設定 server-id 和 log-bin 參數
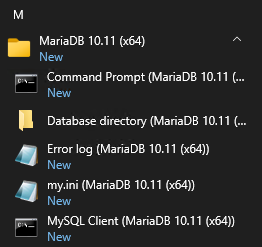
可以在開始功能表中找到my.ini,或是到你安裝時候填寫的資料庫路徑中可以看到my.ini檔案
每個 master 伺服器應該有一個唯一的 server-id,所以要在my.ini設定檔案中加入 server-id、log-bin、log-basename
第一台主機 id 設定為 1
[mysqld]
datadir=C:/Mariadb
port=3306
innodb_buffer_pool_size=2559M
character-set-server=utf8mb4

server-id = 1
log-bin
log-basename = master01
第二台主機 id 設定為 2
[mysqld]
datadir=C:/Mariadb
port=3306
innodb_buffer_pool_size=2559M
character-set-server=utf8mb4

server-id = 2
log-bin
log-basename = master02
在每台伺服器上建立用於備援的使用者帳號,並授予該使用者適當的權限。
在第一台主機 master01 上,新增一個使用者,讓 slave 主機可以透過192.168.0.X的網段連進來
grant replication slave on *.* to 'replica_user'@192.168.0.% identified by '123456';
flush privileges;
在第二台主機 master02 上,新增一個使用者,並且要讓 master01 主機的 IP 可以連進來
grant replication slave on *.* to 'replica_user'@192.168.0.% identified by '123456';
flush privileges;
設定 replication filters,確保只有需要的資料被同步。
啟動二進制日誌(binary logging)並確認每台伺服器都可以互相連接。
4. 測試 Master to Master 備援
在完成設定後,你應該測試 M2M 備援以確保它正常工作。首先,在一台伺服器上添加或修改一些資料,然後檢查另一台伺服器是否已同步這些變更。同樣地,從另一台伺服器修改資料並檢查第一台伺服器。此過程應確保資料在兩個伺服器之間正確同步。
在 Master01 中,查詢 File 和 Position,並且把值記錄下來,等等要填到 master02
在 master02 中,把 master01 的數值填入,並且建立連結
change master to master_host='192.168.0.10',
    -> master_user='replica_user',
    -> master_password='123456',
    -> master_log_file='master01-bin.000001',
    -> master_log_pos=5099;

start slave;
接下來檢查是否有設定成功
接下來回到 master01 去設定跟 master02 的連接
change master to master_host='192.168.0.11',
    -> master_user='replica_user',
    -> master_password='123456',
    -> master_log_file='master02-bin.000002',
    -> master_log_pos=5079;

start slave;
5. 維護和監控 Master to Master 備援
一旦 M2M 備援設定完畢並經過測試,你需要持續監控以確保它正常運作。使用如 MariaDB 的 SHOW SLAVE STATUS 命令來檢查備援的狀態。此外,考慮使用監控工具,如 Nagios 或 Zabbix,來自動檢查伺服器的健康狀態。
相關文章
by Rain Chu 10 月 19, 2023 | Nginx , SERVER
Nginx 是一個高效能、高穩定性的 Web 伺服器。其中,Nginx 提供的 fastcgi_cache 可以有效地快取後端伺服器(如 PHP-FPM)的回應,以提高網站的回應速度。但在預設情況下,我們需要手動清理這些快取。此時,我們可以使用 NGINX Helper 插件來協助進行快取的清除。
前期準備
要有編譯器
NGINX Helper
1. 安裝 NGINX Helper
首先,你需要在你的網站上安裝 NGINX Helper。如果你使用的是 WordPress,可以直接從插件庫中安裝。
2. 設定 NGINX 快取路徑
為了讓 NGINX Helper 知道你的 Nginx 快取路徑,你需要在 Nginx 的設定檔中,指定 fastcgi_cache_path。例如:
fastcgi_cache_path /var/run/nginx-cache levels=1:2 keys_zone=MYCACHE:100m inactive=60m; 此設定將會在 /var/run/nginx-cache 建立快取資料。
3. 配置 NGINX Helper
在 WordPress 的設定中,找到 NGINX Helper 的設定頁面,並啟用以下選項:
Enable Cache Purge
Purge Entire Cache when a post or page is published
並設定你的 Nginx 快取路徑(如 /var/run/nginx-cache)。
4. 手動清除快取
若需要手動清除快取,可以直接在 NGINX Helper 的設定頁面點選 “Purge Entire Cache” 按鈕。
5. Nginx 設定更新
確保你的 Nginx 設定檔有啟用快取清除功能:
location ~ /purge(/.*) { fastcgi_cache_purge MYCACHE "$scheme$request_method$host$1"; } 6.重新加載 Nginx 以使新設定生效。Copy code
sudo systemctl reload nginx
安裝 Nginx 新版包含有ngx_cache_purge
1.備份配置 :
在進行任何更改之前,確保備份你當前的 Nginx 配置,以防止任何數據丟失。
sudo cp -r /etc/nginx /etc/nginx-backup 停止和卸載現有的 Nginx :首先,停止 Nginx 服務:
sudo systemctl stop nginx 然後,卸載 Ubuntu 的 Nginx 版本:
sudo apt-get purge nginx nginx-common nginx-full 下載 OpenSSL
wget -c https://www.openssl.org/source/openssl-3.0.11.tar.gz ; tar zxf openssl-3.0.11.tar.gz ; rm openssl-3.0.11.tar.gz 下載第三方模組
安裝 ngx_cache_purge
下載最新版本 https://github.com/nginx-modules/ngx_cache_purge/releases
wget https://github.com/nginx-modules/ngx_cache_purge/archive/refs/tags/2.5.3.tar.gz
tar -xvzf 2.5.3.tar.gz
ngx_brotli
git clone https://github.com/google/ngx_brotli.git
pushd ngx_brotli
git submodule update --init
popd
編譯 ngx_brotli
cd ~/ngx_brotli/deps/brotli/c
mkdir -p out
cmake ..
make
編譯和安裝 Nginx 1.2 :如果你還沒有下載和編譯 Nginx 1.2,首先下載源代碼,然後編譯和安裝它:
sudo apt-get update
sudo apt-get install libpcre3 libpcre3-dev

wget https://nginx.org/download/nginx-1.24.0.tar.gz

tar -xvzf nginx-1.24.0.tar.gz

cd nginx-1.24.0/

./configure --with-pcre=../pcre-8.45 \
--http-log-path=/var/log/nginx/access.log \
--error-log-path=/var/log/nginx/error.log \
--with-http_ssl_module \
--with-http_gzip_static_module \
--with-openssl=../openssl-3.0.11 \
--add-module=../ngx_brotli \
--add-module=../ngx_cache_purge-2.5.3

make

sudo make install
預設情況下,自行編譯的 Nginx 會被安裝到 /usr/local/nginx。
如果出現下面的錯誤
./configure: error: the HTTP rewrite module requires the PCRE library.
You can either disable the module by using --without-http_rewrite_module
option, or install the PCRE library into the system, or build the PCRE library
statically from the source with nginx by using --with-pcre=<path> option.
代表你apt-get install libpcre3 libpcre3-dev這邊出現問題
可以自行安裝 PCRE
wget https://ftp.exim.org/pub/pcre/pcre-8.45.tar.gz
tar -xvzf pcre-8.45.tar.gz

./configure --with-pcre=../pcre-8.45 \
--http-log-path=/var/log/nginx/access.log \
--error-log-path=/var/log/nginx/error.log \
--with-http_ssl_module \
--with-http_gzip_static_module \
--with-openssl=../openssl-3.0.11 \
--add-module=../ngx_brotli \
--add-module=../ngx_cache_purge-2.5.3
如果出現gzip錯誤
./configure: error: the HTTP gzip module requires the zlib library.
You can either disable the module by using --without-http_gzip_module
option, or install the zlib library into the system, or build the zlib library
statically from the source with nginx by using --with-zlib=<path> option.
那可以自行安中 zlib
sudo apt-get update
sudo apt-get install zlib1g zlib1g-dev
如果出現 cannot find -lbrotlienc or cannot find -lbrotlicommon ,那需要安裝 Brotli
sudo apt update
sudo apt install libbrotli-dev
驗證 Brotli 是否安裝成功
ldconfig -p | grep brotli 檢查安裝是否成功
sudo /usr/local/nginx/sbin/nginx -V 配置系統啟動腳本 :如果你希望 Nginx 在系統啟動時自動運行,你需要設置一個 systemd 服務文件或 init 腳本。由於你從源代碼編譯 Nginx,它不會自帶 systemd 服務文件,所以你可能需要自行創建。
恢復配置 :從你之前備份的配置恢復設置:
sudo cp -r /etc/nginx-backup/* /usr/local/nginx/conf/ 請注意,由於 Nginx 版本之間可能存在差異,所以你可能需要調整配置以使其與 Nginx 1.2 版本兼容。
啟動新的 Nginx :sudo /usr/local/nginx/sbin/nginx
要使 /usr/local/nginx/sbin/nginx 可在任何地方都能執行
使用符號鏈接 :你可以在 /usr/bin 或 /usr/sbin 中創建一個指向 /usr/local/nginx/sbin/nginx 的符號鏈接。這樣,由於 /usr/bin 和 /usr/sbin 通常都在 $PATH 環境變量中,你就可以從任何地方執行 nginx 命令。
sudo ln -s /usr/local/nginx/sbin/nginx /usr/sbin/nginx 修改 $PATH 變量 :作為另一種方法,你可以將 /usr/local/nginx/sbin 目錄添加到 $PATH 環境變量中。這可以在你的 shell 啟動腳本中完成,例如 ~/.bashrc 或 ~/.profile。打開 ~/.bashrc 文件:
在文件末尾添加以下行:
export PATH=$PATH:/usr/local/nginx/sbin 然後,重新加載 .bashrc 以應用更改:
管理 Nginx
你可以直接從GitHub下載nginx-startup-script-for-debian-ubuntu.sh 至你的『/etc/init.d』目錄,並將名稱更改為『nginx』。
sudo wget -O /etc/init.d/nginx https://raw.githubusercontent.com/KJieGitHub/Nginx/master/nginx-script/nginx-startup/nginx-startup-script-for-debian-ubuntu.sh
sudo chmod +x /etc/init.d/nginx
sudo systemctl daemon-reload
sudo systemctl start nginx
sudo update-rc.d -f nginx defaults
實用管理命令
sudo systemctl start nginx
sudo systemctl stop nginx
sudo systemctl restart nginx
sudo systemctl reload nginx
實用連結
Nginx 版本以及下載連結
https://nginx.org/en/download.html
Nginx 第三方模組
NGINX 3rd Party Modules
參考資料
https://www.kjnotes.com/devtools/83
https://github.com/FRiCKLE/ngx_cache_purge
完整版本的 Nginx Config
proxy_cache_path /var/run/proxy_cache/ levels=1:2 keys_zone=demo-proxy:10m max_size=1000m inactive=600m use_temp_path=off;
fastcgi_cache_use_stale error timeout invalid_header http_500;
fastcgi_ignore_headers Cache-Control Expires Set-Cookie;

server {
		listen 80;
        server_name yoursite;

        proxy_cache demo-proxy;
        proxy_cache_valid 200 1d;

        #設定上傳的檔案大小
        client_max_body_size 64M;

        set $skip_cache 0;
        add_header X-Cache $upstream_cache_status;

        if ($request_method = POST) {
            set $skip_cache 1;
        }

        if ($query_string != "") {
            set $skip_cache 1;
        }

        if ($request_uri ~* "/wp-admin/|/xmlrpc.php|wp-.*.php|^/feed/*|/tag/.*/feed/*|index.php|/.*sitemap.*\.(xml|xsl)") {
            set $skip_cache 1;
        }

        if ($http_cookie ~* "comment_author|wordpress_[a-f0-9]+wp-postpass|wordpress_no_cache|wordpress_logged_in") {
            set $skip_cache 1;
        }

        location / {
                proxy_cache_bypass $skip_cache;
                proxy_no_cache $skip_cache;

                proxy_hide_header X-Frame-Options;
                proxy_pass http://X.X.X.X:X;
                proxy_set_header Host $host;
                proxy_set_header X-Real-IP $remote_addr;
                proxy_set_header X-Forwarded-For $proxy_add_x_forwarded_for;
                proxy_set_header X-Forwarded-Proto $scheme;
                proxy_cache        demo-proxy;
                proxy_cache_key    $uri$is_args$args;

        }

    location ~ /purge(/.*) {
        allow 127.0.0.1;
        proxy_cache_purge  demo-proxy $1$is_args$args;
    }
}
by Rain Chu 6 月 29, 2023 | SERVER , SQL
在數據庫管理和開發過程中,經常需要讓 MariaDB 數據庫與外部主機進行連線,尤其是主機需要擴展或是效能調教時候,不能在把WEB和SQL DB放在同一台主機上,這時候就會有需求把SQL主機開放出來,記得在沒加密的情況下不要放到外部網路上。
第一步 : 配置防火牆
將 Port 3306 開放外面存取,較安全的做法是限定 IP 可以存取。
第二步 : 修改 MariaDB 設定檔
找到 my.cnf 或 mariadb.cnf 或 50-server.cnf,會在 /etc/mysql/mariadb.conf.d/ 下,進入檔案編輯,找到 bind-address = 127.0.0.1 ,將這行的最前面加入 #
#bind-address = 127.0.0.1 第三步 : 將外部存取的權限授予使用者
使用 root 帳戶登錄到 MariaDB,然後為外部連接創建一個新的使用者或賦予現有使用者許可權。使用 GRANT 語句來設定使用者的權限和訪問控制
GRANT ALL PRIVILEGES ON *.* TO 'root'@'%' IDENTIFIED by 'yourpassword' WITH GRANT OPTION;
flush privileges;
exit
第四步 : 重啟 MariaDB
sudo systemctl restart mariadb 相關文章
by Rain Chu 2 月 22, 2023 | Microsoft , SERVER , SQL
正常情況安裝完 MS SQL SERVER 後,防火牆都還需要手動打開,SQL SERVER要去開放網路連線協定,我這邊提供一次搞定的批次檔,只要下載到電腦中,並且用管理員權限執行就可以了,以下示範一下如何打開以及注意事項
示範用的環境
Windows server 2022
SQL Server 2022
SQL Server Configuration Manager的設定
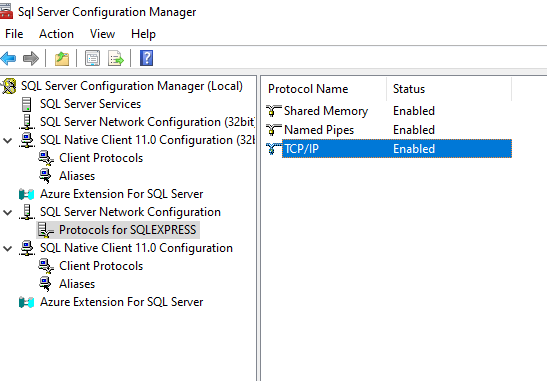
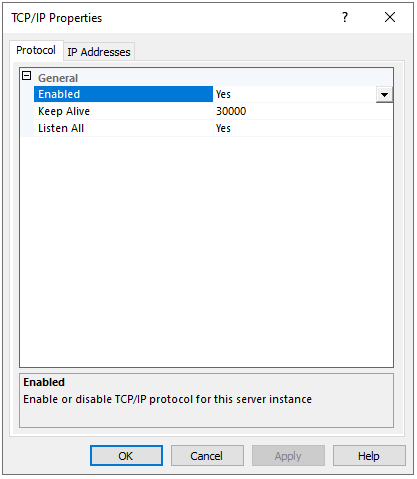
要先打開 SQL 的服務,所以先到 SQL Configuration Manager 中,把 TCP/IP 的協定打開
SQL Server Configuration Manager Network Protocols SQL Server Configuration Manager Network Protocols TCP/IP SQL Server Configuration Manager Network Protocols TCP/IP Enabled 防火牆設定
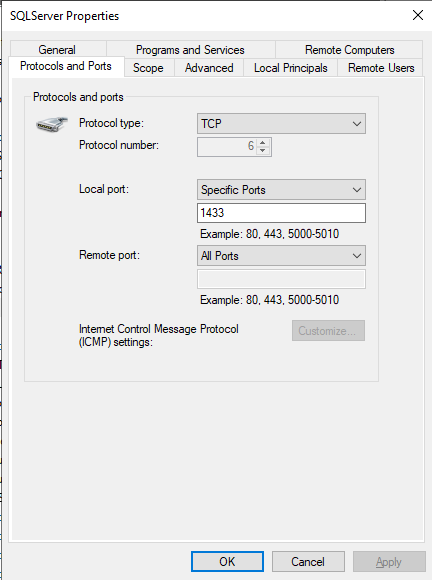
MS SQL SERVER 預設的 PORT 是 1433,打開這一個就可以正常連線
使用 Script 將所有的防火牆設定一次搞定
@echo =========  SQL Server Ports  ===================
@echo Enabling SQLServer default instance port 1433
netsh firewall set portopening TCP 1433 "SQLServer"
@echo Enabling Dedicated Admin Connection port 1434
netsh firewall set portopening TCP 1434 "SQL Admin Connection"
@echo Enabling conventional SQL Server Service Broker port 4022
netsh firewall set portopening TCP 4022 "SQL Service Broker"
@echo Enabling Transact-SQL Debugger/RPC port 135
netsh firewall set portopening TCP 135 "SQL Debugger/RPC"
@echo =========  Analysis Services Ports  ==============
@echo Enabling SSAS Default Instance port 2383
netsh firewall set portopening TCP 2383 "Analysis Services"
@echo Enabling SQL Server Browser Service port 2382
netsh firewall set portopening TCP 2382 "SQL Browser"
@echo =========  Misc Applications  ==============
@echo Enabling HTTP port 80
netsh firewall set portopening TCP 80 "HTTP"
@echo Enabling SSL port 443
netsh firewall set portopening TCP 443 "SSL"
@echo Enabling port for SQL Server Browser Service's 'Browse' Button
netsh firewall set portopening UDP 1434 "SQL Browser"
@echo Allowing multicast broadcast response on UDP (Browser Service Enumerations OK)
netsh firewall set multicastbroadcastresponse ENABLE
下載已經寫好的bat檔案
參考資料
http://support.microsoft.com/kb/968872/zh-tw
by Rain Chu 11 月 15, 2022 | Azure , Microsoft , SERVER , Windows
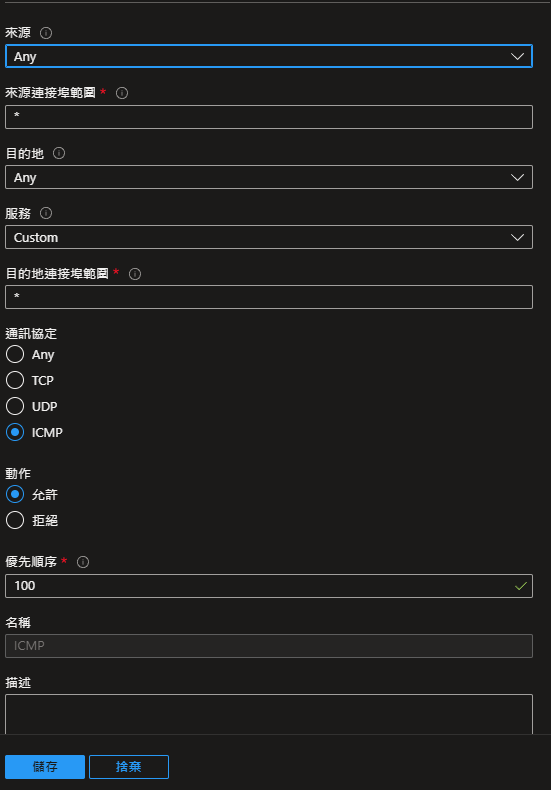
預設在 Microsoft Azure 的 VM 中,ICMP服務協定是關閉的,但常常有需要用ping指令來確認服務是否還存在,打開方法不講的話要找很久,原則上只要在 Azure 中設定,並且到 VM 中將防火牆打開即可
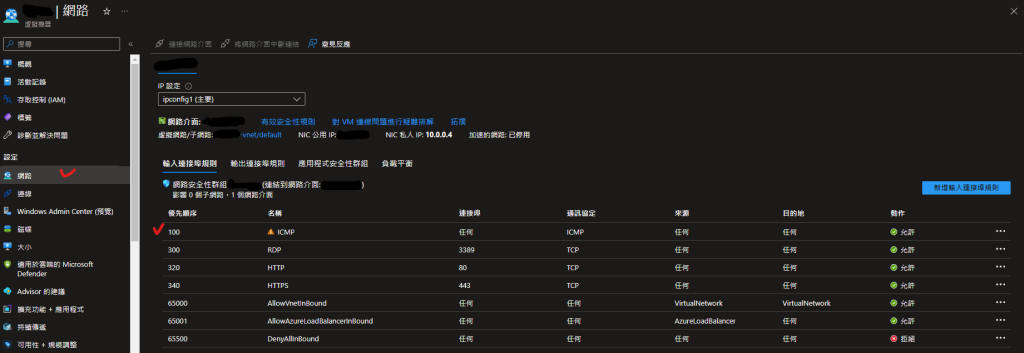
1.Azure中的設定
找到「VM」的「網路」,選擇「新增輸入連接埠規則」
並且輸入any和*
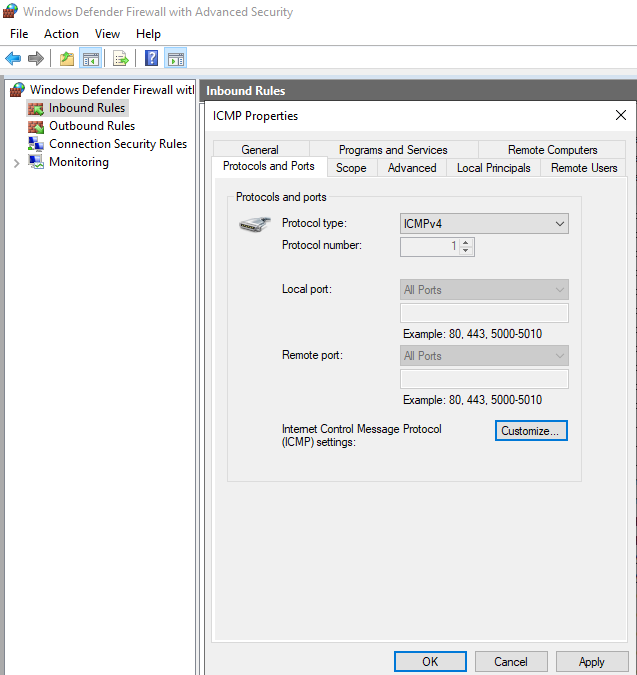
2.Windows Server Firewall 防火牆設定
新增 Inbound Rules ,把ICMPv4和ICMPv6兩個協定加入即可
VIDEO
ICMP 協定
by Rain Chu 5 月 13, 2022 | Nginx , PHP , wordpress
我的系統是 Ubuntu 20 + Nginx + Php7.4-fpm ,遇到不能安裝程式,安裝到一半都會停掉,去檢查 /var/log/php7.4fpm.log ,發現出現 warning message
warning : [pool www] seems busy (you may need to increase pm.start_servers, or pm.min/max_spare_servers), spawning 32 children, there are 0 idle, and 15 total children
我的解決方法是去到 /etc/php/7.4/fpm/pool.d 下打開 www.conf
sudo nano /etc/php/7.4/fpm/pool.d/www.conf 然後改善 pm 的相關設定值,以我的機器為例,16GB RAM,CPU 4 顆,我的設定值參考公式為
pm.start_servers = min_spare_servers + (max_spare_servers - min_spare_servers) / 2 所以我修改的參數如下
pm = dynamic
pm.max_children = 30 # 10-30 間是常見的設定
pm.start_servers = 10
pm.min_spare_servers = 10
pm.max_spare_servers = 10
pm.max_requests = 5000
修改完畢之後,重啟就不會看到問題了
pm.max_children 的合理配置方法
要合理的評估一個數字,要先考量以下幾點
伺服器可用的記憶體 (RAM):確認伺服器總共有多少記憶體可供 PHP-FPM 使用。每個 PHP 進程的平均記憶體消耗量 :觀察或測試你的應用,以確定每個 PHP 進程大概需要多少記憶體。保留記憶體 :為作業系統和其他服務保留一部分記憶體,以確保系統穩定運行。
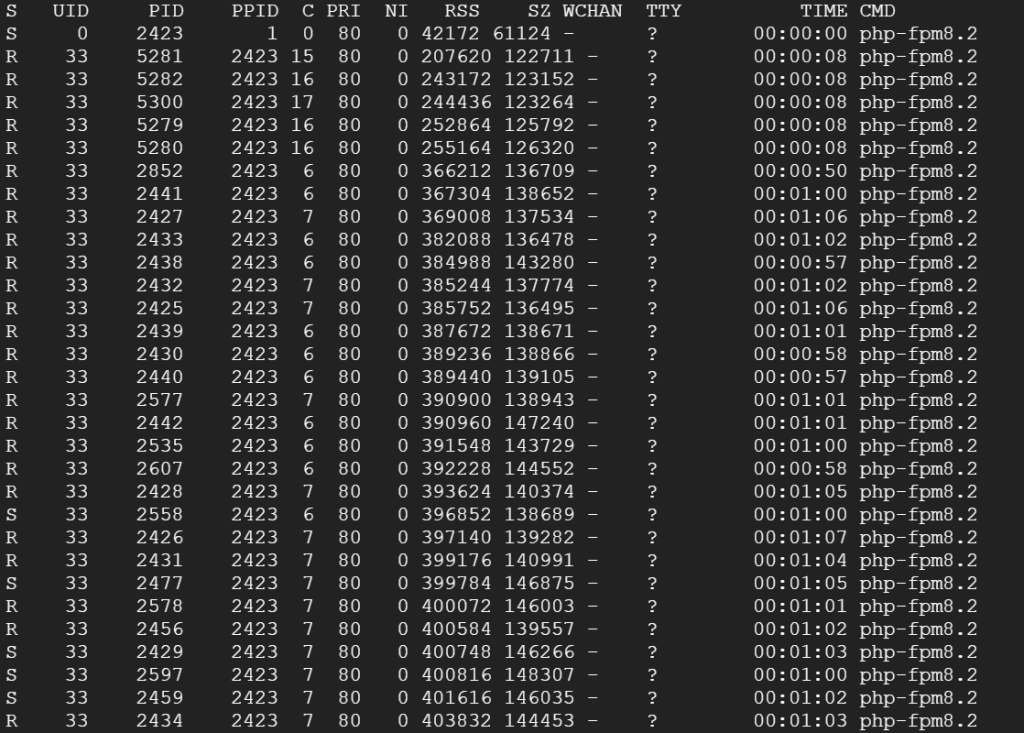
步驟 1:測量 PHP 進程的平均記憶體消耗
ps -ylC php-fpm8.2 --sort:rss 找到 RSS 列的值(常駐集大小),將它們加起來,然後除以 PHP-FPM 進程的數量,得到平均記憶體消耗量(單位是 KB)。
步驟 2:計算可用記憶體
確定伺服器上為 PHP-FPM 分配的記憶體總量。如果伺服器僅運行 PHP-FPM(例如,沒有資料庫等其他服務),則可以減去為作業系統和其他必要服務保留的記憶體量。一個常見的保留量是 512MB 到 1GB。
步驟 3:計算 pm.max_children
利用以下公式
pm.max_children = (伺服器可用記憶體 – 保留記憶體) / 平均每個 PHP 進程的記憶體消耗
假設:
伺服器有 6GB(6144MB)的 RAM。
作業系統和其他服務保留了 1GB(1024MB)。
通過測量,你發現每個 PHP 進程平均消耗 50MB 記憶體
pm.max_children = (6144MB – 1024MB) / 50MB = 102.4
在這個例子中,你可以將 pm.max_children 設置為大約 100。
注意 :始終留有足夠的餘地來處理意外的高峰,不要將所有資源都分配給 PHP-FPM,以避免伺服器過載。此外,實際部署後,應監控伺服器性能,並根據需要調整 pm.max_children 的值。
參考資料如下
https://www.gushiciku.cn/pl/p9Vf/zh-tw
![wordpress 優化 PHP : WARNING: [pool www] seems busy (you may need to increase pm.start_servers, or pm.min/max_spare_servers)](https://rain.tips/wp-content/uploads/2024/03/image-9-1024x733-152401_1024x675.png)
近期留言