by Rain Chu 8 月 18, 2022 | woocommerce , wordpress
電子商務、課程、遊戲型的網站,都有其特別要記錄的事件以及標籤,這時候一個一個自己慢慢的建立或是編寫的話,會需要耗費不少心力,還好用 WordPress 在處理我的部落格和商城,可以直接使用外掛 GTM4WP ,並且採用她預先已經定義好的 json 來快速建立電子商務流程或是表單的追蹤程式碼。
設定 WordPress 的 GTM4WP
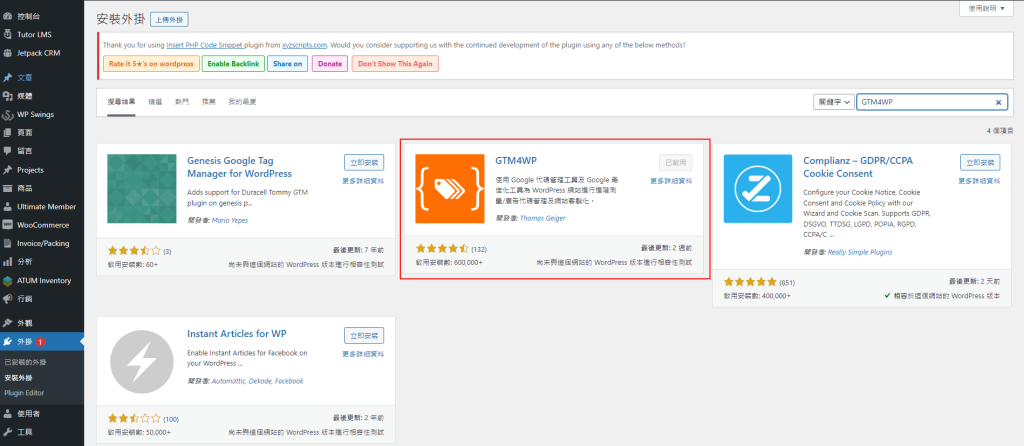
首先安裝外掛 – GTM4WP
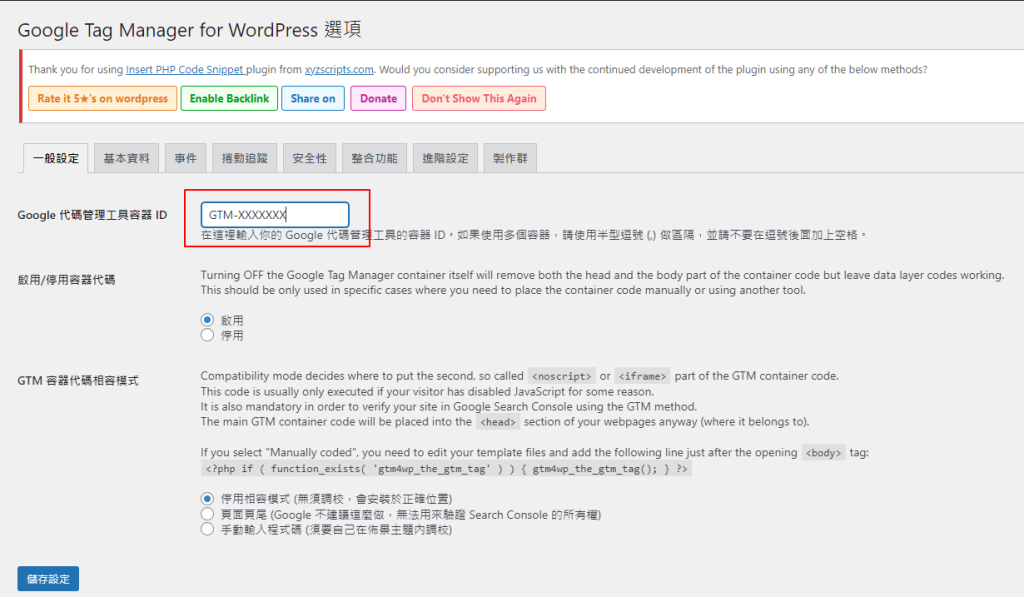
GTM4WP 設定 GTM 代碼 ID
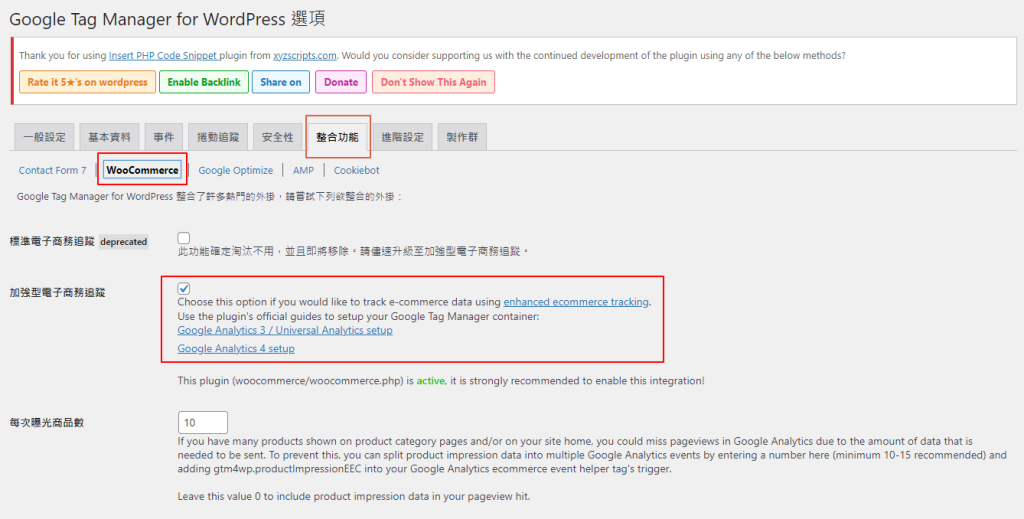
將 woocommerce 追蹤功能啟用
啟用 woocommerce 加強型電子商務追蹤功能 設置 Google GTM
去到 https://tagmanager.google.com/ 設定一個新的 GA4 的代碼
GTM GA4 代碼設定說明 導入GTM4WP Google Analytics 4容器範本
下載範本 https://gtm4wp.com/gtm-containers/gtm4wp-ga4-container-elements-20200419.json
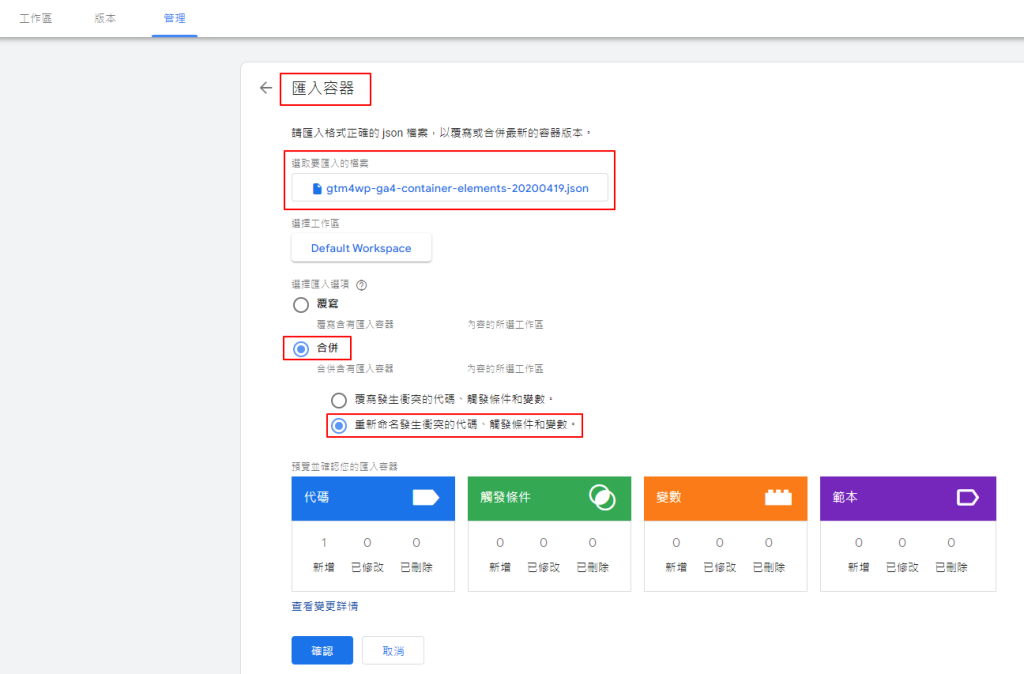
並且去到 「管理」 中的 「匯入容器」上傳範本
gtm4wp ga4 container 範本 過程中會創建預設好的事件以及代碼
預設事件以及代碼 完成新創建的電子商務事件代碼
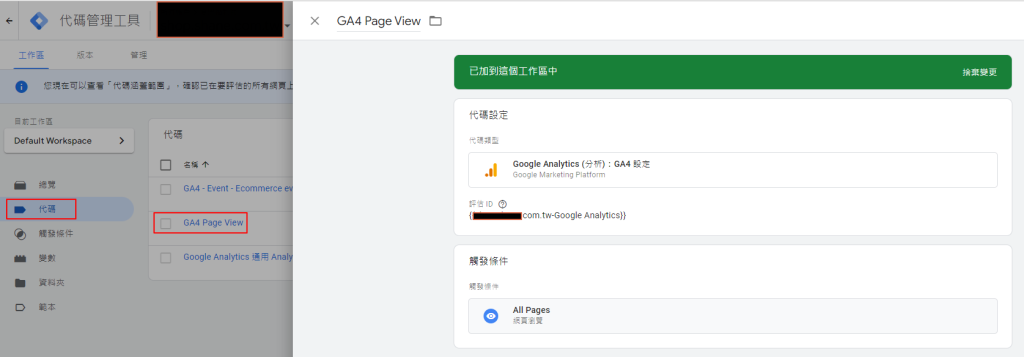
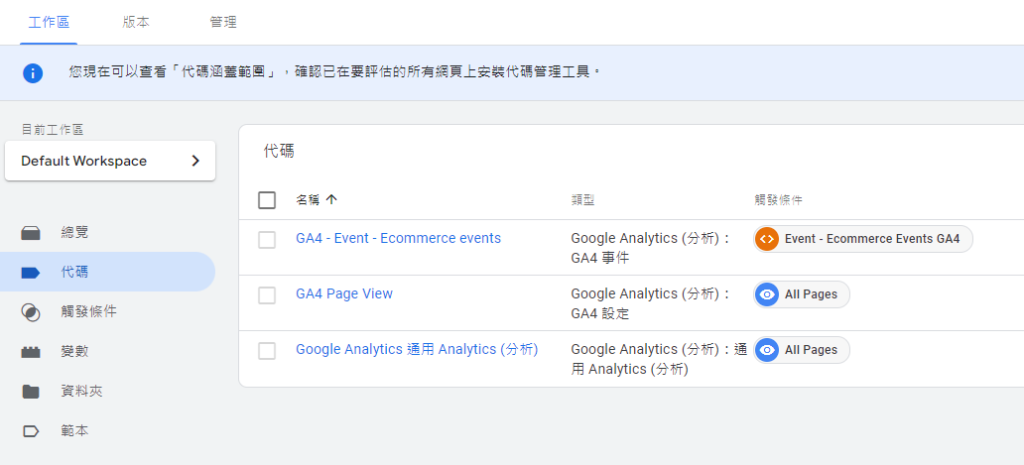
在前面你應該已經有了 “Google Analyitcs 4: GA4 configuration tag” 打開 “GA4 – Event – Ecommerce events” 打開 Configuration Tag drop down 選擇 GA4 configuration tag 存檔即可 別忘了要驗證是否成功
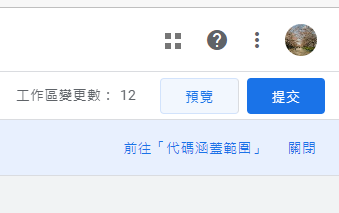
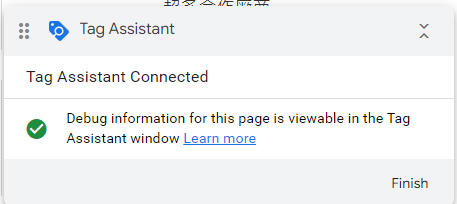
按下預覽按鈕
看到連線成功就可以了
參考資料
啟用 GA 加強型電子商務報表,追蹤 Woocommerce 銷售數據 | WebLai
為 WooCommerce 啟用 GA 加強型電子商務功能 | applemint Ltd.
谷歌分析4 / GA4 – 增強的電子商務跟蹤 – 如何設置?- 谷歌跟蹤管理器外掛程式為WordPress (gtm4wp.com)
[GA4] 建議事件 – Analytics (分析)說明 (google.com)
https://analytics.google.com/
https://tagmanager.google.com/
by Rain Chu 8 月 5, 2022 | woocommerce , wordpress
在寫 woocommerce 的程式時候,最常使用到的就是 $order 這個參數了,每次都要用 Google 查找很不方便,這次把它整理並且記錄起來,當作簡易字典查找,就快速且簡單的多了,也謝謝 Rodolfo Melogli 大神分享了好用的文章。
// Get Order ID and Key
$order->get_id();
$order->get_order_key();

// Get Order Totals $0.00
$order->get_formatted_order_total();
$order->get_cart_tax();
$order->get_currency();
$order->get_discount_tax();
$order->get_discount_to_display();
$order->get_discount_total();
$order->get_fees();
$order->get_formatted_line_subtotal();
$order->get_shipping_tax();
$order->get_shipping_total();
$order->get_subtotal();
$order->get_subtotal_to_display();
$order->get_tax_location();
$order->get_tax_totals();
$order->get_taxes();
$order->get_total();
$order->get_total_discount();
$order->get_total_tax();
$order->get_total_refunded();
$order->get_total_tax_refunded();
$order->get_total_shipping_refunded();
$order->get_item_count_refunded();
$order->get_total_qty_refunded();
$order->get_qty_refunded_for_item();
$order->get_total_refunded_for_item();
$order->get_tax_refunded_for_item();
$order->get_total_tax_refunded_by_rate_id();
$order->get_remaining_refund_amount();

// Get and Loop Over Order Items
foreach ( $order->get_items() as $item_id => $item ) {
   $product_id = $item->get_product_id();
   $variation_id = $item->get_variation_id();
   $product = $item->get_product(); // see link above to get $product info
   $product_name = $item->get_name();
   $quantity = $item->get_quantity();
   $subtotal = $item->get_subtotal();
   $total = $item->get_total();
   $tax = $item->get_subtotal_tax();
   $tax_class = $item->get_tax_class();
   $tax_status = $item->get_tax_status();
   $allmeta = $item->get_meta_data();
   $somemeta = $item->get_meta( '_whatever', true );
   $item_type = $item->get_type(); // e.g. "line_item"
}

// Other Secondary Items Stuff
$order->get_items_key();
$order->get_items_tax_classes();
$order->get_item_count();
$order->get_item_total();
$order->get_downloadable_items();
$order->get_coupon_codes();

// Get Order Lines
$order->get_line_subtotal();
$order->get_line_tax();
$order->get_line_total();

// Get Order Shipping
$order->get_shipping_method();
$order->get_shipping_methods();
$order->get_shipping_to_display();

// Get Order Dates
$order->get_date_created();
$order->get_date_modified();
$order->get_date_completed();
$order->get_date_paid();

// Get Order User, Billing & Shipping Addresses
$order->get_customer_id();
$order->get_user_id();
$order->get_user();
$order->get_customer_ip_address();
$order->get_customer_user_agent();
$order->get_created_via();
$order->get_customer_note();
$order->get_address_prop();
$order->get_billing_first_name();
$order->get_billing_last_name();
$order->get_billing_company();
$order->get_billing_address_1();
$order->get_billing_address_2();
$order->get_billing_city();
$order->get_billing_state();
$order->get_billing_postcode();
$order->get_billing_country();
$order->get_billing_email();
$order->get_billing_phone();
$order->get_shipping_first_name();
$order->get_shipping_last_name();
$order->get_shipping_company();
$order->get_shipping_address_1();
$order->get_shipping_address_2();
$order->get_shipping_city();
$order->get_shipping_state();
$order->get_shipping_postcode();
$order->get_shipping_country();
$order->get_address();
$order->get_shipping_address_map_url();
$order->get_formatted_billing_full_name();
$order->get_formatted_shipping_full_name();
$order->get_formatted_billing_address();
$order->get_formatted_shipping_address();

// Get Order Payment Details
$order->get_payment_method();
$order->get_payment_method_title();
$order->get_transaction_id();

// Get Order URLs
$order->get_checkout_payment_url();
$order->get_checkout_order_received_url();
$order->get_cancel_order_url();
$order->get_cancel_order_url_raw();
$order->get_cancel_endpoint();
$order->get_view_order_url();
$order->get_edit_order_url();

// Get Order Status
$order->get_status();

// Get Thank You Page URL
$order->get_checkout_order_received_url();
參考資料
https://woocommerce.github.io/code-reference/
by Rain Chu 7 月 27, 2022 | woocommerce , wordpress
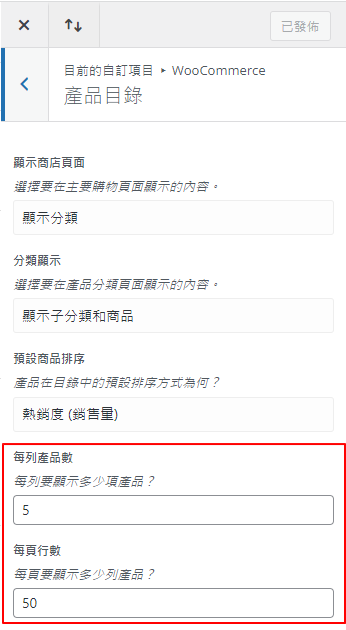
在還沒有安裝 Divi 外掛的時候,想要修改 woocommerce 的每頁商品顯示數量,是需要去後台 外觀 -> 自訂 -> 佈景主題 -> woocommerce -> 產品目錄下修改每列產品數以及每頁行數的,但現在安裝了 Divi 外掛後,要改到後台 Divi -> Theme Options -> General 中,修改下面兩個項目才行
Number of Posts displayed on Archive pages Number of Products displayed on WooCommerce archive pages 預設 WooCommerce 修改每頁商品顯示數量處
外觀 -> 佈景主題 -> 自訂 -> woocommerce -> 產品目錄
Divi 修改每頁商品顯示數量處
Divi -> Theme Options -> General
by Rain Chu 6 月 9, 2022 | woocommerce , wordpress
woocommerce 在 wordpress 中是可以擁有自己的除錯系統的,可以獨立在 wordpress, php, nginx 以外,可以利用 WooCommerce 官方提供的 Log 記錄功能,可以記錄各種狀態,和自己的標籤,可以比較有秩序且快速的除錯
使用 WC_Logger
WC_Logger官方文件 示範了標準用法
$log = new WC_Logger();
$log_entry = print_r( $e, true );
$log_entry .= 'Exception Trace: ' . print_r( $e->getTraceAsString(), true );
$log->log( 'new-woocommerce-log-name', $log_entry );
簡易用法
$logger = wc_get_logger();
$logger->debug( 'debug message', array( 'source' => 'my-extension' ) );
查看 WC Log
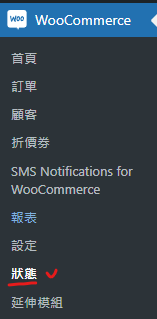
在 WP 後台,選擇 WooCommerce -> 狀態
並且選擇 狀態 -> 日誌紀錄 ,選擇完畢後,在選擇你建立的紀錄標籤後,就可以看到清楚的訊息輸出了
同廠加映,用WordPress內建的除錯
編輯 wp-config,將 WP_DEBUG 的選項打開,缺點就是訊息太多,比較不好看清楚
define( 'WP_DEBUG', true );
define( 'WP_DEBUG_LOG', true );
define( 'WP_DEBUG_DISPLAY', false );
by Rain Chu 3 月 25, 2022 | woocommerce , wordpress
網路上有很多解決在 woocommerce 的分類目錄中,隱藏無庫存商品的方法,但都不合我用,只好自己動手寫一個適合的,設計的思維是,在取得商品的之前 (pre_get_posts) ,我們判斷商品是否已經無庫存,是的話,我們就把發布狀態設定為私密 (private),型錄可見度設定為「隱藏」
在 functions.php 中加入以下的程式碼
// 在目錄中隱藏無庫存的商品
add_action( 'pre_get_posts', 'custom_pre_get_posts_query' );
function custom_pre_get_posts_query( $q ) {
if ( ! $q->is_main_query() ) return;
if ( ! $q->is_post_type_archive() ) return;
if ( ! is_admin() ) {

$q->set( 'tax_query', array(array(
'taxonomy' => 'product_cat',
'field' => 'slug',
'terms' => array( 'sb00001' ), // 設定在那幾個目錄中要處理,多個目錄的話用逗號分隔
'operator' => 'NOT IN',
'post_status' => 'private',
)));
}
remove_action( 'pre_get_posts', 'custom_pre_get_posts_query' );
}
2022-03-28 更新
上面的寫法不一定成功,補充另一個寫法,只要在商品庫存量被變更的時候,去將商品的顯示狀態設定成隱藏起來就可以了
add_action( 'pre_get_posts', 'custom_pre_get_posts_query' );
function custom_pre_get_posts_query( $q ) {
if ( ! $q->is_main_query() ) return;
if ( ! $q->is_post_type_archive() ) return;
if ( ! is_admin() ) {

global $wpdb;
$results = $wpdb->get_results(
'SELECT * FROM `wp_aws_index` c WHERE c.id in (SELECT a.ID FROM `wp_posts` a
join `wp_postmeta` b ON a.ID = b.post_id
where b.meta_key = "_stock_status" and b.meta_value = "outofstock");

UPDATE `wp_aws_index` c SET c.visibility = "hidden" WHERE c.id in
(SELECT a.ID FROM `wp_posts` a join `wp_postmeta` b ON a.ID = b.post_id where b.meta_key = "_stock_status" and b.meta_value = "outofstock");

DELETE FROM `wp_aws_cache`;
delete from `wp_term_relationships` WHERE `term_taxonomy_id` = 7 AND `object_id` in (SELECT a.ID FROM `wp_posts` a join `wp_postmeta` b ON a.ID = b.post_id where b.meta_key = "_stock_status" and b.meta_value = "outofstock");
INSERT INTO `wp_term_relationships` (`object_id`, `term_taxonomy_id`) VALUES ((SELECT a.ID FROM `wp_posts` a join `wp_postmeta` b ON a.ID = b.post_id where b.meta_key = "_stock_status" and b.meta_value = "outofstock"), 7);'
, OBJECT);

remove_action( 'pre_get_posts', 'custom_pre_get_posts_query' );
}
by Rain Chu 3 月 22, 2022 | PHP , woocommerce , wordpress
點選商品圖片後的行為網址
客戶常常是想要快速結帳,所以通常希望在商品頁面中,點選圖片就可以直接進入結帳了,這時候在 wordpress woocommerce 中沒有特別好用的 Pugin 可以利用,我的解法是在佈景主題中的 functions.php ,加入下面的程式碼片段,其中add-to-cart=id , id 指的是商品 id , quantity=1,1 是數量。
點選圖片後,會直接到結帳頁面,/checkout/?add-to-cart=’.$product->get_id().’quantity=1 點選圖片後,會直接到購物車,/cart/?add-to-cart=’.$product->get_id().’&quantity=1 /?add-to-cart=’.$product->get_id() functions.php
// woocommerce
// 設定圖片上的商品連結
if ( ! function_exists( 'woocommerce_template_loop_product_link_open' ) ) {
	/**
	 * Insert the opening anchor tag for products in the loop.
	 */
	function woocommerce_template_loop_product_link_open() {
		global $product;

        //原先的設定
		//$link = apply_filters( 'woocommerce_loop_product_link', get_the_permalink(), $product );

      	// 1.改成直接到結帳頁面中
        $link = '/checkout/?add-to-cart='.$product->get_id().'&quantity=1';

      	// 2.點選圖片直接會到購物車中
      	$link = '/cart/?add-to-cart='.$product->get_id().'&quantity=1';

      	// 3.點選圖片後不跳轉,但會加入到購物車中
      	$link = '/?add-to-cart='.$product->get_id();

		echo '<a href="' . esc_url( $link ) . '" class="woocommerce-LoopProduct-link woocommerce-loop-product__link">';
	}
}
搜尋商品後,點選產品清單中的圖片直接進入購物車
/wp-content/themes/themename/template-tags.php
修改$permalink = !empty( $args[‘permalink’] ) ? $args[‘permalink’] : ‘/checkout/?add-to-cart=’.$post_id.’quantity=1′;
function et_extra_get_post_thumb( $args = array() ) {
	$default_args = array(
		'post_id'                    => 0,
		'size'                       => '',
		'height'                     => 50,
		'width'                      => 50,
		'title'                      => '',
		'link_wrapped'               => true,
		'permalink'                  => '',
		'a_class'                    => array(),
		'img_class'                  => array(),
		'img_style'                  => '',
		'img_after'                  => '', // Note: this value is not escaped/sanitized, and should be used for internal purposes only, not any user input
		'post_format_thumb_fallback' => false,
		'fallback'                   => '',
		'thumb_src'                  => '',
		'return'                     => 'img',
	);

	$args = wp_parse_args( $args, $default_args );

	$post_id = $args['post_id'] ? $args['post_id'] : get_the_ID();

	// add to cart link
	//$permalink = !empty( $args['permalink'] ) ? $args['permalink'] : get_the_permalink( $post_id );
	$permalink = !empty( $args['permalink'] ) ? $args['permalink'] : '/checkout/?add-to-cart='.$post_id.'quantity=1';

	$title = !empty( $args['title'] ) ? $args['title'] : get_the_title( $post_id );

	$width = (int) apply_filters( 'et_extra_post_thumbnail_width', $args['width'] );
	$height = (int) apply_filters( 'et_extra_post_thumbnail_height', $args['height'] );
	$size = !empty( $args['size'] ) ? $args['size'] : array( $width, $height );
	$thumb_src = $args['thumb_src'];
	$img_style = $args['img_style'];

	$thumbnail_id = get_post_thumbnail_id( $post_id );

	if ( !$thumbnail_id && !$args['thumb_src'] ) {
		if ( $args['post_format_thumb_fallback'] ) {
			$post_format = et_get_post_format();
			if ( in_array( $post_format, array( 'video', 'quote', 'link', 'audio', 'map', 'text' ) ) ) {
				$thumb_src = et_get_post_format_thumb( $post_format, 'thumb' );
			} else {
				$thumb_src = et_get_post_format_thumb( 'text', 'thumb' );
			}
		} else if ( !empty( $args['fallback'] ) ) {
			return $args['fallback'];
		} else {
			$thumb_src = et_get_post_format_thumb( 'text', 'icon' );
		}
	}

	if ( $thumbnail_id ) {
		list($thumb_src, $thumb_width, $thumb_height) = wp_get_attachment_image_src( $thumbnail_id, $size );
	}

	if ( 'thumb_src' === $args['return'] ) {
		return $thumb_src;
	}

	$image_output = sprintf(
		'<img src="%1$s" alt="%2$s"%3$s %4$s/>%5$s',
		esc_attr( $thumb_src ),
		esc_attr( $title ),
		( !empty( $args['img_class'] ) ? sprintf( ' class="%s"', esc_attr( implode( ' ', $args['img_class'] ) ) ) : '' ),
		( !empty( $img_style ) ? sprintf( ' style="%s"', esc_attr( $img_style ) ) : '' ),
		$args['img_after']
	);

	if ( $args['link_wrapped'] ) {
		$image_output = sprintf(
			'<a href="%1$s" title="%2$s"%3$s%5$s>
				%4$s
			</a>',
			esc_attr( $permalink ),
			esc_attr( $title ),
			( !empty( $args['a_class'] ) ? sprintf( ' class="%s"', esc_attr( implode( ' ', $args['a_class'] ) ) ) : '' ),
			$image_output,
			( !empty( $img_style ) ? sprintf( ' style="%s"', esc_attr( $img_style ) ) : '' )
		);
	}

	return $image_output;
}


近期留言